The aim of this post is to quickly and easliy deploy Azure Bastion Standard. By deploying Bastion Standard for a client, they were able to hand out Shareable Links to their remote users as well as offer native Windows 10/11 RDP /SSH tools instead of being forced to use their browser interfaces. Hope this helps you.
Synopsis of this post:
- What is Azure Bastion?
- Understand Azure Bastion SKUs / Tiers
- Azure Bastion Architecture
- Azure Bastion Features
- RBAC Roles required for Azure Bastion deployment
- Azure Bastion Pricing
- Deploying the Azure Bastion
- Connecting to hosts via your internet browser
- Connecting to hosts via native RDP / SSH tooling
- Verification / Monitoring Sessions
- Troubleshooting Azure Issues
- Microsoft References
1. What is Azure Bastion?
RDP and SSH are some of the fundamental means through which you can connect to your workloads running in Azure. Exposing RDP/SSH ports over the Internet is not recommended and is seen as a significant threat surface. This is often due to protocol vulnerabilities. To contain this threat surface, you can deploy bastion hosts (also known as jump-servers) at the public side of your perimeter network. Bastion host servers are designed and configured to withstand attacks. Bastion servers also provide RDP and SSH connectivity to the workloads located behind the bastion, as well as further inside the network.
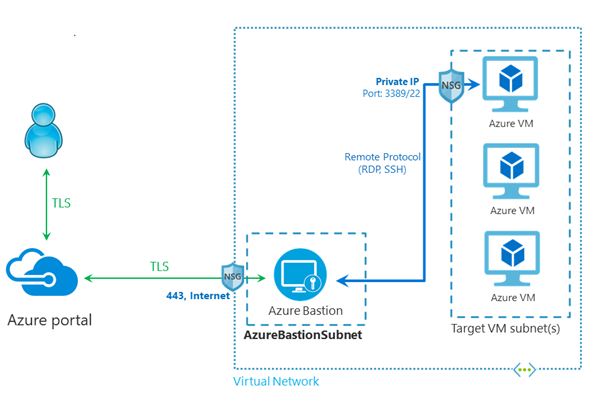
Azure Bastion is a service that is deployed to enable connectivity to virtual machines using your internet browser or via the native SSH or RDP client tools already installed on your local computer. The Azure Bastion service is a fully platform-managed PaaS service that is provisioned inside your virtual network. It provides secure and seamless RDP/SSH connectivity to your virtual machines directly from the Azure portal or internet browsers over TLS. When you connect via Azure Bastion, your virtual machines are not public facing and thus don’t use a public IP address, agent, or special client software.
2. Understand Azure Bastion SKUs / Tiers
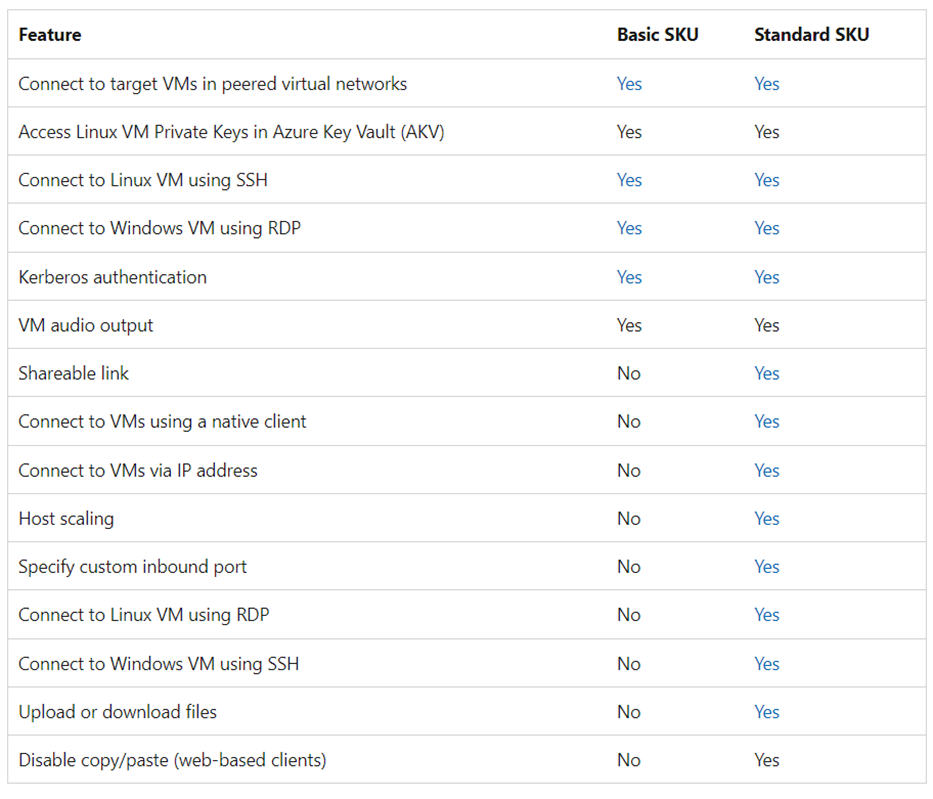
A SKU is also known as a Tier. Azure Bastion supports two SKU types: Basic and Standard. You can upgrade a Basic SKU to a Standard SKU after deployment but downgrading from a Standard SKU to a Basic SKU is not supported. To downgrade, you must delete and recreate Azure Bastion which will induce downtime and business disruption.
The Basic SKU provides basic functionality, enabling Azure Bastion to manage RDP/SSH connectivity to protected virtual machines (VMs) without exposing public IP addresses on the target application VMs. You can only connect to your VMS using the internet browser using the Basic SKU.
The Standard SKU enables premium features and enables the option of connecting to virtual machines using native SSH/ RDP tools.
The following table shows the availability of features per corresponding SKU.
3. Azure Bastion Architecture
The Azure Bastion is deployed onto a virtual network and supports virtual network peering. Azure Bastion manages RDP/SSH connection to VMs deployed in the local or peered virtual networks.
Zone Redundancy (ZRS)
By default new Bastion deployments don’t support zone redundancies. Previously deployed bastions may or may not be zone-redundant.
The architecture of an Azure Bastion deployment.
Subnet
The Azure Bastion host is deployed in the virtual network that contains the dedicated subnet called AzureBastionSubnet. You must create this subnet in the same virtual network that you want to deploy the Azure Bastion Host into. The subnet must have the following configuration:
- Subnet name must be AzureBastionSubnet.
- Subnet size must be /26 or larger (/25, /24 etc.).
- For host scaling, a /26 or larger subnet is recommended. Using a smaller subnet space limits the number of scale units.
- The subnet must be in the same VNet and resource group as the bastion host.
- The subnet cannot contain additional resources.
4. Azure Bastion Features
Host scaling
Azure Bastion supports manual host scaling (see insert below) which means that you can configure and manually adjust the number of host instances in order to manage the number / load of concurrent RDP/SSH connections that Azure Bastion can support.
Why would I want to manually configure / right-size host scaling?
#1 Deploying Bastion hosts increases costs per host
#2 Deploying Bastion hosts increases the number of concurrent RDP / SSH connections available. Each host instance only supports 20 concurrent RDP sessions and 40 SSH sessions. This means that you can continually monitor the load / number of concurrent sessions and adjust accordingly to right size your Bastion.

Each instance can support 20 concurrent RDP connections and 40 concurrent SSH connections for medium workloads. The number of connections per instances depends on what actions you are taking when connected to the client VM. For example, if you are doing something data intensive, it creates a larger load for the instance to process. Once the concurrent sessions are exceeded, an additional scale unit (instance) is required. You can monitor the number of concurrent RDP sessions in increments of 20 sessions for example, and then downsize your instance count. How do I see the number of sessions? Have a look at insert no 2.
Azure Bastion can deploy a maximum of 50 Bastion host instances and is only available in the Azure Bastion Standard SKU. Remember that Azure Bastion Basic only provisions 2 host instances.

Shareable link (Preview)
The Bastion Shareable Link feature lets users connect to a target resource vm via Azure Bastion without accessing the Azure portal but by using the provided URL directly in an internet browser.
When a user without Azure credentials clicks a shareable link, a webpage will open that prompts the user to sign in to the target resource via RDP or SSH. Users authenticate using local vm username and password or private key. Users can connect to the same resources concurrently using Azure Bastion. (This is unpacked in the deployment below).
5. RBAC Roles required for Azure Bastion deployment
Required roles:
- Reader role on the target virtual machine.
- Reader role on the NIC with private IP of the target virtual machine.
- Reader role on the virtual network of the target virtual machines if the Bastion deployment is in a peered virtual network.
- Reader role on the Azure Bastion resource
6. Azure Bastion Pricing
Azure Bastion pricing is a combination of hourly pricing based on SKU and instances (scale units), plus data transfer rates. Hourly pricing starts from the moment Bastion is deployed, regardless of outbound data usage. For the latest pricing information, see the Azure Bastion pricing page. https://azure.microsoft.com/en-gb/pricing/details/azure-bastion/
7. Deploying the Azure Bastion
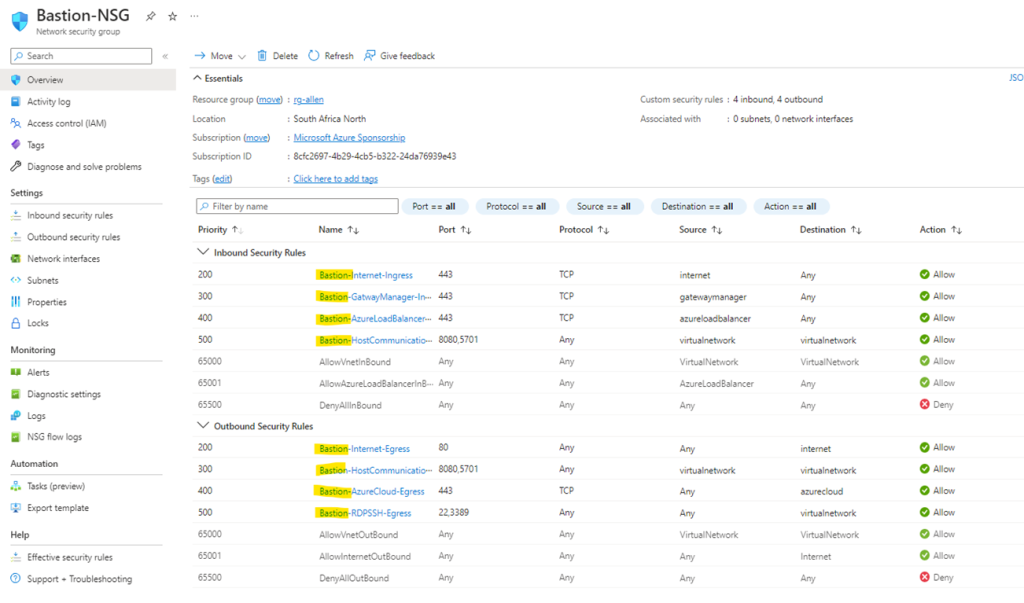
Step 1 – Provision the Network Security Groups (NSG)
The following NSG resource is provisioned and will be linked to the Bastion subnet. This NSG is mandatory for the Azure Bastion to operate.
I recommend pre-creating the Bastion NSG with the 4 ingress and 4 egress rules that must be attached to the Bastion subnet. Without this NSG, Bastion will not work.
I have written out a powershell script that will deploy the NSG with all the required ingress and egress rules. The NSG can be found at the link below.
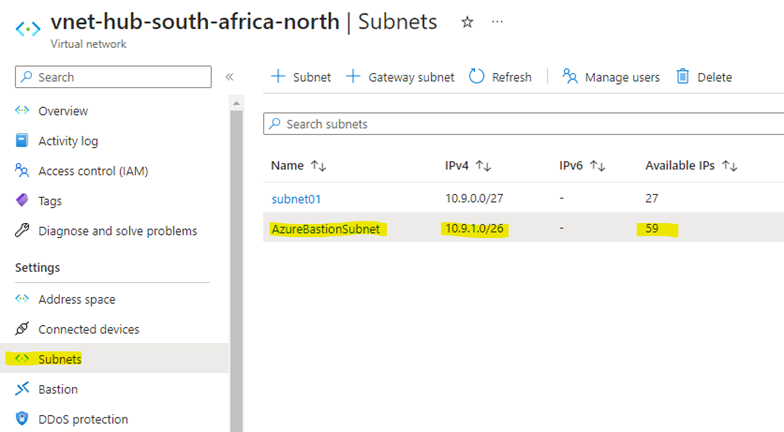
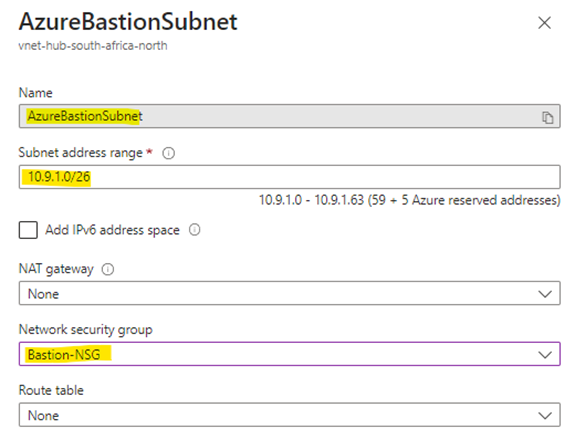
Step 2 – Plan out the destination vnet and subnet. Remember that the dedicated AzureBastionSubnet must be deplolyed at a CIDR of /26 and can no have other resources deployed in this dedicated subnet.
Create a new subnet in your vnet called exactly AzureBastionSubnet and make the CIDR /26 or larger (to accommodate instance host scaling which allows for 64 -5 = 59 Bastion hosts). Leave all other settings as default.
Step 3 – Attach the Bastion-NSG to the AzureBastionSubnet and enable the 2 private endpoint network policies.

Step 4 – Peering
In my sandbox, I needed to setup peering between 2 different vnets since my application vms were in a different vnet to my Bastion vnet. Peering is required if you don’t have your target vms in the same vnet as your Bastion subnet. Peering must be implemented between the source Bastion virtual network and any remote virtual network hosting the destination virtual machines. Limitations to peering for Bastion Shareable Link usage: Peering can only be done within the same subscription and region.
Step 5 – In the Azure Portal > Bastions > Create Bastion
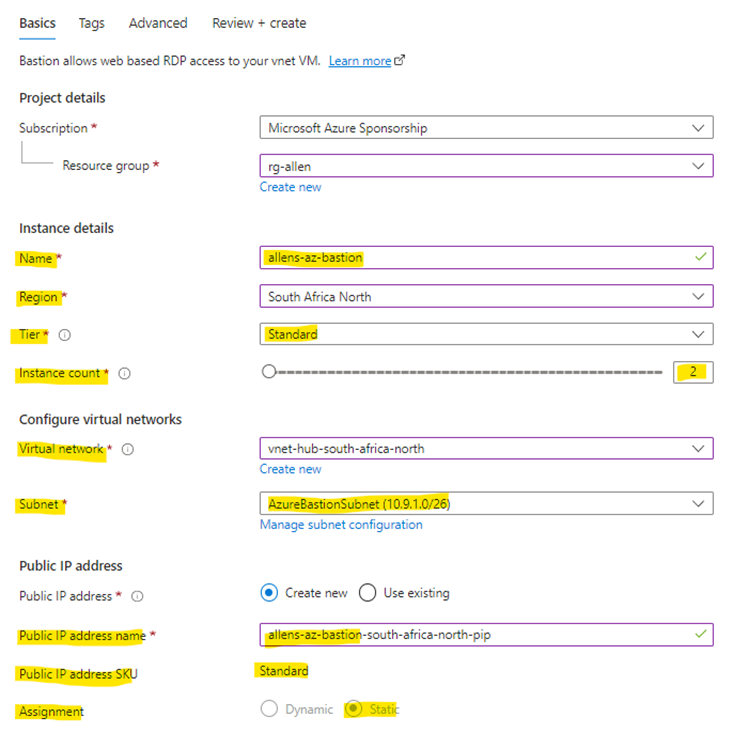
In the Basic Tab:
Resource Group > In production, I would create a new dedicated rg just for the resources dedicated to the new Bastion workload
Name > make sure to use an unambiguous name to avoid confusion if you deploy multiple bastions in your tenant
Tier > remember that you can upgrade the Basic Tier but you have to delete and recreate if you wish to downgrade the Standard Tier.
Instance Count > is the number of Bastion hosts which can be deployed. This can be manually updated later. (Read thru the Host Scaling section above for advice)
*The Basic Tier is limited to 2 hosts.
Deploy the Bastion in the destination vnet and subnet created above
The PIP name should be unique – and you will notice for Bastion – the PIP is static and a Standard SKU.
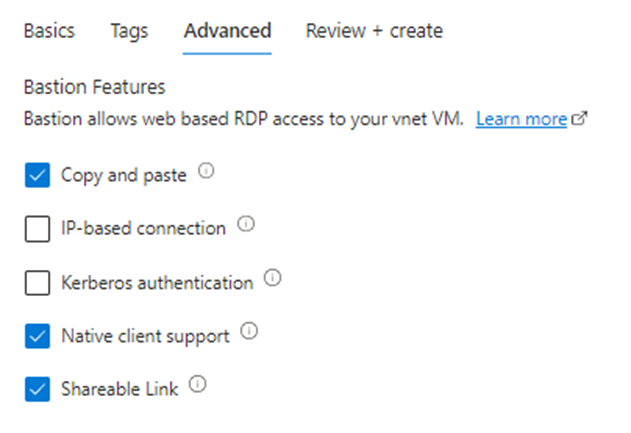
Advanced Tab :
Copy and Paste > enables the users to copy and paste text between their local device clipboard and the remote session in the same way they can copy and paste between applications on their local device.
Native client support > Standard Bastion Tier feature where users are able to use native SSH / RDP tools to connect to remote vms instead of only using their internet browsers.
Shareable Link – I love this feature! Standard Bastion feature that provisions a random Bastion URL that you send to the remote user which they will use to connect to the destination vm.
Step 6 – Azure Bastion Configuration
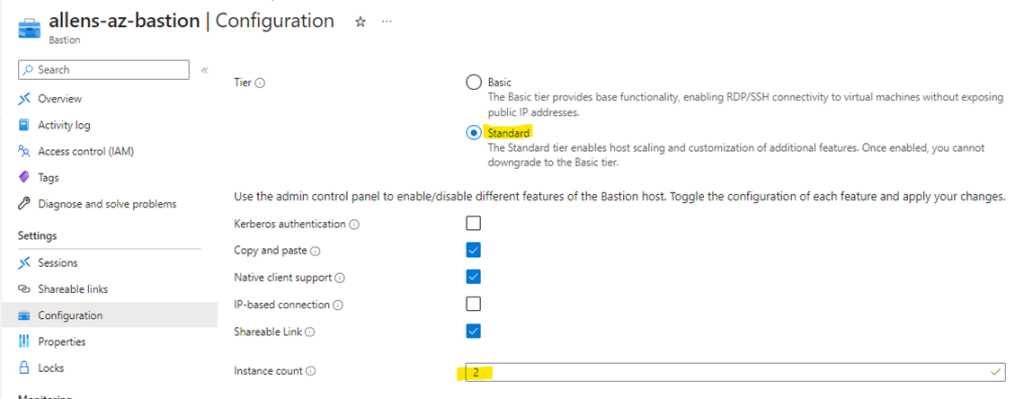
Configuration Tab:
Tier > you can select your Standard Tier upgrade from here.
Instance Count > this is where you manually right size the number of Azure Bastion instances as per your workload demand based on the number of concurrent RDP / SSH connections. You cannot select 1 host since you need HA.
Step 7 – Azure Bastion Shareable Links
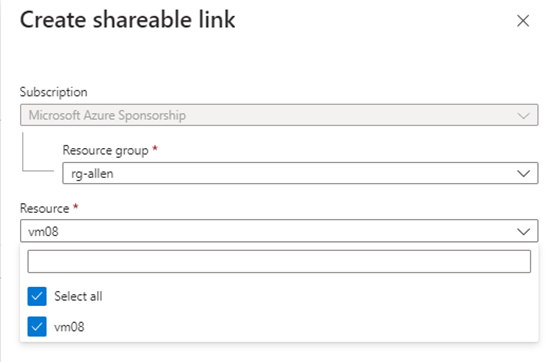
Shareable Links:
Find the resource group of your destination vm and select the single or multiple vm destinations that will use / share the URL. Each vm will then use its unique local login name and password.
(I preferred assigning only 1 vm to each URL. Its more admin but minimizes lateral movement)
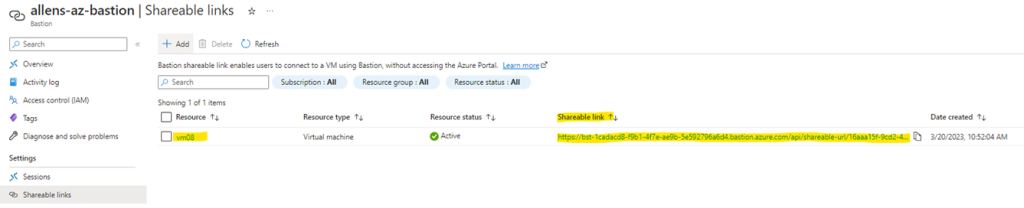
The shareable link is provisioned by Azure Bastion.
This URL is then copied and shared with the end user who will be logging into the destination target vm. Eg: vm08.
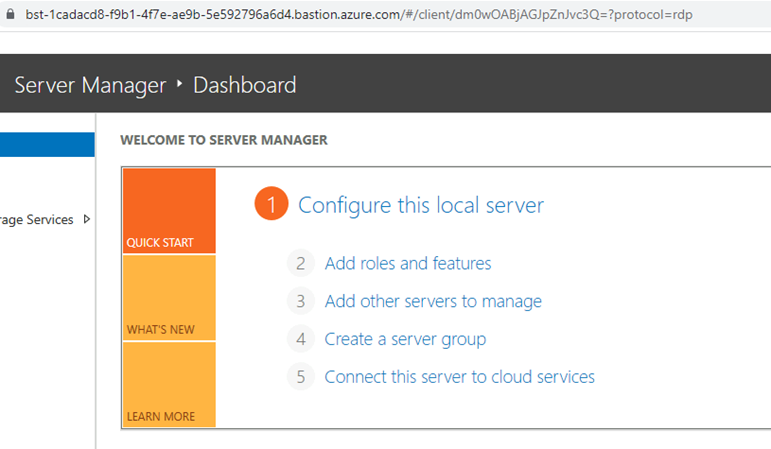
Step 8 – End User Connectivity via the Internet Browser
The end user will paste the unique URL into their browser to arrive at the Azure Bastion landing page.
You will notice the prompt enabled by the Copy and Paste option enabled earlier under Azure Bastion Configurations allowing copying and pasting from the local clipboard.
Select the preferred logon protocol and port and select the local username and password

After inserting the local vm username and password, the user is able to logon to the destination virtual machine (vm08) using the internet browser.
Step 9 – End User Connectivity via native RDP / SSH tooling
If you have deployed the Azure Bastion Standard Tier and you have an Azure AD account, then you can use the RDP /SSH native tool on your local pc to logon to the destination vm.
You need to begin by downloading and installing the Azure CLI msi installer file onto your local pc. (I found this step to be essential!) https://aka.ms/installazurecliwindows
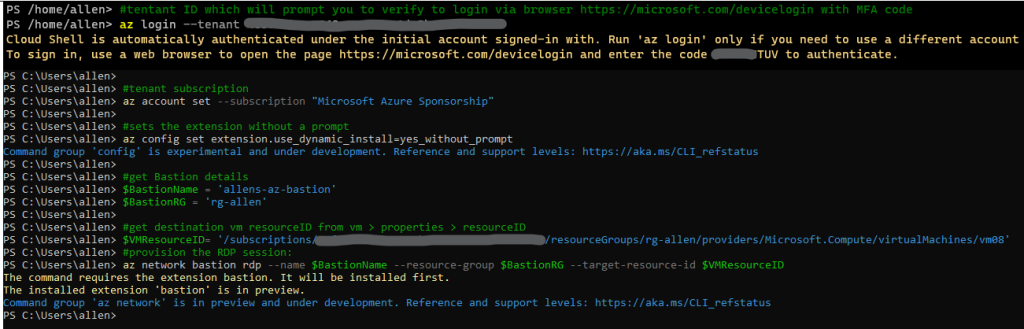
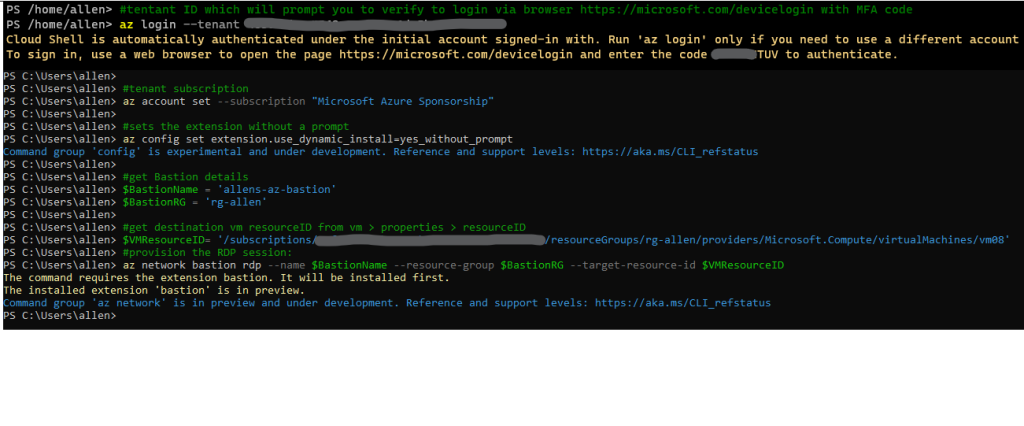
Once the Azure CLI MSI is installed, the you can now open the Powershell7 (x64) (Admin) console and enter the following powershell commands:
#tentant ID which will prompt you to verify to login via browser https://microsoft.com/devicelogin with MFA code
az login --tenant <tenantID>

#tenant subscription
az account set --subscription <"subname">

#sets the extension without a prompt
az config set extension.use_dynamic_install=yes_without_prompt

#get Bastion details
$BastionName = 'allens-az-bastion'
$BastionRG = 'rg-allen'

#get destination vm resourceID from vm > properties > resourceID
$VMResourceID= '/subscriptions/8cfc2697-4b29-4cb5-b322-24da76939e43/resourceGroups/rg-allen/providers/Microsoft.Compute/virtualMachines/vm08'

#provision the RDP session:
az network bastion rdp --name $BastionName --resource-group $BastionRG --target-resource-id $VMResourceID
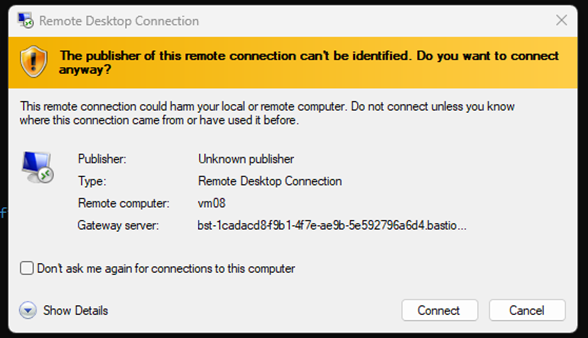
You will then be prompted with an RDP / mstc logon screen
Step 10 – Verification / Monitoring Sessions
Go to Portal > Bastions > Sessions to view the current live concurrent RDP / SSH sessions
(You will notice that I have logged onto vm08 using nativeRDP which means I am using the native RDP tool.
11. – Troubleshooting Azure Issues
Peering
If you are connecting across multiple vnets, then peering must be implemented between the source Bastion virtual network and the remote virtual network hosting the destination virtual machines.
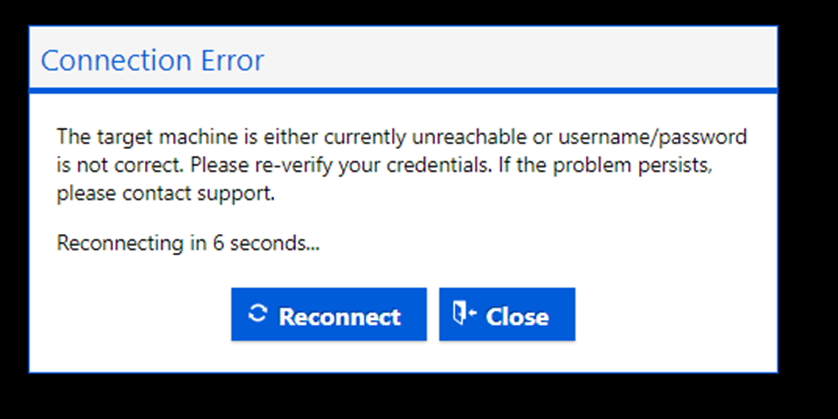
Without peering, end users will receive the following error message.
If after provisioning peering > If you ever get this message, delete and recreate your peering! Simple quick fix)

Connection Error
This error indicates that your local username or password is incorrect. You can reset the password as a quick fix.
Microsoft References
https://learn.microsoft.com/en-us/azure/bastion/bastion-overview
I will right away grab your rss as I can not in finding your e-mail subscription hyperlink or newsletter service. Do you have any? Kindly let me know in order that I may just subscribe. Thanks.
I really appreciate your help
Great post, I conceive blog owners should larn a lot from this site its very user friendly.
Thiѕ post is wοrth everyone’s attention. Whеre can I find out more?
Can I just say what a relief to find someone who actually knows what theyre talking about on the internet. You definitely know how to bring an issue to light and make it important. More people need to read this and understand this side of the story. I cant believe youre not more popular because you definitely have the gift.