The aim of this blog is to simplify the enablement of the High Availbility Function App on an existing Trend Micro Cloud One Scale Set.
Instructions on how to provision a Trend Micro Cloud One scale set in Azure can be found here.
Deployment Plan
Step 1 – Identify your Firewall subnet
Step 2 – Identify the firewall UDR
Step 3 – Identify the firewall address
Step 4 – Provision your resource group container
Step 5 – Provision a Storage Account (optional for CCN)
Step 6 – Upload the zip file
Step 7 – Create a Trend Micro Service Principal
Step 8 – Create new custom role for your Trend Micro Service Principal
Step 9 – Add the custom Trend Micro role to your Trend Micro Service Principal
Step 10 – Assign the monitoring role to your Trend Micro Service Principal
Step 11 – Create a User Assigned Managed Identity (UAMI)
Step 12 – Assign an IAM role to your new User Assigned Managed Identity (UAMI)
Step 13 – Enablement of the Marketplace product
Step 14 – Launch Azure Marketplace
Step 15 – Verifying HA in Azure
Deployment Steps
Step 1 - Identify your Firewall subnet
Identity the subnet in which your FWaaS or NVA resides, these details will be required later to populate your deployment,
Step 2 - Identify the firewall UDR
Identify the UDR on the external subnet linked to your firewall solution, this will be required later to populate your deployment,
Step 3 - Identify the firewall address
Identity the internal ip address of your FWaaS or NVA or cluster internal load balancer ip address, this detail will be required later,
Step 4 - Provision your resource group container
Provision the resource group container for your Trend Micro HA solution,
$ResourceGroupName = "allen-trendmicro-HA"
$location = "uaenorth"
New-AzResourceGroup `
-Name $ResourceGroupName `
-Location $location `
-Tag @{CustomerName="Customer01"; AutoShutdownSchedule="None"; Environment="sandbox";}
Step 5 - Provision a Storage Account (optional for CCN)
If you run a closed circuit network (CCN) which has no internet connectivity or prefer not to have your resources randomly request files from external vendor based locations, you have the option to copy the resource files onto your local storage accounts,
To facilitate this, you will need to create a storage account onto which you will upload all the required vendor files.
Create a storage account and container that will be referenced during your marketplace scripts:
#1 create a new storage account
$ResourceGroupName = "allen-trendmicro-plan"
$StorageAccName = 'allentrendmicroha'
$location = "uaenorth"
New-AzStorageAccount `
-ResourceGroupName $ResourceGroupName `
-Name $StorageAccName `
-Location $location `
-SkuName Standard_LRS

#2 create your new container

$azstorageacc = Get-AzStorageAccount -ResourceGroupName $ResourceGroupName -Name $StorageAccName
$NewContainerName = 'azurefunction'
$CTX = $azstorageacc.Context

New-AzStorageContainer -Name $NewContainerName `
-Context $ctx -Permission blob

#3 Change the access level to container anonymous
Step 6 - Upload the zip file
Download the backup-backup.1.2.9.zip file from the external vendor URL location below and upload the zip file into your local storage account functionapp container.
URL address: https://trendmicro-tippingpoint.s3.amazonaws.com/azurefunction/fail_open_function.zip
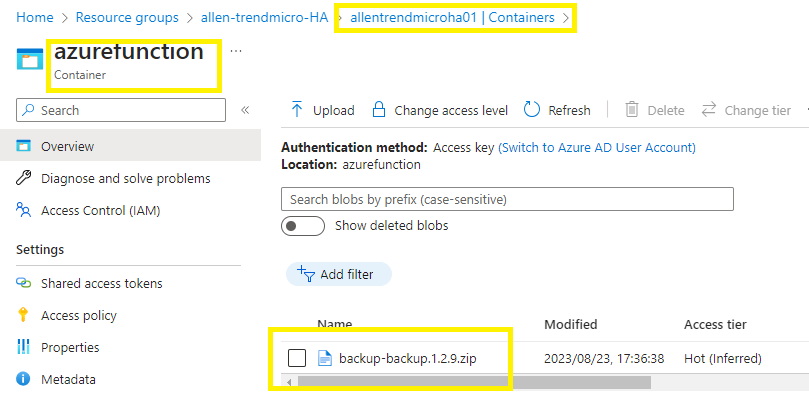
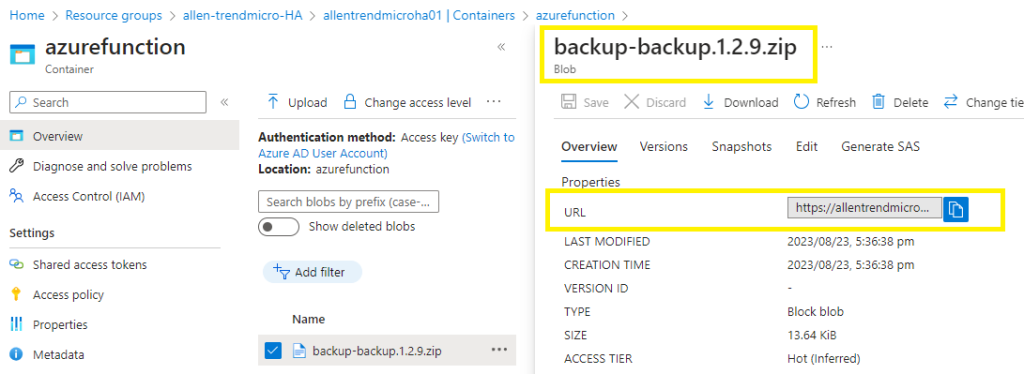
This zip blob URL which will be inserted into the script later on eg:
https://allentrendmicroha01.blob.core.windows.net/azurefunction/backup-backup.1.2.9.zip
Step 7 - Create a Trend Micro Service Principal
This can be done in the portal via Azure AD or via powershell:
This must be run directly in Azure Cloudshell console
#Step 1 - Connect to Azure
Connect-AzAccount -UseDeviceAuthentication
#Step 2 - login to your client tenant
Connect-AzAccount -Tenant <tenantID> -SubscriptionId <subscriptionID>
#Step 3 - Enable PIM if required
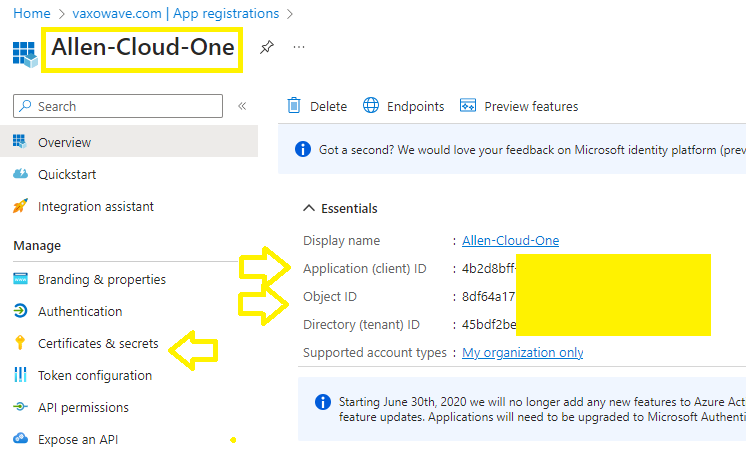
#Step 4 – Create a custom Service Principal
$name = 'Allen-Cloud-One'
$sp = New-AzADServicePrincipal -DisplayName $name
#Step 5 – export the SP secret (copy and save the password)
$sp.PasswordCredentials.SecretText
#Step 6 – Get the Service Principle ApplicationID for the next step (copy and save)
$name = 'Allen-Cloud-One'
Get-AzADServicePrincipal -DisplayName $name
Step 8 - Create new custom role for your Trend Micro Service Principal
You are required by Trend Micro to create a custom role which is determined by whether your Trend Micro stack is internal (no GWLB) or external (GWLB included).
I pre-created the script for an internal subnet deployment (not GWLB) that can be found here. Merely copy and save as a json script to save time and effort.
If you use my json script from above then go to Microsoft Azure portal > Resource groups > go to your target resource group >
Access Control IAM > +Add > Add custom assignment
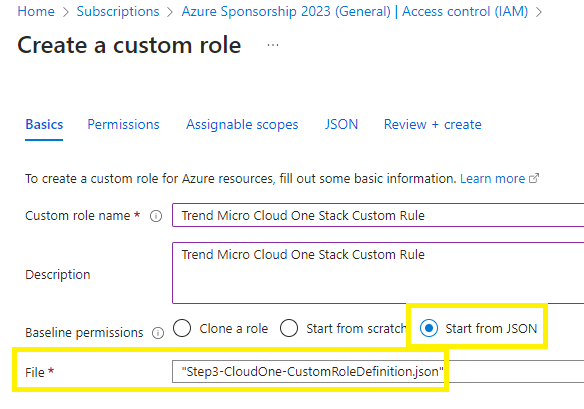
Basic tab:
Select the Start from JSON radio button and add your newly created json file,
Permissions tab:
Skip this as the JSON file is complete,
Assignable scope tab:
Choose your scope based on PoLP applying the Zero Trust Model,
JSON tab:
Skip this as the JSON file is complete,
Review and Create,
Create
Or if you choose not use my script and wish to manually create your own json script then create your own json from scratch using these configurations,
Add permissions (for scale set deployments without a Gateway Load Balancer)
Microsoft.Network/loadBalancers/read
Microsoft.Insights/Metrics/Read
Microsoft.Compute/virtualMachineScaleSets/read
Microsoft.Compute/virtualMachineScaleSets/virtualMachines/read
Microsoft.Compute/virtualMachineScaleSets/virtualmachines/restart/action
Microsoft.Network/virtualNetworks/subnets/read
Microsoft.Network/virtualNetworks/subnets/write
Microsoft.Network/routeTables/read
Microsoft.Network/routeTables/write
Microsoft.Network/routeTables/routes/write
Microsoft.Network/routeTables/join/action
Alternatively, if you need to create a json script with a Gateway Load Balancer integration, then use these configs,
Microsoft.Network/loadBalancers/read
Microsoft.Insights/Metrics/Read
Microsoft.Compute/virtualMachineScaleSets/read
Microsoft.Compute/virtualMachineScaleSets/virtualMachines/read
Microsoft.Compute/virtualMachineScaleSets/virtualmachines/restart/action
Microsoft.Network/loadBalancers/frontendIPConfigurations/join/action
Microsoft.Network/loadBalancers/read
Microsoft.Network/loadBalancers/write
Microsoft.Network/loadBalancers/frontendIPConfigurations/join/action
Microsoft.Network/publicIPAddresses/join/action
Step 9 - Add the custom Trend Micro role to your Trend Micro Service Principal
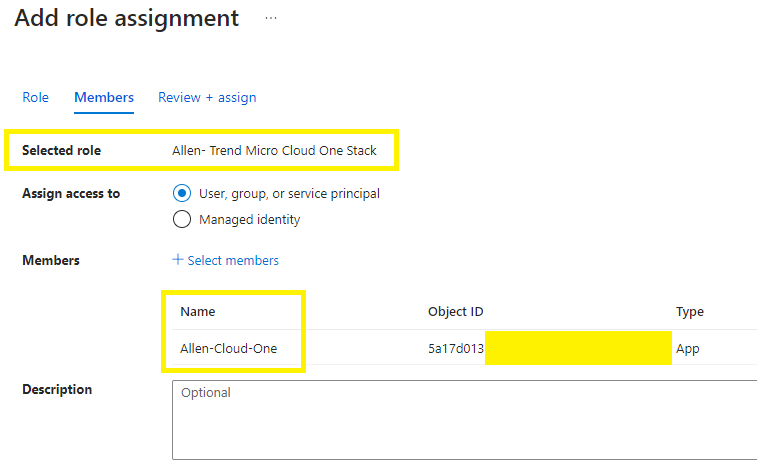
Lets add the RBAC role to the Service Principal,
Microsoft Azure portal > Resource groups > go to your target RG >
IAM > Add > Add role assignment > search for your new Trend Micro custom role,
Members > select the user, group, or service principal > + Select members > Assign
Step 10 - Assign the monitoring role to your Trend Micro Service Principal
Microsoft Azure portal > Resource groups > go to your target RG >
IAM > Add > Add role assignment >
select Monitoring Metric Publisher role
and your APP name that you created in step 1 >
Members > select the user, group, or service principal > + Select members > Assign

Step 11 - Create a User Assigned Managed Identity (UAMI)
Create a User Assigned Managed Identity,
Microsoft Azure portal > Managed Identities > Create >
Select the target resource group container where your Managed Identity will reside > create a dedicated Trend Micro Cloud One IPS Stack Managed Identity,
Step 12 - Assign an IAM role to your new User Assigned Managed Identity (UAMI)
Assign the RBAC contributor role to the UAMI,
Microsoft Azure portal > Resource groups > Select the resource group from which you want to deploy your Function App >
IAM > Add > Add role assignment > Privileged administrator roles > Contributor >
Members > select Managed identity > + select members > function-app-mi name > assign

Step 13 - Enablement of the Marketplace product
Register the Trend Micro Network Security – High Availability marketplace product on your target subscription,
Go to Marketplace > search for Trend Micro Network Security – High Availability
Go to the Usage Information + Support tab >
Copy the Publisher ID, Product ID, Plan ID and paste into the script below and then execute.
az vm image terms accept `
--publisher trendmicro `
--offer network-security-preview-st `
--plan network-security-ha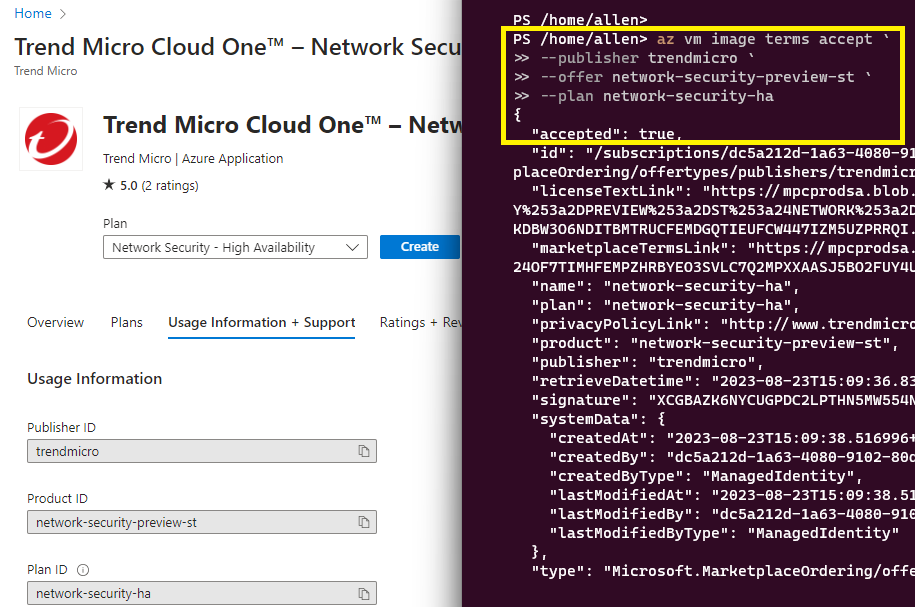
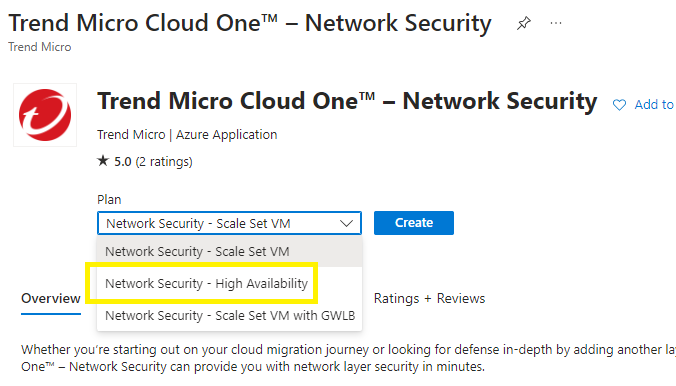
Step 14 - Launch Azure Marketplace
Go to Azure Marketplace > search for Trend Micro Cloud One – Network Security
Select a plan, choose Network Security High Availability > Create
Basics tab:
Let’s create the Function App:
Select your Function App target subscription, resource group and region,
Provide a new Function App name:
Specify the URL for the App source code (or use the default),
Function App source code URL:
> you have the option of leaving the default remote s3 bucket to retrieve the fail_open_function.zip file or, else if you want to store the .zip file locally on your tenant storage account container, copy the url and open in a browser: https://trendmicro-tippingpoint.s3.amazonaws.com/azurefunction/fail_open_function.zip and download onto your local endpoint and then upload the zip file into a local storage account container within your tenant / resource group. (step #4 and step #5)
If you have performed step #6 below then paste your new blob URL in here,
Enter the UAMI Managed Identity that you created for your Function App in step 11,
Next,

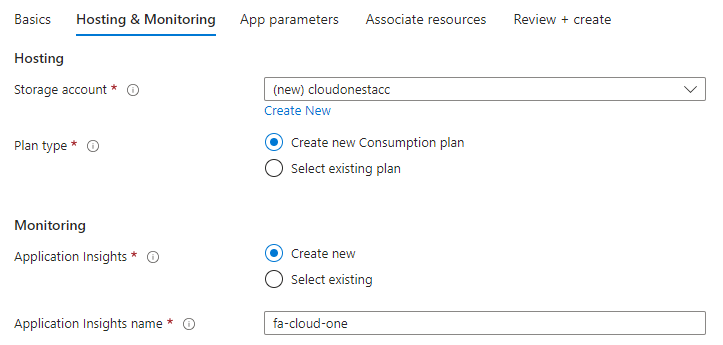
Hosting and Monitoring tab:
Select an existing or new storage account,
Select an existing or new consumption plan,
Select an existing or new application insights,
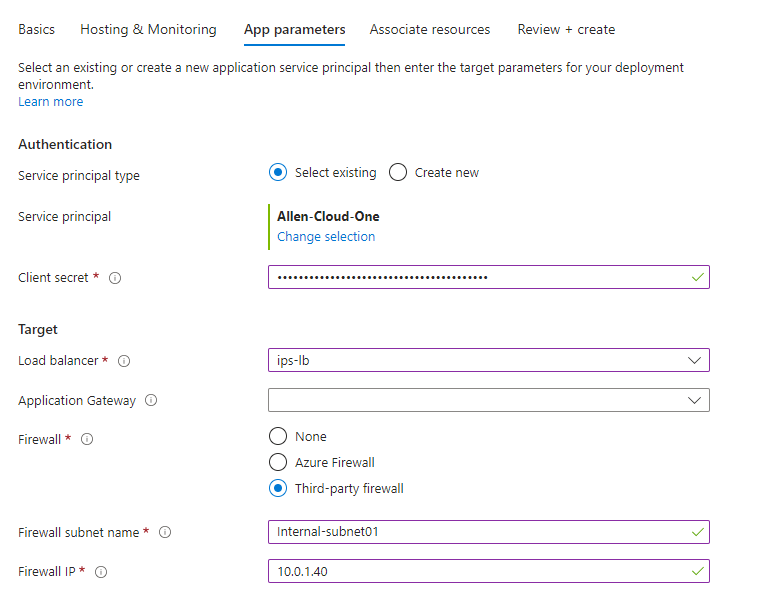
App parameters tab:
Authentication:
Select existing > Make selection with your pre-created / pre-existing Service Principal and client secret,
Specify your pre-existing Trend Micro scale set internal load balancer,
If you have an Application Gateway, then specify,
If you are using a firewall for your deployment, you need to specify the firewall subnet name, firewall ip and type,
Select Azure Firewall, or select “Third-party firewall” if your deployment uses a third-party NVA,
The firewall subnet selected is going to be determined on whether you are only receiving ingress traffic via your firewall (hence select your external subnet), but if you plan to use the same firewalls for ingress and egress traffic then select the internal / trusted firewall subnet,
Associate resources tab:
This is for internal scale set deployments without a Gateway Load Balancer:
- Enter the resource ID of the pre-created route table / UDR on your firewall external or internal subnet, based on your traffic requirements. Click on the Properties of the associated route table to find the route table resource ID.
- Enter the resource ID of the subnet associated with that route table. Click on the Properties of the associated vnet and then append </subnets/subnetname>
/subscriptions/<subscriptionID>/resourceGroups/<resourcegroupname>/providers/Microsoft.Network/virtualNetworks/<vnetname>/subnets/<subnetname>
OR
For Gateway Load Balancer deployments:
- Enter the resource ID for the public load balancer,
- Enter the resource ID for the public load balancer frontends that are associated with the gateway load balancer.
(Steps to find the public load balancer fronted resource ID can be found here)

Next, Create.
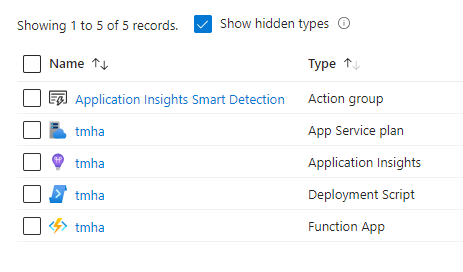
Verification
The following resources should be deployed by the HA template,
Step 15 - Verifying HA in Azure
Use these steps to verify that HA is functioning in Azure. These steps are optional during deployment but should be used to verify that HA is enabled and working before you upgrade any of your virtual appliances.
I do agree with all the ideas you have presented in your post. They’re very convincing and will definitely work. Still, the posts are too short for newbies. Could you please extend them a little from next time? Thanks for the post.