
The aim of this blog is to deploy a high availability Fortinet Next Generation Firewall Fortigate template which deploys a minimum of 3 instances in a virtual machine scale set spread across 3 availability zones.
This deployment includes the Forti Analyzer which I have included in the template for centralized security log collection purposes. If you want the Forti Analyzer instance included in the template deployment, edit the template accordingly as explained below.
The blog provides deployment steps via powershell whenever possible to accelerate deployment time.
Deployment Plan:
- Provision a Service Principal,
- Provision a new resource group,
- Provision / update a networking security group,
- Provision a storage account,
- Run the Fortigate deployment script,
- Provision an internal load balancer,
Deployment Steps:
Step 1 – Programmatic enablement of Marketplace products
Step 2 – Create a new resource group container
Step 3 – Create a Service Principal for this Fortigate deployment
Step 4 – Add Service Principal to the resource group
Step 5 – Create and provision the network security group
Step 6 – Download zip file funcapp.zip
Step 7 – Create and provision a storage account
Step 8 – Provision the ARM custom template
Step 9 – Download the fortigate-autoscale-azure.zip file
Step 10 – Edit the autoscale zip file
Step 11 – Adding you BYOL licenses
Step 12 – Upload the post-deployment template configuration files
Step 13 – Deploy the Azure Internal load balancer
Step 14 – Verification
Deployment Steps:
Step 1 - Programmatic enablement of Marketplace products
Programmatic deployment will be enabled at subscription level.
Go to Marketplace > search for your product > Usage Information + Support tab >
copy the Publisher ID, Product ID, Plan ID and paste into the script below.
az vm image terms accept `
--publisher fortinet `
--offer fortinet-fortigate `
--plan fortinet-fortigate-aa-elb-ilb-public
Step 2 - Create a new resource group container for the Fortigate stack resources
$rgName = "resourcegroupname"
$location = "uaenorth"
New-AzResourceGroup `
-Name $rgName `
-Location $location `
-Tag @{CustomerName="Customer01"; `
AutoShutdownSchedule="None"; `
Environment="sandbox";}
Step 3 - Create a Service Principal for this Fortigate deployment
(you will need to enable PIM to run this)
#Step 1 – #create a new SP
$name = 'Allen-Fortigate3'
$sp = New-AzADServicePrincipal -DisplayName $name

#Step 2 – export the SP secret (copy and save the password)
$sp.PasswordCredentials.SecretText

#Step 3 – Get the Service Principle ApplicationID for the next step (copy and save)
$name = 'Allen-Fortigate3'
Get-AzADServicePrincipal -DisplayName $name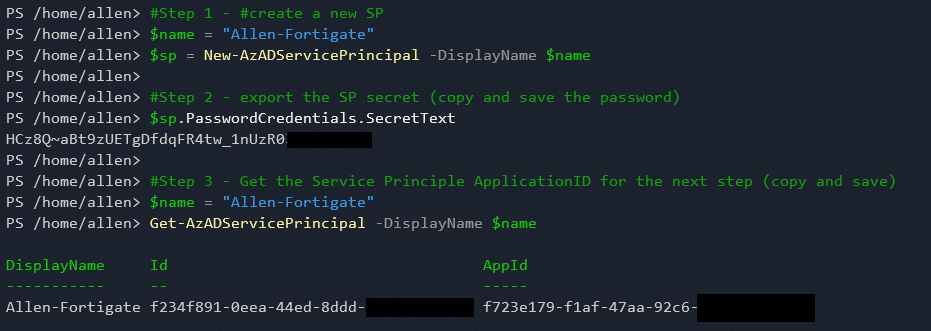
Step 4 - Add Service Principal to the resource group
Go the new target resource group or subscription (depending on your wanted scope) > IAM > Add role assignment > Privileged administrator roles > Role tab > Contributor >
#Allen-Fortigate
New-AzRoleAssignment -ObjectId 0000-0000-0000-0000-0000 `
-RoleDefinitionName Contributor `
-ResourceGroupName resourcegroupname `
-Description "Service Principal for Fortigate"
(If you omit the -resourcegroupname entry then the role will be applied at subscription level)
Verify assignment for the HA to work.
Step 5 - Create and provision the network security group
This NSG needs to be deployed in the same resource group container as the virtual network (not the Fortigate stack).
Merely create the NSG and attach to the external subnet, there is no need to create any rules. The rules will be be provisioned by the template.
$rgName = "resourcegroupname"
$nsgName = "Allen-NSG"
$location = "uaenorth"
New-AzNetworkSecurityGroup `
-Name $nsgName `
-ResourceGroupName $rgName  `
-Location  $location
Step 6 - Download zip file funcapp.zip
Download the zip file onto your local endpoint from https://github.com/fortinet/fortigate-autoscale-azure/releases > fortigate-autoscale-azure-funcapp.zip
This zip file contains the configuration required by the Azure Function App.

Step 7 - Create and provision a storage account, (optional)
The default template reaches out for a script in github. If your organization forbids connectivity to github, then we create a “local” storage account in our tenant and deploy the zip file into a container which we will customize the template to point to.
Deploy the storage account in the same region as where you plan to deploy the Fortigate resources. Create a unique named container into which to upload the zip file.
I have provisioned a storage account via azure portal called fortigatestoracc01
Create container access level with “blob anonymous read access for blobs only”
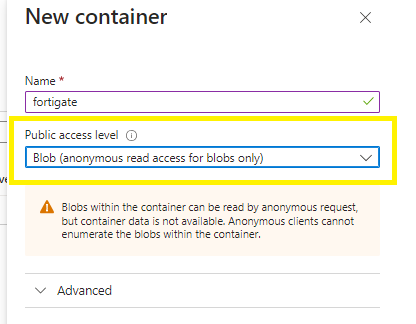
Upload the fortigate-autoscale-azure-funcapp.zip into the new container.
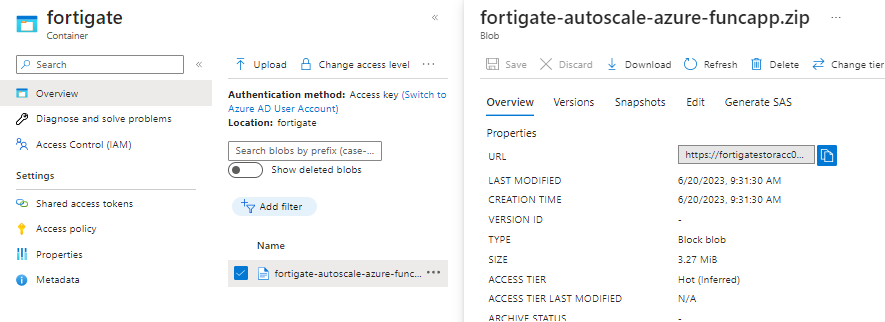
Grab the blob url for the template below.
(This url will be added as the blob’s url in the arm template during the steps below).
https://fortigatestoracc01.blob.core.windows.net/fortigate/fortigate-autoscale-azure-funcapp.zip
Step 8 - Provision the ARM custom template
Go to Portal > Custom Template >
- Template > load file from .\fortigate-autoscale-azure\templates\deploy_fortigate_autoscale.hybrid_licensing_template.json >
Save
- Edit parameters > load file > load file from .\fortigate-autoscale-azure1\templates\deploy_fortigate_autoscale.hybrid_licensing.params.json >
Save
Template Deployment:
Project and Instance details:
- Populate the Subscription, Resource Group and Region,
- Access Restriction IP Range > Specify a single or network cidr range, from public or on premises IP, to allow access from outside Azure to the CosmosDB and Function App. Make sure to write your address in cidr notation.
- Enter Admin password and username,
- Enter BYOL minimum instance (as per your count per your licensing model),
- Add the Forti Analyzer Autoscale Admin password and Username (by integrating FortiAnalyzer, you can consolidate logging and reporting for your FortiGate cluster),
- Forti Analyzer custom private ip address,
- Forti Analyzer instance type > sku size,
- Forti Analyzer integration options > yes,
- Forti Analyzer public ip address > (leaving empty will be deployed by template),
- Forti Analyzer version > latest version,
- Forti Gate PSK Secret > insert any alphanumeric with special chars password,

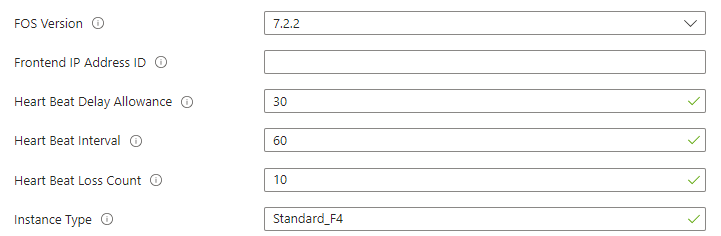
Select the Fortigate OS version,
Frontend IP > will provision during deployment if not provided,
Heart beat delay,
Heart beat interval,
Heart beat loss count,
Instance type > sku size,
Select the minimum and maximum instance count under your respective license selection,

Package Res URL > by default points to the github based autoscale Function App source file fortigate-autoscale-azure-funcapp.zip.
(I have downloaded the fortigate-autoscale-azure-funcapp.zip and configured a local storage account container with the Fortigate Service Principal RBAC contributor role applied along with IAM blob reader),
I have created a publicly accessible blob and uploaded the fortigate-autoscale-azure-funcapp.zip and added the blob’s url to the arm template
Default arm template value:
Updated to internal value:
https://fortigatestoracc01.blob.core.windows.net/fortigate/fortigate-autoscale-azure-funcapp.zip
Edit autoscaling threshold if required,

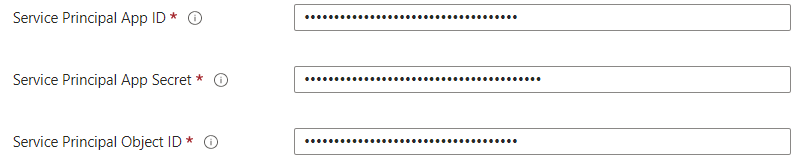
Enter the details of the pre-created Fortigate Service Principal
Select the storage account replication,
Select the subnets to be included / excluded in the template.
Two subnets need to be configured:
The 1st subnet will be configured as the external subnet,
The 2nd subnet will be configured as the internal subnet.
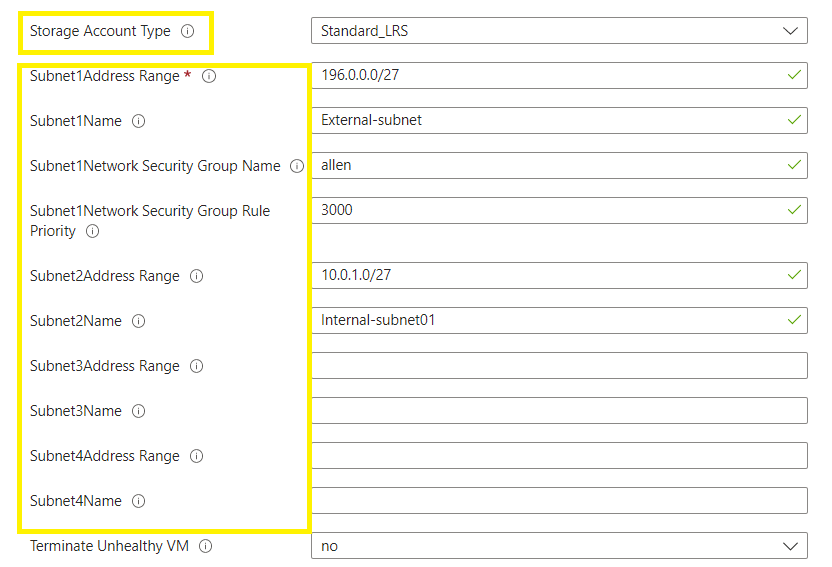
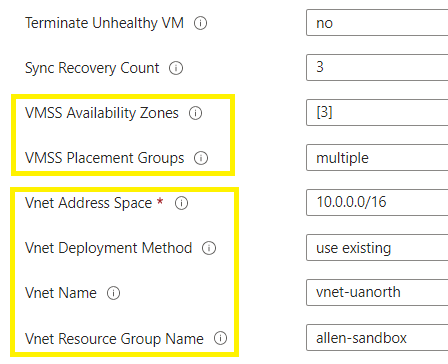
Add the number of availability zones to the vmss and ppg’s,
Specify the vnet details,
*VMSS Placement Groups – A single placement group has a range of 0-100 VMs. A multiple placement group has a range of 0-1,000 VMs.
Create.
The ARM template deployment takes about 15 minutes to complete.
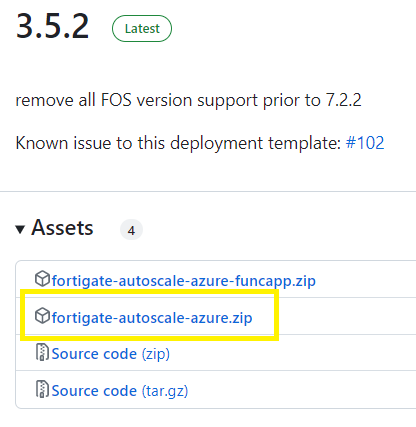
Step 9 - Download the fortigate-autoscale-azure.zip file
This zip file contains the fortigate port configurations and license files.
Download the zip file from the following location: https://github.com/fortinet/fortigate-autoscale-azure/releases
Download the fortigate-autoscale-azure.zip onto your local device, this will be used for your custom template deployment).
Unzip the folder on your local device.
Step 10 - Edit the autoscale zip file
Extract and open the fortigate-autoscale-azure.zip onto your local device.
Open the assets > config folder,
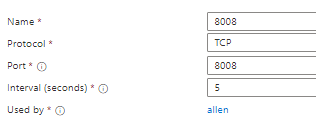
Edit the port2config file which manages your internal nic traffic connectivity.
The image on the left is the default configuration.
The image on the right is my updated configuration which required a static route that provided the gateway to the external subnet . Without this, my licenses were unable to be verified.
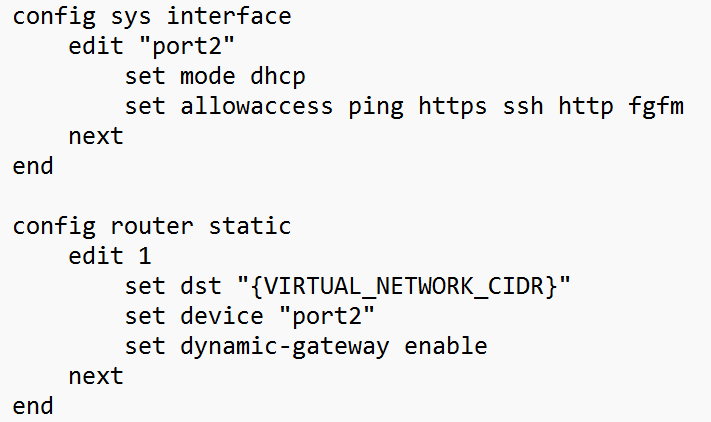
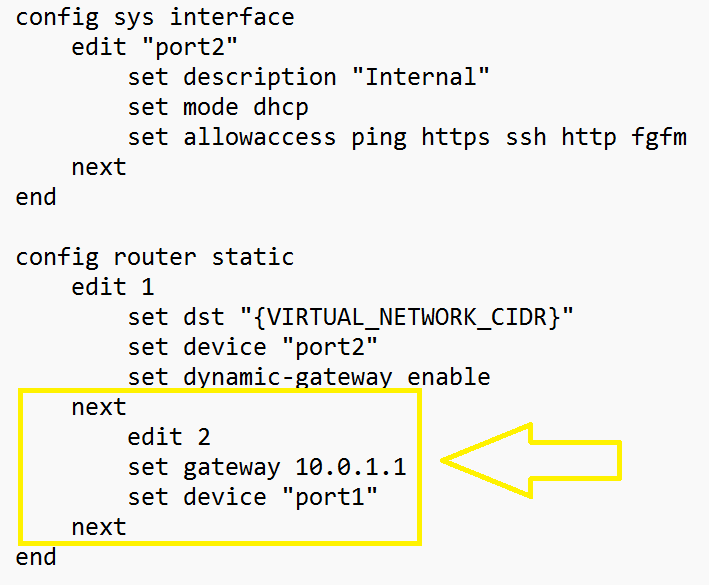
If you are not adding BYOL licenses then once you have updated your port2config file, save and zip the file again,
Step 11 - Adding you BYOL licenses
If you have purchased Fortigate BYOL licenses then its time to add the .lic license files.
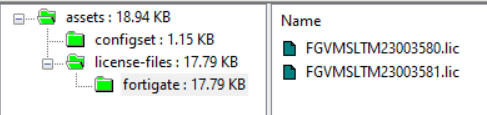
Create new sub-folders under the “assets” folder called “license-files\fortigate\”.
Inside the same fortigate-autoscale-azure.zip file which you have unzipped, copy and paste your BYOL .lic license files into the assets\license-files\fortigate\ folder.
Once you have updated your port2config file and added your BYOL licenses to your newly created folders , save and zip the fortigate-autoscale-azure.zip file again,
Step 12 - Upload the post-deployment template configuration files
Go to the newly provisioned storage account with the container \fortigate-autoscale\ (provisioned by the ARM template) and now upload the .\fortigate-autoscale-azure\assets\ folder (which you have edited in the above 2 steps).

Step 13 - Deploy the Azure Internal load balancer
The internal load balancer is not deployed as part of the Fortigate template and as such, needs to be deployed separately.
If you are deplolying Fortigates in an Active | Active | Active scenario then S-NAT is required so that return traffic knows which Fortigate instance to return to. This scenario will require an internal load balancer deployment. The internal load balancer will also be required for any east-west traffic flow to any peered virtual networks.
If you want to quickly deploy an internal load balancer via powershell, follow this link.
13.1 You have the option of deploying the internal load balancer in the same resource group as the fortigate stack.
13.2 Create the internal front end,
13.3 Create the backend pool,
13.4 Add the backend targets, select both scale sets,

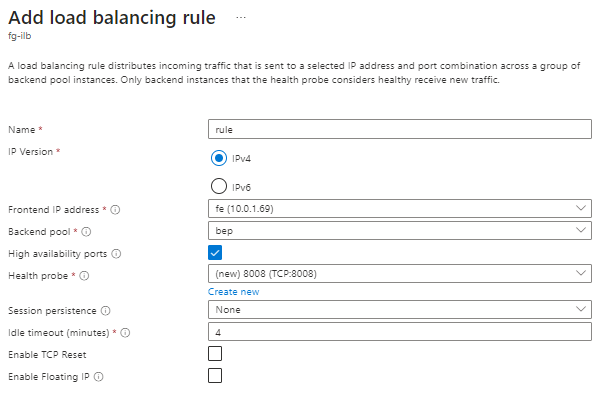
13.5 Load Balancing Rule
Configure the load balancing rule as per your choice of internal ports.
Make sure to select high availability and de-select the TCP reset and floating IP options.
13.6 Health probe
Configure the health probe to monitor the healthy state of the backend targets.
13.7 Outbound Rule
Configure this as per your requirements,
Review and Create.
Step 14 - Verification
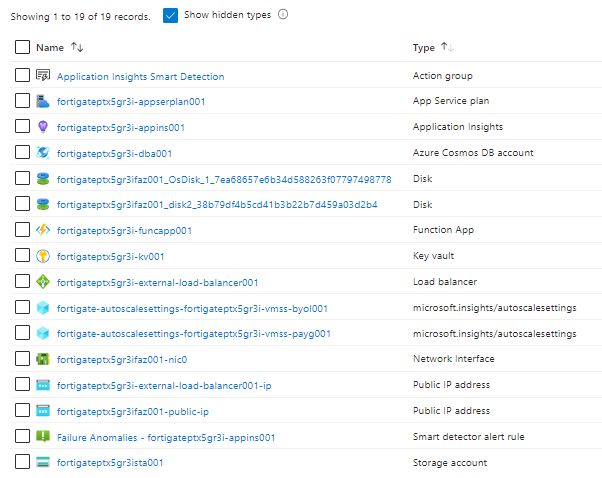
14.1 – Verify your resources are deployed
The following resources are deployed by the ARM template:
If you exclude the Forti Analyzer then only 19 resources will be deployed via the template (this excludes the storage account your manually provisioned for the function.zip).
14.2 – Start up your virtual machine scale set instances
Starting your virtual machine scale set instances
1. Go to the scale set as per your licensing model > scaling > change to custom autoscale > save. (Im using the byol scale set).
2. Go to scale set > instances > refresh > (your instances will provision as per the arm template settings)


14.3 – Verify your Function App is functional
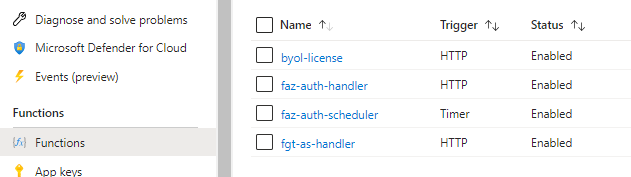
Go to Function App > Functions > you must see the following 4 functions, namely
byol-license: The function to distribute BYOL licenses.
faz-auth-handler: The function to handle authorization of FortiGate in the FortiAnalyzer.
faz-auth-scheduler: The function to handle authorization of FortiGate in the FortiAnalyzer on a timely basis.
fgt-as-handler: The main autoscaling function.
14.4 – Verify your Azure Cosmos database
Go to the newly deploy Cosmos database > Data Explorer > Expand the database FortiGateAutoscale
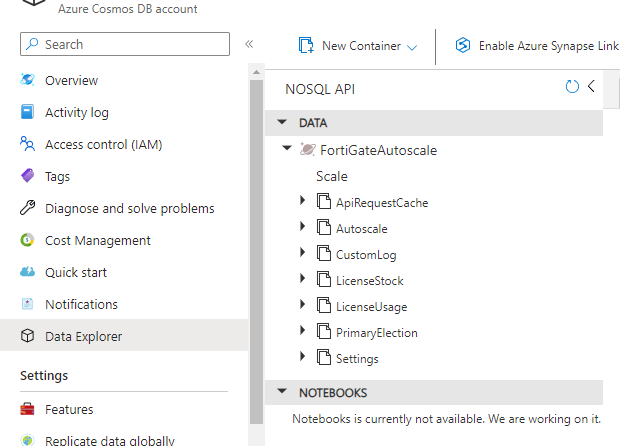
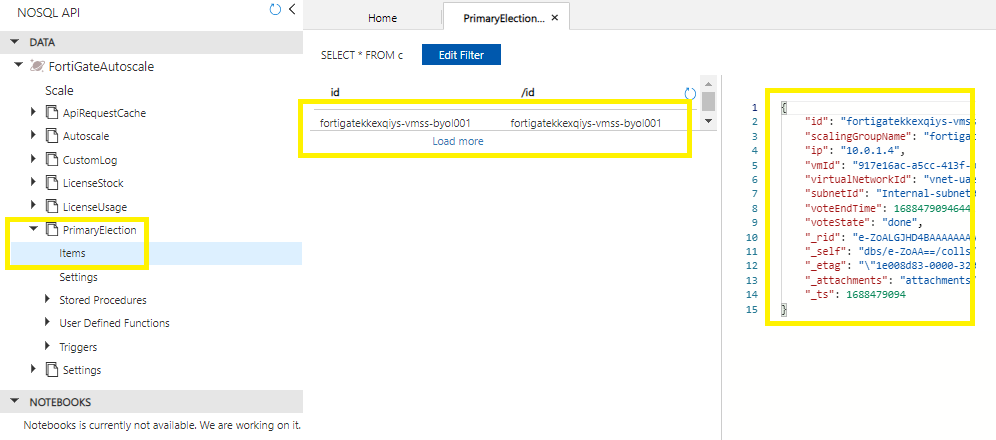
14.5 – Verify the primary election
The primary FortiGate-VM will be logged in the CosmosDB FortiGateAutoscale in the table PrimaryElection > Items
14.6 – Logon to virtual Fortigate instance
Go to the newly deployed internal load balancer > Inbound NAT rules >
Decide on your preferred login method (Im going to use the 8443)
Enter your external load balancer front end ip and port (eg https://20.233.152.133:40000) into your browser

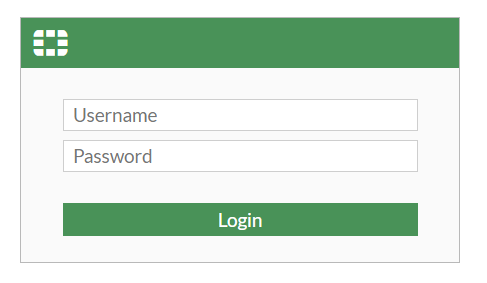
You should be presented with the admin logon screen
When logging onto your secondary Fortigate, it is suggested to login using Read-Only.

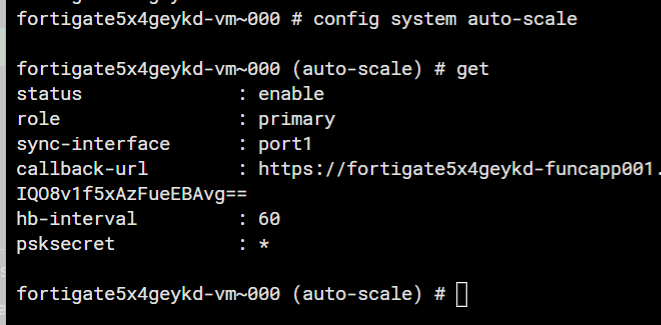
Run CLI on each instance to verify the auto-scale role status:
config system auto-scale
get

Step 15 - Troubleshooting
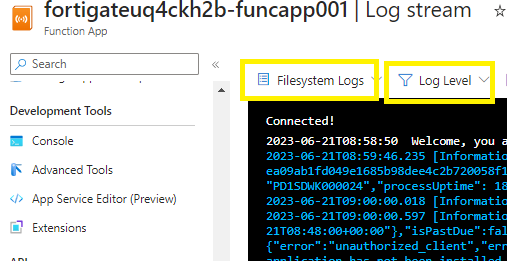
15.1 – Function App Log Stream
Go to Function App > Log Stream
Switch to Filesystem logs,
Log level = verbose,
–End–
Have you ever considered writing an ebook or guest authoring on other sites? I have a blog centered on the same ideas you discuss and would love to have you share some stories/information. I know my audience would appreciate your work. If you’re even remotely interested, feel free to shoot me an email.
I believe other website proprietors should take this web site as an model, very clean and fantastic user pleasant style.
I simply wanted to write down a brief comment so as to express gratitude to you for those magnificent tips and tricks you are placing at this website. My considerable internet investigation has finally been paid with wonderful insight to share with my two friends. I ‘d assert that most of us visitors actually are quite lucky to dwell in a decent website with many lovely professionals with useful solutions. I feel pretty fortunate to have come across your website page and look forward to so many more entertaining moments reading here. Thanks a lot once more for a lot of things.
I want to thank you for your assistance and this post. It’s been great.
Some times its a pain in the ass to read what blog owners wrote but this internet site is really user genial! .