The aim of this blog is to simplify the deployment of the OPSWAT MetaDefender Core and ICAP servers into a Kubernetes cluster on Azure using Terraform.
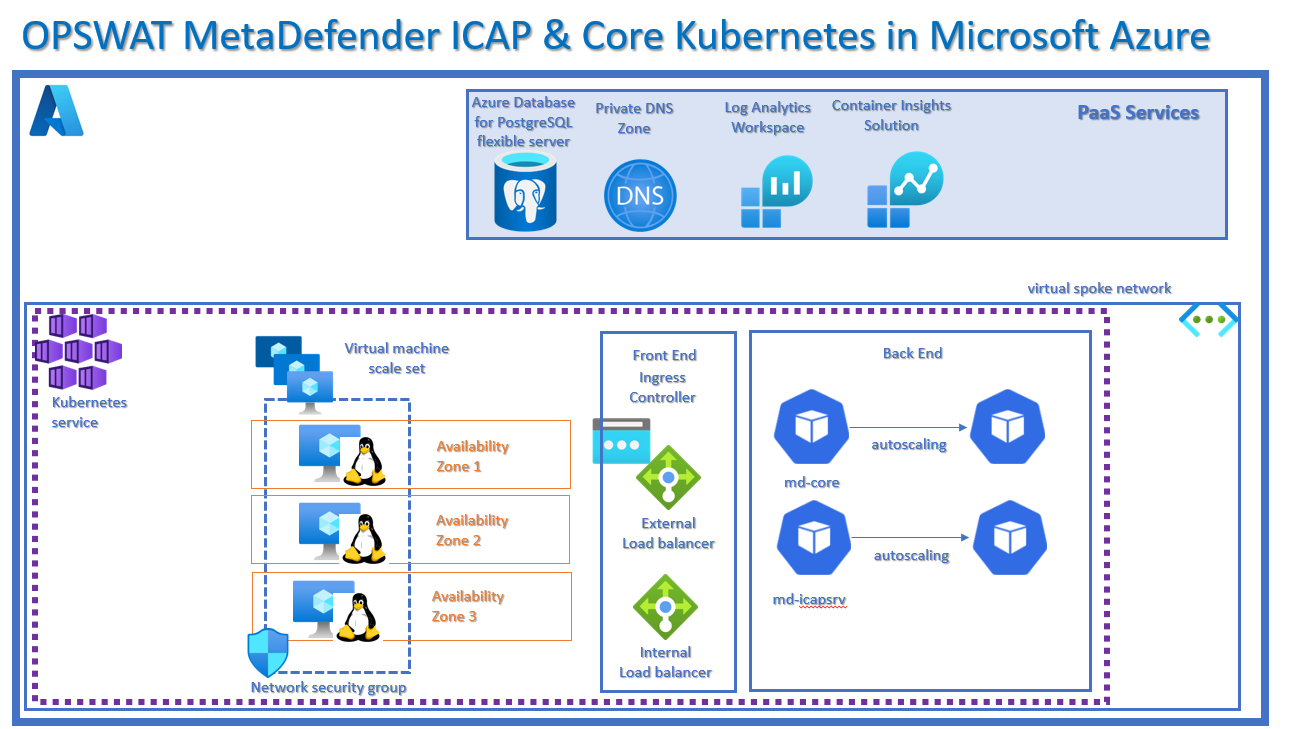
I have updated the kubernetes cluster to deploy across 3 Azure availability zones for high availability, as part of an organizations BCDR plan.
I have also updated the Terraform files by adding an import.tf file thereby allowing you to bulk Terraform import your existing virtual network and thereby deploying the OPSWAT k8s cluster onto your existing vnet, instead of having to deploy a new vnet in parallel.
Deployment Plan
Please find my customized Terraform main.tf – which has been modernized to deploy the K8S clusters across 3 av zones, and the import.tf file which enables bulk Terraform Import onto your existing vnet infrastructure.
My entire zip folder with all the updated files can be found here
Step 1 – Clone / Download zip file from OPSWAT Github
Step 2 – Provision a Service Principal with RBAC
Step 3 – Edit the metadefenderk8s.sh file
Step 4 – Edit terrafrom.tfvars file
Step 5 – Edit the terraform main.tf file
Step 6 – Edit the variable.tf file
Step 7 – Terraform Import (optional)
Step 8 – Azure Authentication
Step 9 – Terraform Authentication
Step 10 – Execute the metadefender script
Step 11 – Verify your deployment
Step 12 – Configure your kubectl
Step 13 – Access Kubernetes Dashboard
Step 14 – OPSWAT Kubernetes Licensing
OPSWAT License Activation Modes
Deployment Step
Step 1 - Clone / Download zip file from OPSWAT Github
The first step is to download and extract the .zip file or clone the following OPSWAT Github location: https://github.com/OPSWAT/metadefender-k8s/tree/main
Step 2 - Provision a Service Principal with RBAC
Create a dedicated service principal that will be used to authenticate Terraform to Azure during this build and to assign its RBAC role,
Go to your Bash and run the following script to create your unique service principal with OWNER RBAC role. (Contributer keeps generating build errors).
az ad sp create-for-rbac --name Allens-Service-Principal \
			 --role OWNER \
                	 --scopes /subscriptions/<subscriptionID>/resourceGroups/<rgname>

update diagram to owner role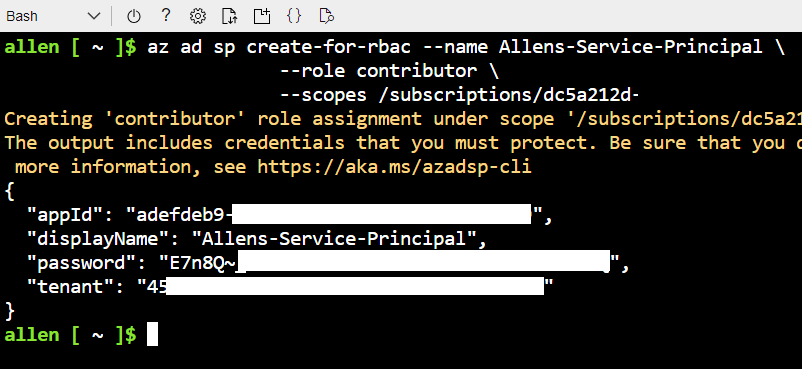
Copy and paste the output into OneNote for safekeeping for your next steps,
Step 3 - Edit the metadefenderk8s.sh file
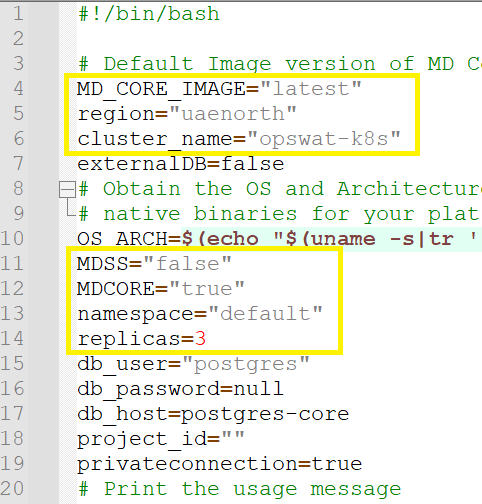
Open and edit the .\metadefender-k8s-main\metadefenderk8s.sh file,
Update the region (line #5),
Update the k8s cluster name (line #6),
Update MDCore installation (line #12),
Update the number of replicas (line #14)
Step 4 - Edit terrafrom.tfvars file
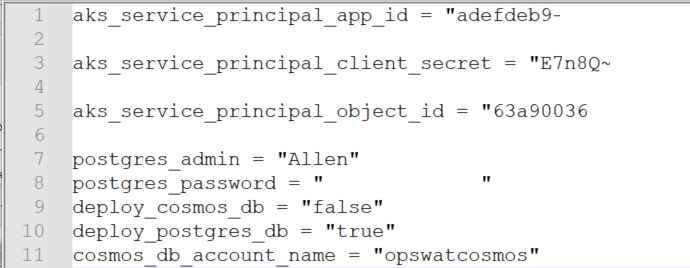
Open and edit your .\metadefender-k8s-main\terraform\azure\terraform.tfvars file and update the variables:
Replace the values in your terraform.tfvars file with your service principal appId and password. Terraform will use these values to authenticate to Azure before provisioning your resources.
Update the following from your service principal details under Azure AD App Regisrtations:
aks_service_principal_app_id
aks_service_principal_client_secret
aks_service_principal_object_id
Update the following as per your requirements:
postgres_admin = “dbadminname”
postgres_password = “yourdbpassword”
deploy_cosmos_db = “false”
deploy_postgres_db = “true”
cosmos_db_account_name = “opswatcosmos”
Step 5 - Edit the terraform main.tf file
I found a few edits / updates that needed to be performed on the terraform script to improve functionality.
Update #1
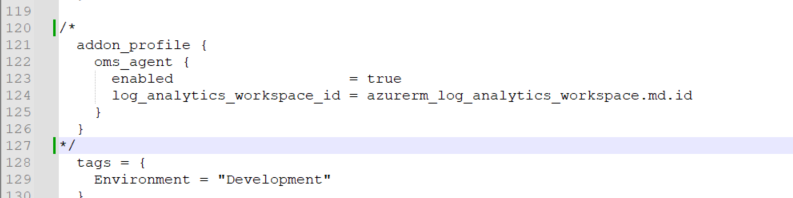
Go to main.tf file > .\metadefender-k8s-main\terraform\azure\main.tf > comment out or delete from line 120 to 127 > Save
The │ `addon_profile` block has been deprecated and will be removed in version 3.0 of the AzureRM Provider. All properties within the
│ block will move to the top level.
Solution:
Update #2
Invalid value for “path” parameter: no file exists at “~/.ssh/id_rsa.pub”;
Solution:
I had to edit out from line 94 to 102 as no public key is generated by the script and the script creates an error when keeps looking for a pre-created public ssh key.

Update #3
I removed Line #14 – 20 where “random_pet” resource group names are created. I need to standardize with a fixed naming convention,
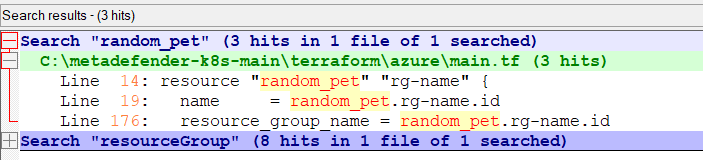
I replaced the resource group naming convention:

Update #4
If you plan to integrate your OPSWAT k8s solution onto an existing network then we need to do some bulk Terraform imports to update the virtual network and resource group details to ensure a successfull deployment onto a current existing virtual network.
Update #5 azurerm_kubernetes_cluster
I updated the azurerm_kubernetes_cluster to spread the cluster over 3 availability zones and not use kubenet but rather azure cni integration onto my existing network.
default_node_pool {
name = "agentpool"
node_count = var.agent_count
vm_size = "Standard_F8s_v2"
type = "VirtualMachineScaleSets"
availability_zones = ["1", "2", "3"]
enable_auto_scaling = true
min_count = 3
max_count = 10
vnet_subnet_id = "${azurerm_subnet.subnet21.id}"
}
#I added in the service_cidr to define the service subnet range, as well as define the docker_bridge_cidr. This enables integration onto your existing vnet.
network_profile {
load_balancer_sku = "Standard"
network_plugin = "azure"
service_cidr = "40.1.2.0/24"
dns_service_ip = "40.1.2.5"
docker_bridge_cidr = "40.1.3.0/24"
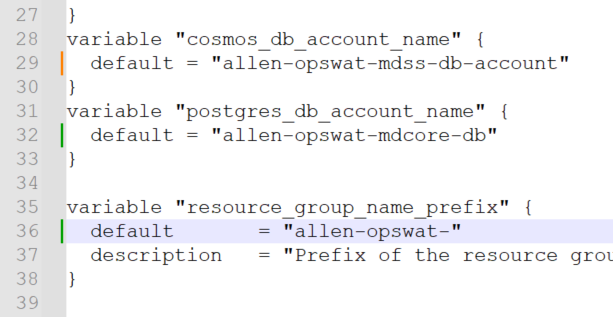
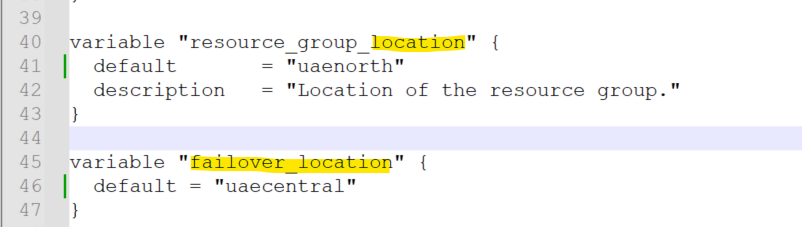
}Step 6 - Edit the variable.tf file
Open and edit your .\metadefender-k8s-main\terraform\azure\variables.tf file and update the following variables:
I updated the naming conventions for the cosmosdb, postgres and resource group, location and failover location as well as agent count.
Step 7 - Terraform Import (optional)
Terraform Import any existing infrastrucutre on which you want to deploy the new k8s opswat resources onto. You may either Terraform Import each resource individually, or use Terraform Import bulk import.
Create a new file called import.tf and populate with the vnets, subnets and resource groups as per the link here.
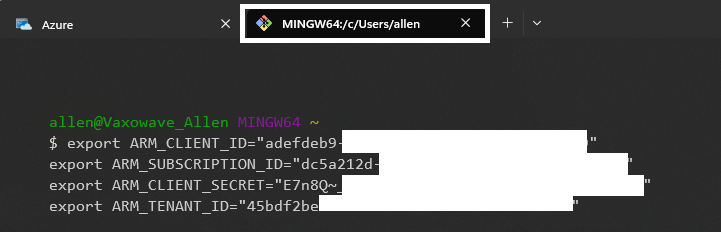
Step 8 - Azure Authentication
Once you have created your service principal, use the following format to populate the enviroment variables in powershell to populate your Terraform authentication credentials:
appID = client_ID,
password = CLIENT_SECRET,
FORMAT
$env:ARM_CLIENT_ID=""
$env:ARM_SUBSCRIPTION_ID=""
$env:ARM_TENANT_ID=""
$env:ARM_CLIENT_SECRET=""
Copy and paste these values into your cloud shell powershell:

Run the following PowerShell command to verify the Azure environment variables have been applied:
gci env:ARM_*
Step 9 - Terraform Authentication
Open Git bash and populate the Service Principal credentials which will be used to authenticate Terraform in Azure,
Populate the following Gitbash credentials and execute in a Gitbash console:

Step 10 - Execute the metadefender script
In your Gitbash > change to local folder:
cd /c/metadefender-k8s-main/Execute the following based on your requirements:
-mdcore will install the metadefender core server
-icap will install the icap server
./metadefenderk8s.sh provision -l Azure --mdcore --icap
press Y to continue,

You should get all successfully initialized!
Type Y when prompted
Upon completion of the first part of the script you will have 13 resources deployed along with a client certificate created by the script.

The second part of the script deploys the ICAP server inside the K8S cluster:

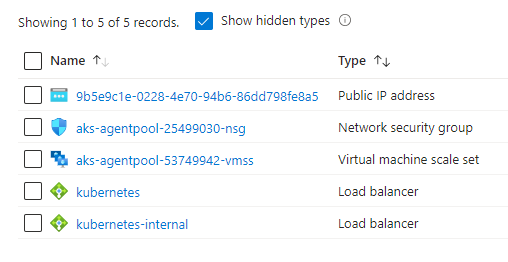
Step 11 - Verify your deployment
Your portal should show the following Azure resources in your first resource group container (unless you have a pre-existing PostgreSQL server elsewhere),
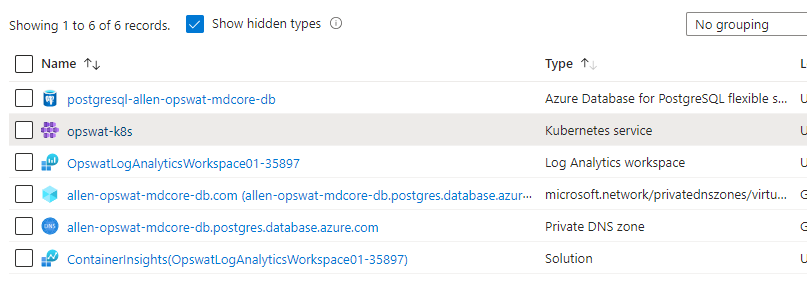
A 2nd resource group container will be provisioned with the prefix of MC_x
Step 12 - Configure your kubectl
Now you need to run the following command to retrieve the access credentials for your AKS cluster via cloud shell:
az aks get-credentials `
--resource-group <resourcegroupname> `
--name <k8sclustername>

az aks get-credentials `
--resource-group <resourcegroupname> `
--name <k8sclustername>
Step 13 - Access Kubernetes Dashboard
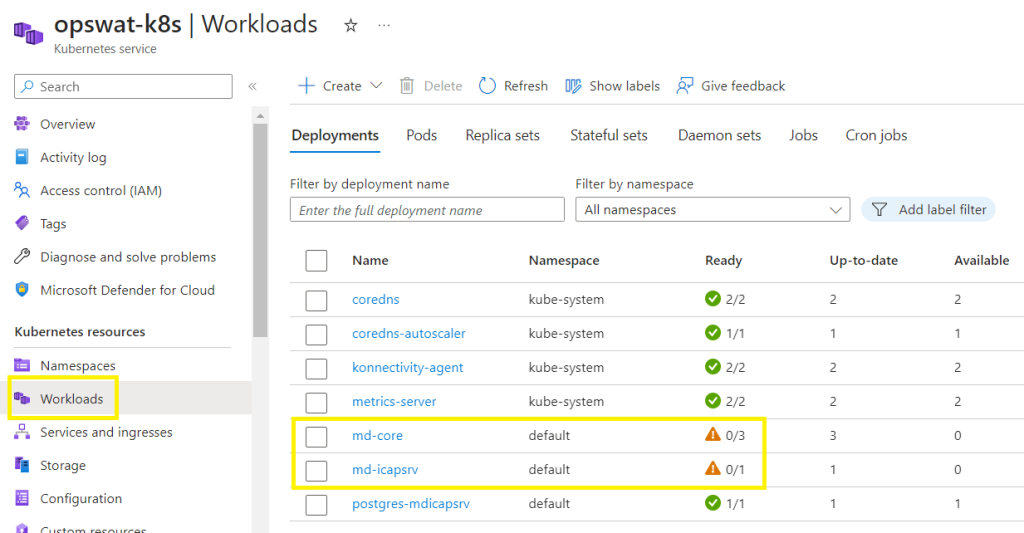
Accessing the Azure Portal’s Kubernetes resource view,
Go straight to Azure portal > Kubernetes service > Workloads
or run the following script and then click on the provided URL
az aks browse `
--resource-group opswat--alive-seahorse `
--name md-k8s
*Azure recommends using this view over the default Kubernetes dashboard, since the AKS dashboard add-on is deprecated for Kubernetes versions 1.19+.
az aks browse `
--resource-group <resourcegroupname> `
--name <k8sclustername>
Step 14 - OPSWAT Kubernetes Licensing
Licensing Configuration
Every time a pod of md-core is created it will create a deployment id attached to that pod so it is automatically activated. In case the pod goes down it will be automatically deactivate thanks to a side container installed that will make a call to the OPSWAT Activation Server.
Warning
The md-core pods use the secrets mdcore-license-key to generate a deployment id and activate that pod. In case of failure on activation the app container will restart until that secret is properly set up with a license key with enough activations.
OPSWAT License Activation Modes
The metadefender ICAP and CORE servers require license before they will beome operational.
There are three different options for the product activation:
Online activation: MetaDefender will connect directly to the OPSWAT licensing server online, and acquire its license based on your Activation key and its Deployment ID.
Offline activation: Requiring you to upload a license file (.yml). That license file could be retrieved by activating your license via OPSWAT Portal. Follow the displayed instructions for details.
Request trial key online: For evaluation purpose, you can receive an trial Activation key via email. Follow the displayed instructions for details.
Check Your License Details
For more license details and activating your MetaDefender Core:
Product name: product name as on your order (e.g. MetaDefender Core for Windows – 4 engine package (Rev.C) – Evaluation)
Package ID: product identification as on your order (e.g. MSCW-4c-EVAL-UNLIMITED)
Expiration: last day of license validity
Activation key: key used for activating product
Deployment ID: identification of this installation
–The End–
I hope this blog helped to successfully deploy your containerized OPSWAT ICAP and CORE server across availability zones while integrating into your existing virtual network.
Thanks for any other informative site. Where else could I am getting that kind of information written in such an ideal means? I’ve a project that I am simply now operating on, and I’ve been on the glance out for such info.
Good – I should definitely pronounce, impressed with your site. I had no trouble navigating through all tabs as well as related info ended up being truly easy to do to access. I recently found what I hoped for before you know it in the least. Reasonably unusual. Is likely to appreciate it for those who add forums or anything, web site theme . a tones way for your client to communicate. Nice task..