This blog on how to configure a simple end user test for your Azure based Fortigate high availability deployment. I have decided to provision a simple end user RDP and IIS test to satisfy the end user test criteria.
The fortigate scenario uses an external Azure load balancer and 3 Fortigate NVA’s configured in Active | Active | Active High Availability.
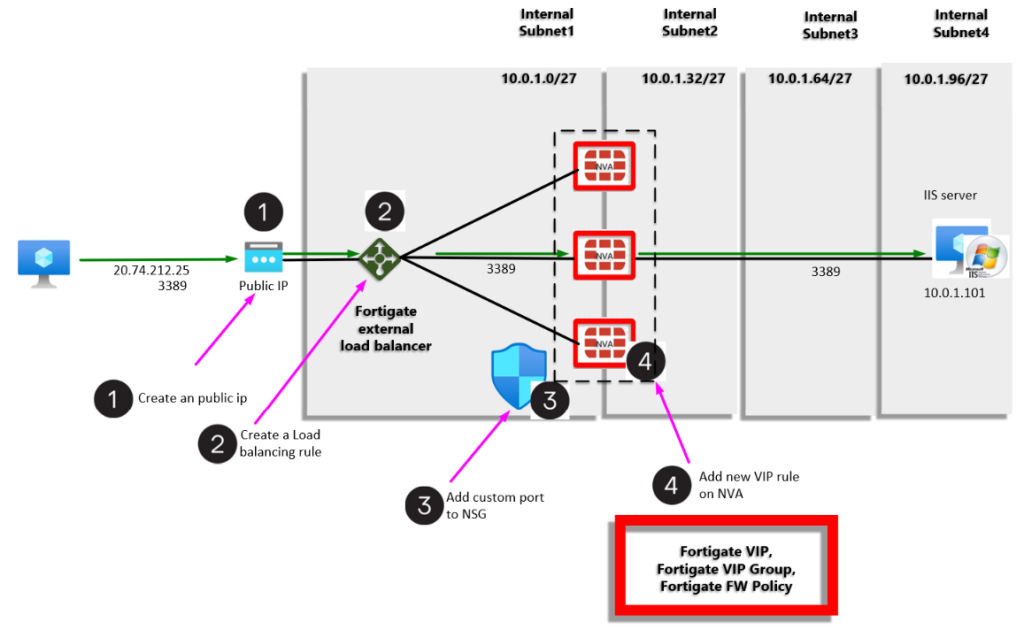
Routing
Routing consists of 2 layers, namely:
- Azure layer – on a virtual network, all the subnets will by default, communicate using the system routing. Default system routing will be overridden by any UDR’s and NSG’s that you create,
- The Fortigate NVA’s will require a static route configuration on the NVA to point each port to its respective gateway.
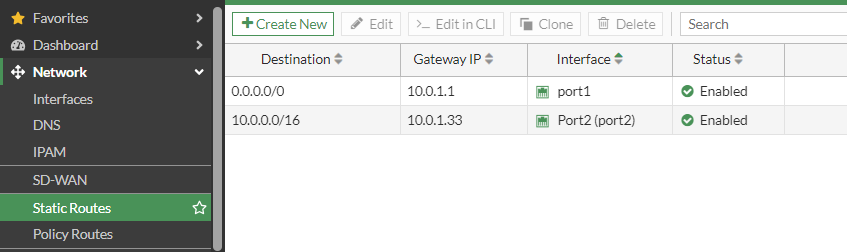
Go to Network > Static Routes and make sure the Gateway IP is correct for the respective subnet upon which each interface resides.
My port 1 resides on subnet01 with cidr 10.0.1.0/27 subnet, so its gateway is 10.0.1.1,
My port2 resides on subnet02 with cidr 10.0.1.32/27 subnet, so its gateway is 10.0.1.33
Step 1 - Azure Load Balancer: Create an additional external interface
On your external Azure load balancer > Frontend IP configuration > Add a new public front end ip address and name the interface easily identifiable eg “RDP”.

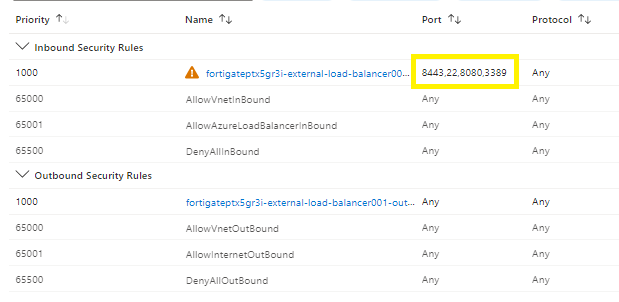
Step 2 -Network Security Group
Go to the network security group and add the intended port. In the example, we are going to add “3389” to our inbound rule.
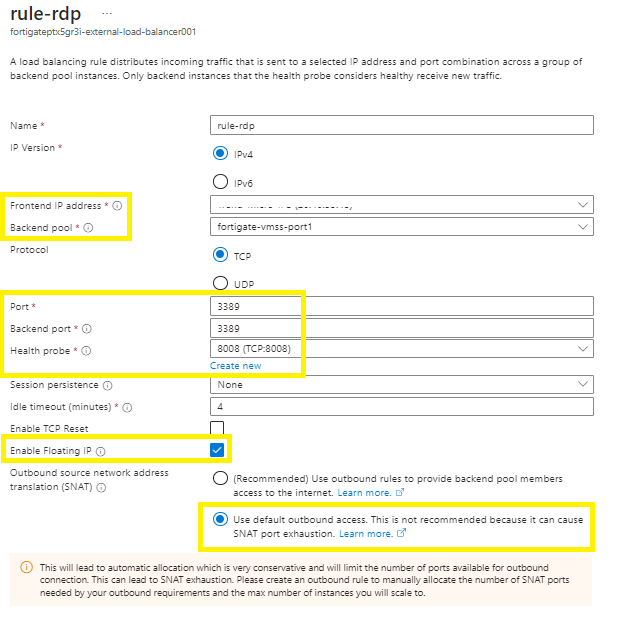
Step 3 - Azure Load Balancer Rule
On your external load balancer > go to your load balancer rules > Add >
Custom descriptive name,
IP version,
Frontend IP address > use the same public ip that you created in step 1,
Backend pool > add your Fortigate backend pool,
Select your frontend/ public port,
Select your backend port,
Select the health probe. (If you deployed via the Fortigate template, then the 8008 probe will already be active on the Fortigate NVA’s),
Select your own session persistence,
Select your own timeout value,
Dont enable TCP reset,
Enable Floating IP,
SNAT access will depend on your environment. If you select the default outbound access, then you will need to create a new public IP per rule.
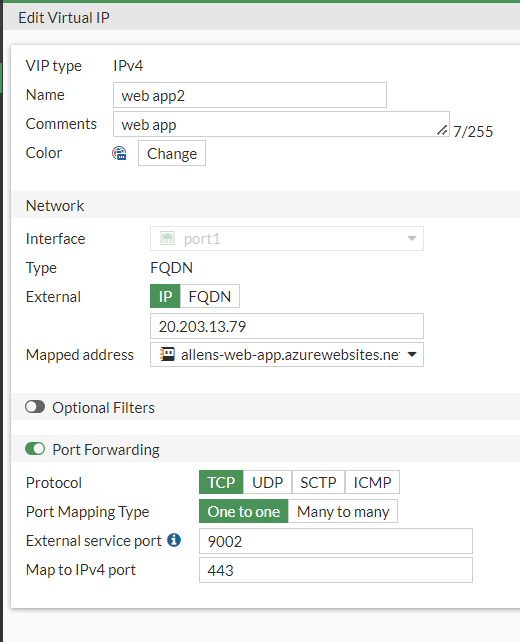
Step 4 - Fortigate: Setup the Virtual IP
4.1 Setup VIP for internal virtual machine:
Inside your Fortigate NVAs,
Policy & Objects > Virtual IPs > Create New > Virtual IP >
Add a custom name and comment,
Interface = select your public WAN(port1),
External IP address = add your external load balancer RDP new public ip address (that you created in step 1) here (yes, excuse the pip in the picture, its different),
Mapped IP address/ range = add your internal destination RDP host,
Port Forwarding = Enable,
Protocol = TCP,
Port Mapping Type = One-to-One, External Service Port = 3389, #this is your custom port added in the step fronted port
Map to port = 3389 (kept all default ports),
OK,

4.2 Setup VIP for azure app service
Configure the same as above but this time, change the Type to FQDN and in the mapped address, add the apps service url eg allens-web-app.azurewebsites.net
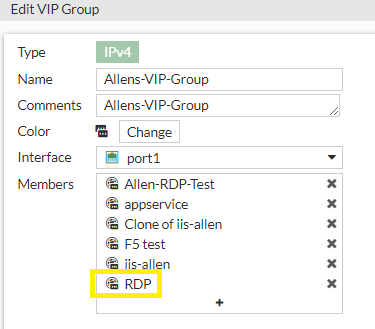
Step 4 - Fortigate: Setup Virtual IP Group
Now add the virtual IP’s to the virtual IP group.
In the portal, go to:
Policy & Objects > Virtual IPs > Create New > Virtual IP Group >
Name and Comment,
Interface = WAN (port1)
Members = add the RDP group from the previous step,
OK
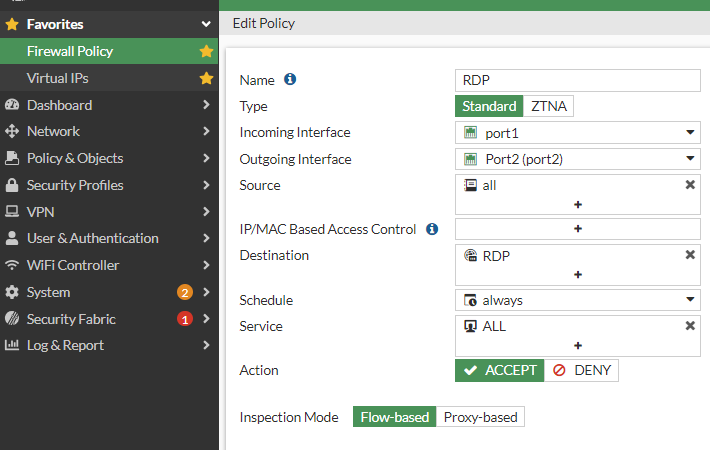
Step 5 - Fortigate: Setup the Firewall Policy
Add the virtual IP group to the firewall policy.
Firewall Policy > Create new >
Name = RDP Policy,
Incoming interface = WAN (port1),
Outgoing interface = LAN (port2),
Source = All,
Destination = VIP Group (created earlier),
Schedule = always,
Service = All,
Action = Accept,
Inspection Mode = Flow-based,
Comments = RDP,
OK
Step 6 - Validation
Test your mstsc login to the external load balancer RDP port your created, using your custom port and you should successfully RDP login.
I truly enjoy studying on this internet site, it holds superb blog posts. “Beware lest in your anxiety to avoid war you obtain a master.” by Demosthenes.