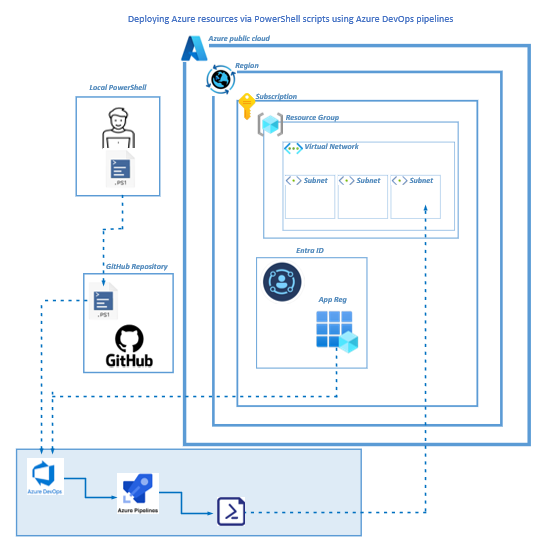
This blog is written on a 100 level, explaining how to use the most simplistic tooling to deploy Azure resources using PowerShell scripts, GitHub and deployed via Azure DevOps pipelines with continuous integration.
Deployment Plan
Step 2 – Github.com remote repository
Step 3 – Upload PowerShell scripts
Step 4 – Create a new DevOps project
Step 5 – Create DevOps Service Connections
Step 6 – Service Connections Permissions
Step 7 – Create a DevOps Pipeline
Step 10 – Pipeline Verification
Step 11 – Resource deployment verification
Step 12 – Continuous Integration
Deployment Steps
Step 1 - PowerShell code
Begin by preparing your PowerShell scripts.
For simplicity, I will be adding 2 Powershell scripts to the DevOps pipeline. The first script will deploy a simple Azure virtual network. This 2nd script will deploy a Storage Account.
Step 2 - Github.com remote repository
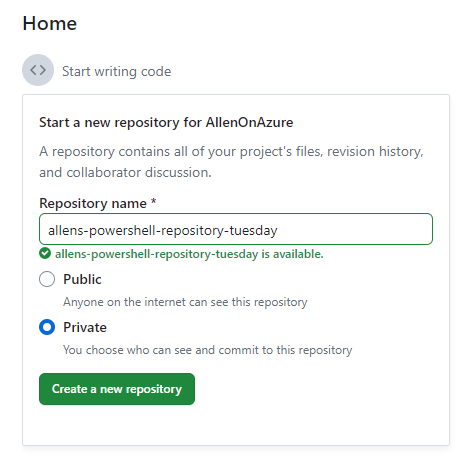
Create a new GitHub.com remote repository,
Go to https://github.com/
Create a New repository with a unique name,
Select whether you want the repository to be private or publicly visible,
Click the green Create a new repository button to provision the new repository,
Step 3 - Upload PowerShell scripts
Once your Github repository has been created, its time to upload your pre-created PowerShell scripts.
Click on the url uploading an existing file
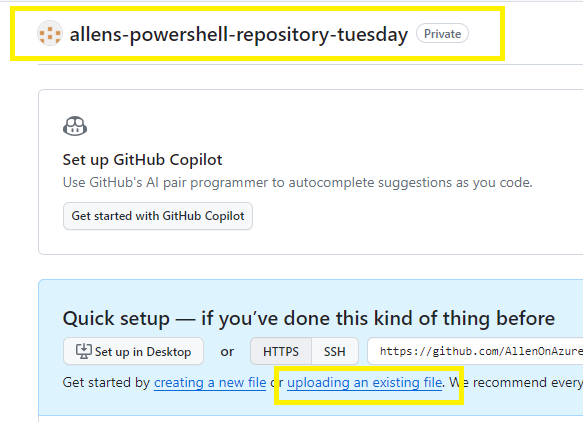
Drag and drop your PowerShell ps1 files into the remote repository and click on Commit changes

Step 4 - Create a new DevOps project
You need to be a member of the Project Collection Administrators group to be able to create new DevOps projects,
Open your Azure DevOps > + New Project >
Select a unique name,
Select whether your DevOps repo will be publicly visible or private,
Select Create,

Step 5 - Create DevOps Service Connections
** You will need to have PIM enabled to complete this task**
Your PowerShell scripts will be provisioned inside of its own task inside the DevOps pipeline.
Each task will require a service connection assigned to it,
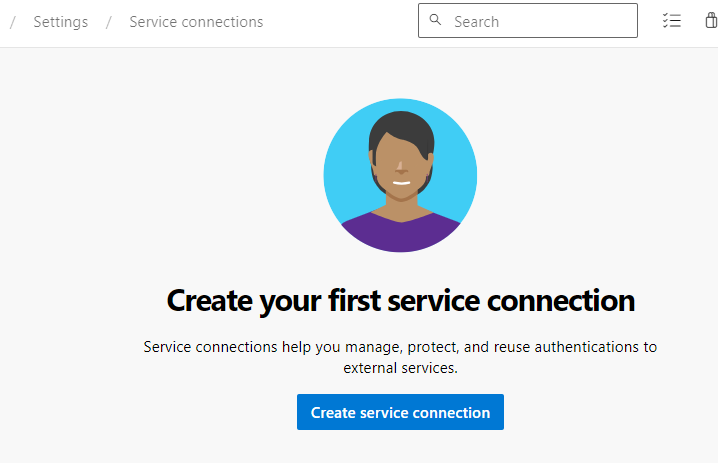
Scroll down the left DevOps menu and click on Project Settings

Search for Service Connections

Click on the Create service connection button
Since we are deploying Azure resources using PowerShell, select the Azure Resource Manager (ARM) service connection type,
Next,
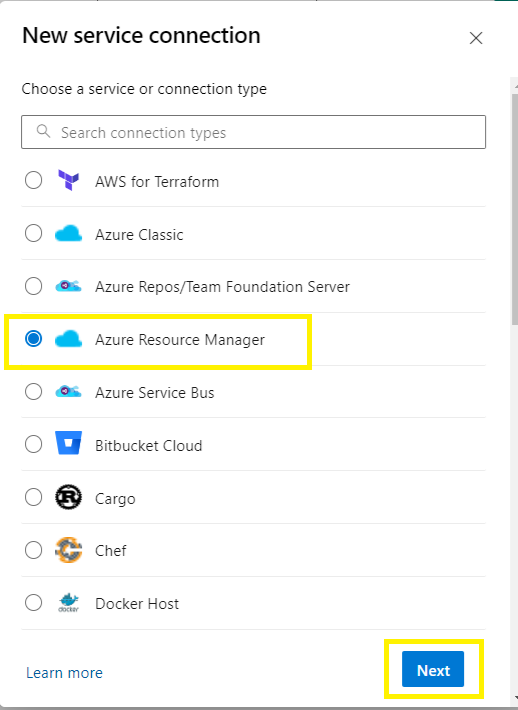
Select the automated Service Principal for simplicity, unless you have prepared another identity,
Next,

Select the Azure configuration options:
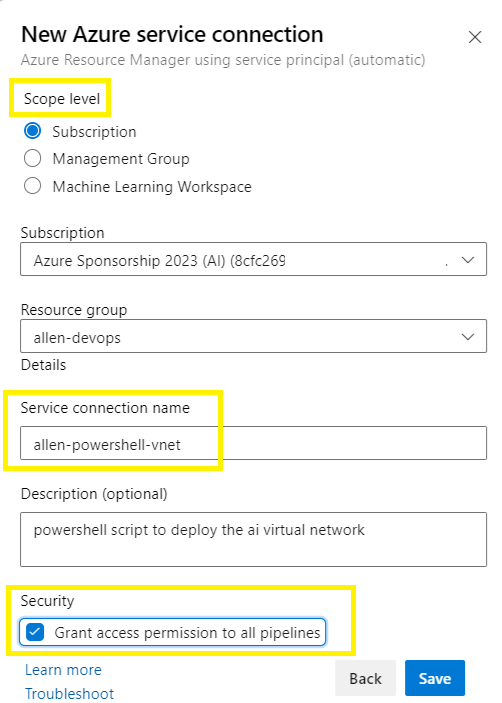
Select the scope level of your service connection,
Select the destination / resident resource group,
Create a custom service name ( I like to specify the name / function of the ps1 for easy identification later),
Security > Grant access permissions to all pipelines
Save
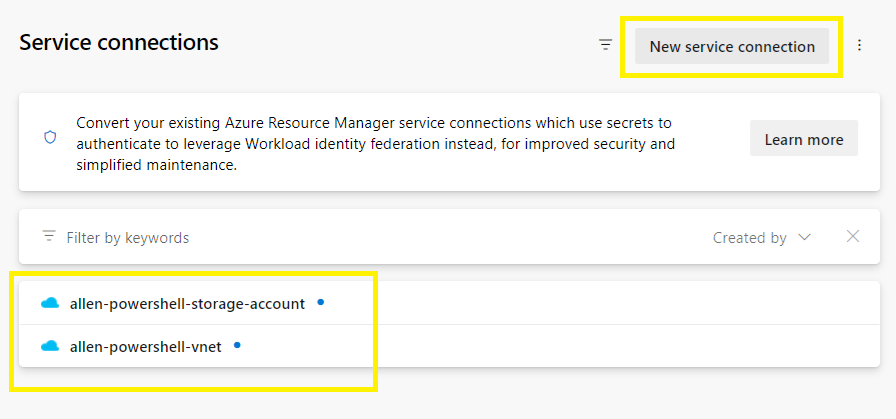
When you have completed provisioning your service connections, you will see your service connection/s inside your Service connections window,
You may create one or more service connections for use across all pipeline tasks. (Each of these service connections are registered apps that will have to be granted IAM roles and assigned to scopes. )
Step 6 - Service Connections Permissions
Next, configure the appropriate RBAC role and scope for your new DevOps service connections registred app, based on the Principle of Least Privilege (PoLP):
In this example I will grant my service connection the RBAC contributor role and give the scope of subscription,
Go to the DevOps service connection > and select your service connection >
Click on the Manage Service Principal link,
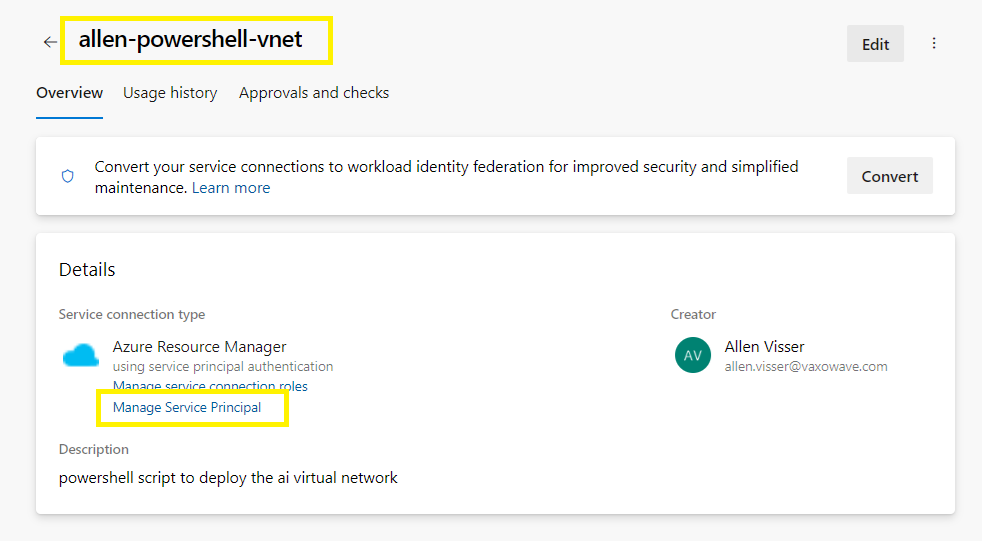
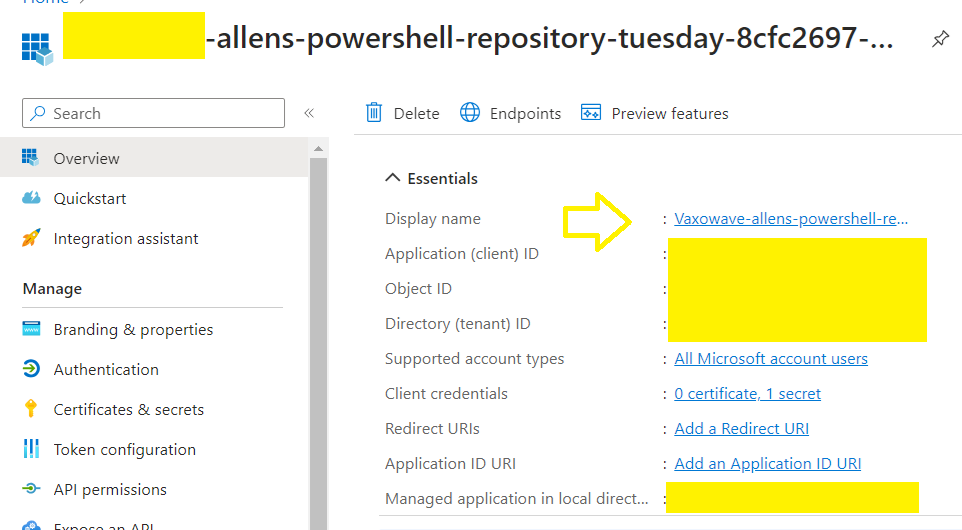
This link will redirect you to the Azure Portal Entra ID blade > Registered App,
Copy the display name which includes a long GUIDid,
Go to Azure Portal > Azure Subscriptions > select your destination subscription > IAM >
Add > Add role assignment >
Role tab:
Privileged administrator roles > Select Contributor,
Members tab:
User, group, or service principal > paste the copied Registered App display name > Select
Review & Assign
Step 7 - Create a DevOps Pipeline
In the left menu > Select pipelines,
Select Create Pipeline,

On the Where is your code?
Click on the Use the classic editor link,

Select your Github repository,
Select a customized connection name,
Select your authorization mechanism > click on Authorize using OAuth

Select your Repository,
Select your branch,
Continue,

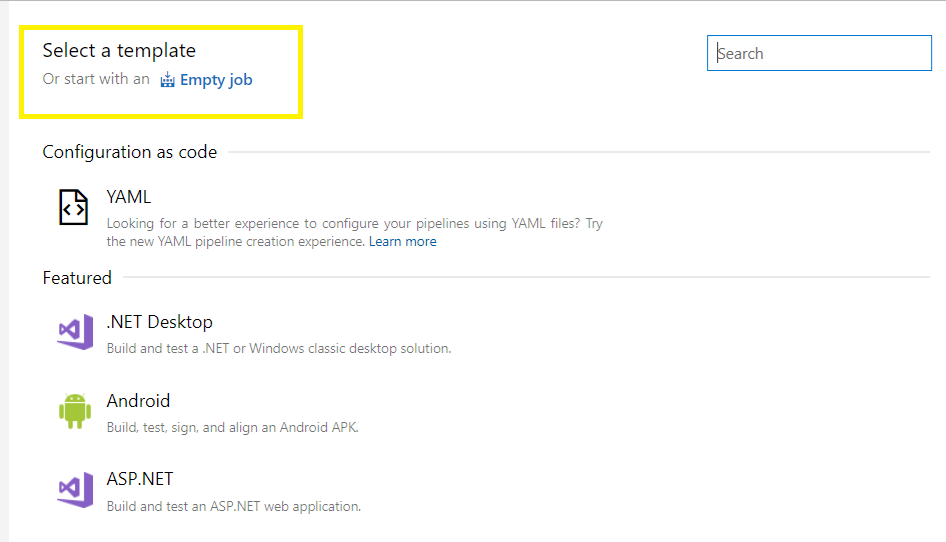
Step 8 - Select a Template
Select an Empty job
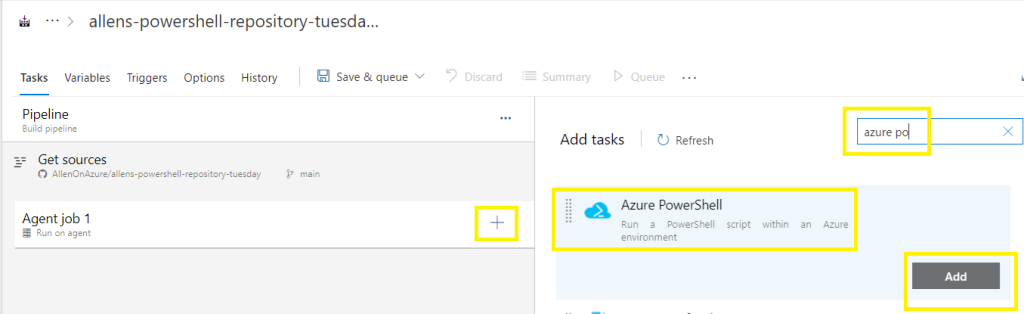
Click on the + to add a new task,
Search for azure PowerShell
Select the Azure PowerShell task,
Add
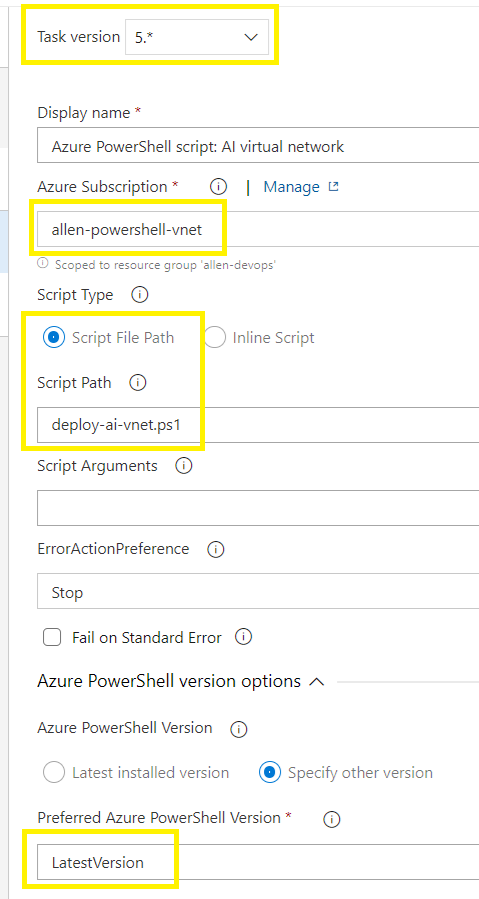
Configure the new Azure PowerShell task:
Task version = 5
Customize the display name as per the name of your PowerShell script:
Azure subscription > select your service connection name
Select Script File Path > copy and paste the name of the PowerShell script that you pasted into your Github repository main branch,
Scroll down to Preferred Azure PowerShell Version > paste in LastestVersion
Select the Save button > Save
Step 9 - Pipeline Test
To test your pipeline, click on Queue and then Run,

Step 10 - Pipeline Verification
The Job pane will show Agen Job 1 status in running,
Click on the Agent job 1 to drill deeper

You will be able to view the success of the incremental tasks.

Step 11 - Resource deployment verification
Once the pipeline has completed, you can verify that the resources have been deployed via the Azure Portal,

Step 12 - Continuous Integration
You have the option of enabling continuous integration between your remote Github.com repository and DevOps pipeline.
Once you enable the Devops pipeline checkbox below, each time you edit and save the PowerShell scripts in the remote Github repository, the pipeline will be triggered.
Go to Triggers tab on your pipeline,
Select the Enable continuous integration,
Save > Save

Step 13 - Testing
To test your continuous integration, merely click on the GitHub edit and immediately Commit changes,
The pipeline will automatically begin running,
–I hope you found this blog simple and easy to follow as a level 100 setup–
I want to thank you for your assistance and this post. It’s been great.
Sustain the excellent work and producing in the group!
The articles you write help me a lot and I like the topic
I like the helpful info you provide in your articles. I抣l bookmark your blog and check again here regularly. I am quite certain I抣l learn lots of new stuff right here! Good luck for the next!
Hey There. I found your blog using msn. This is a very well written article. I抣l make sure to bookmark it and return to read more of your useful information. Thanks for the post. I抣l definitely comeback.