Synopis
This post will simplify how to register, authenticate and govern the Azure Blob Storage accounts in Microsoft Purview and how to share data and receive shares from Blob storage accounts.
Components:
- Step 1 – Provsion Azure Storage Account
- Step 2 – Registration of the Azure Blob Storage
- Step 3 – Scanning the Azure Blob Storage
- Step 4 – Configuring authentication for scanning
- Step 5 – Creating the scan
- Step 6 -Scoping and running the scan
- Step 7 – Viewing Scan
- Step 8 – Managing Scan
- Step 9 – Data sharing
- Step 10 – Prepare the Azure Storage Account subscription
- Step 11 – Share Azure Storage data in-place with Microsoft Purview Data Sharing (preview)
- Step 12 – Microsoft Purview Data Sharing (preview): Receive Azure Storage data in-place
Some quick fluffy stuff for you as to why we would share data in-place using blob storage.
Traditionally, organizations have shared data with internal teams or external partners by generating data feeds, requiring investment in multiple copies of data and refresh pipelines. This results in higher costs of data in flight and storage data proliferation (multiple copies), and delay in access to time-sensitive data.
With Microsoft Purview Data Sharing, data providers can now share data in-place from Azure Data Lake Storage Gen2 and Azure Storage accounts, both within and across organizations. Share data directly with users and partners without data duplication and centrally manage your sharing activities from within Microsoft Purview.
With Microsoft Purview Data Sharing, data consumers can now have near real-time access to shared data. Storage data access and transactions are charged to the data consumers based on their consumption, and at no cost to the data providers.
Microsoft Purview Data Sharing only stores metadata about your share. It doesn’t store a copy of the shared data itself. The data is stored in the underlying source storage account that is being shared. You can have your storage accounts in a different Azure region than your Microsoft Purview account.
The capabilities offered by Azure Blob Storage
Permissions: Data Source Administrator and Data Reader or Data Share Contributor roles are required to register a source and manage it in the Microsoft Purview governance portal.
Before you start, identify an existing or create a new Azure Storage Account for Microsoft Purview. For the sake of confidentiality | privacy | data isolation I will be creating a dedicated storage account for Microsoft Purview.
How in-place data sharing works
Microsoft Purview enables sharing of files and folders in-place from ADLS Gen2 and Blob storage accounts.

A data provider creates a share by selecting a data source that is registered in Microsoft Purview, choosing which files and folders to share, and who to share them with. Microsoft Purview then sends an invitation to each data consumer.
When a consumer accepts the invitation, they specify a target storage account in their own Azure subscription that they’ll use to access the shared data. This establishes a sharing relationship between the provider and consumer storage accounts. This sharing relationship provides data consumer read-only access to shared data through the consumer’s storage account. Any changes to the data in the provider’s source storage account is reflected in near real-time in the consumer’s storage account.
The data provider pays for data storage and their own data access, while the data consumer pays for their own data access transactions.
Data providers can revoke access to the shared data at any time, or set a share expiration time for time-bound access to data. Data consumers can also terminate access to the share at any time.
Step 1 - Provsion Azure Storage Account
Before you start, identify an existing or create a new Azure Storage Account for Microsoft Purview. For the sake of confidentiality | privacy | isolation I will be creating a dedicated storage account for Microsoft Purview. Provsion a Storage Account as a pre-requisite for the configuration of the Azure Blob Storage.
Provision containers in the Storage Account for data sharing.

Step 2 - Registration of the Azure Blob Storage
This section will enable you to register the Azure Blob storage accounts (both sharing and receiving) for scaning and data sharing in Microsoft Purview.
You must register the Azure Blob Storage as a data source in Microsoft Purview prior to setting up a scan for the Azure Blob Storage data source.
- Go to Azure portal > Microsoft Purview account > select your Purview account >
- Open the Microsoft Purview Governance Portal > Data Map >
- Collection > Add a Collection > Assign permissions to individual subcollections >
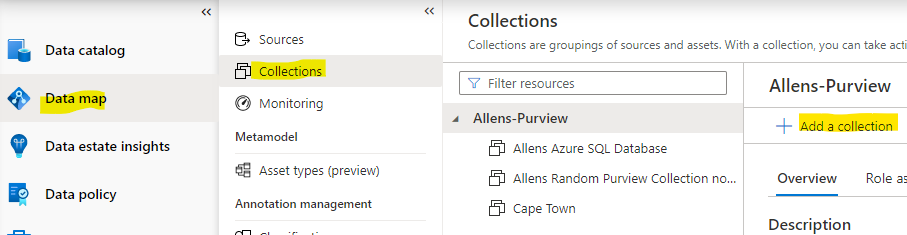
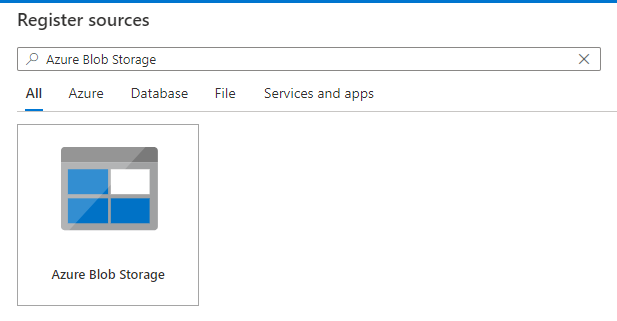
4. Go to Sources > select target collection > and select the Register new Azure Blob data source >
Select Azure Blob Storage data source > Continue
Provide a suitable Name > Azure subscription > existing Azure Blob Storage account name > select collection and select Apply. Leave the Data Use Management toggle on the disabled > Register
The Azure Blob storage account will appear under the selected Collection.

Step 3 - Scanning the Azure Blob Storage
For file types such as csv, tsv, psv, ssv, the schema is extracted when the following format is folllwed:
- The first row values must not be empty
- The first row values must be unique
- The first row values must not a date or a number
Step 4 - Configuring authentication for scanning
Your Azure network must allow for communications between your Azure resources, but if you’ve set up firewalls, private endpoints, or virtual networks within Azure, you’ll need to follow one of these configurations below.
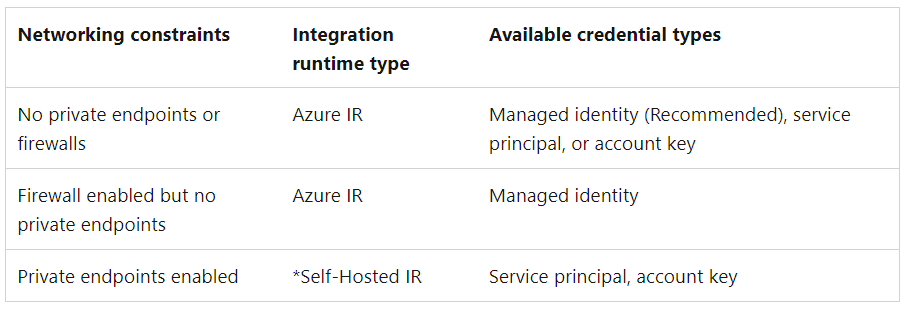
Using a system or user assigned managed identity for scanning:
There are two types of managed identity you can use. The configuration of provision the SAMI and UAMI are explained in my earlier post (step 1)
- System-assigned managed identity (Recommended)
- User-assigned managed identity (preview)
If you have firewall enabled on your storage account, you must use managed identity authentication method when setting up a scan.
Adding a pre-created Managed Identity on an Azure resource.
- Go to Azure portal > the scope at subscription | resource group | or resource (Azure Blob storage account) that you would like to allow the catalog to scan >
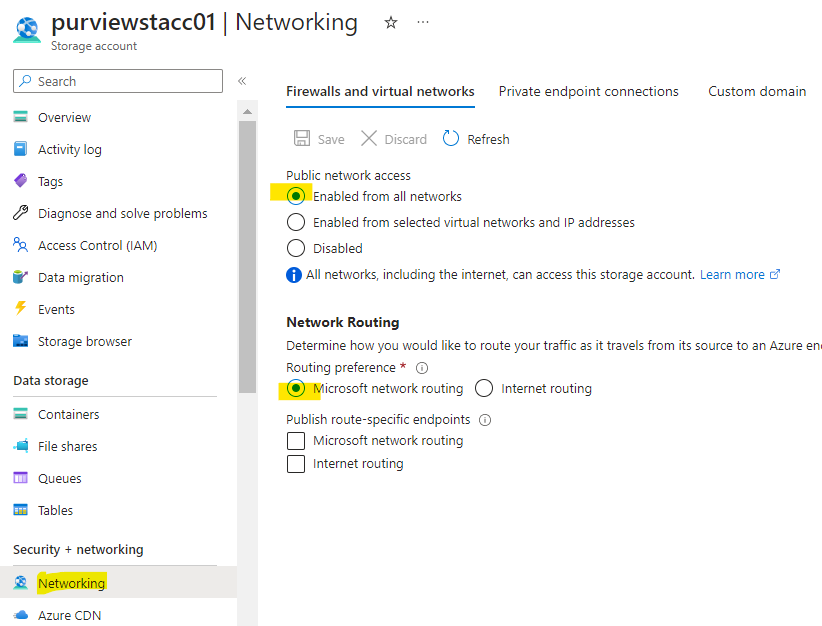
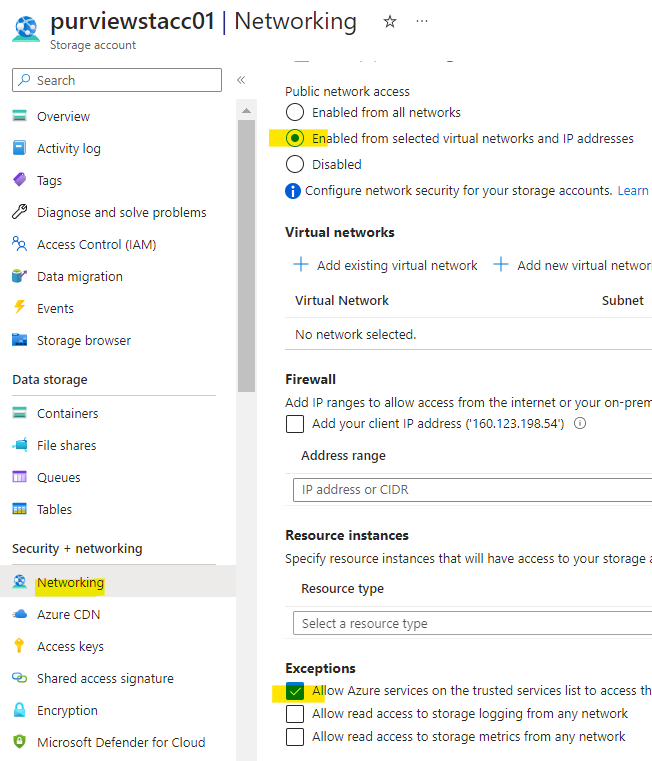
- Go to Portal > Azure Blob storage account > Networking > Enabled from selected virtual networks and IP addresses > Allow Azure services on the trusted services list to access this storage account > Save
Using Account Key for scanning
If you choose to use an Account Key instead of using a SAMI / UAMI then follow these steps https://learn.microsoft.com/en-us/azure/purview/register-scan-azure-blob-storage-source#using-account-key-for-scanning
Using Service Principal for scanning
If you choose to use a Service Principle instead of using a SAMI / UAMI then follow these steps https://learn.microsoft.com/en-us/azure/purview/register-scan-azure-blob-storage-source#using-service-principal-for-scanning
Step 5 - Creating the scan
Open Microsoft Purview account > Microsoft Purview Governance Portal > Data map > Sources > view the collection hierarchy
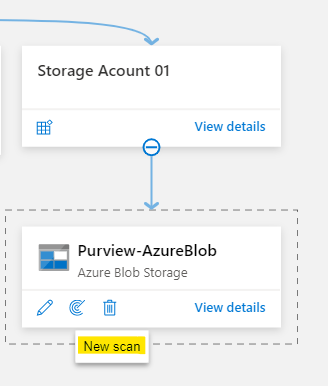
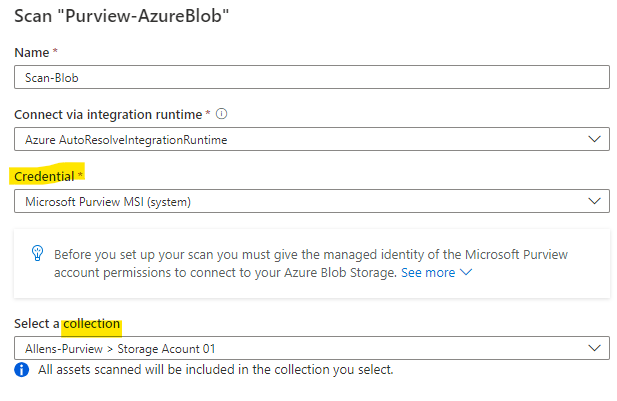
Go to Azure Blob data source registered earlier > select New Scan
Provide a Scan name > select the Microsoft Purview accounts SAMI or UAMI > target collection > Test connection. On a successful connection, select Continue
(The Test connection failed on my UAMI but passed on my SAMI account, so Im using my SAMI account)

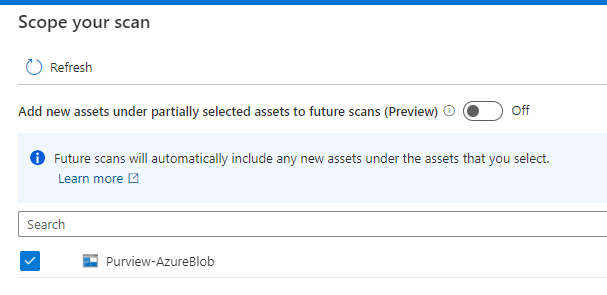
Step 6 -Scoping and running the scan
You can scope your scan to specific folders and subfolders by choosing the appropriate items in the list > Continue
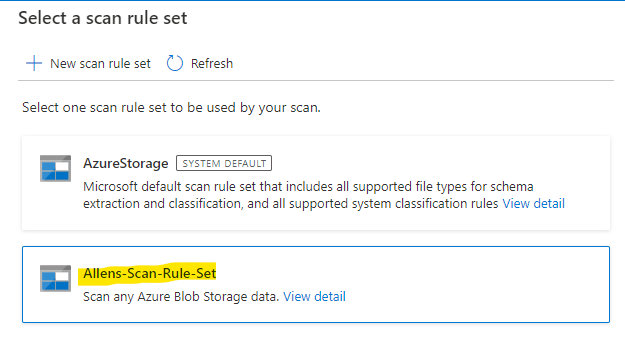
Now select a scan rule set. You can choose between the default system default, existing custom rule sets, or create a new rule set inline. Scan Rule sets are discussed in my previous posts***
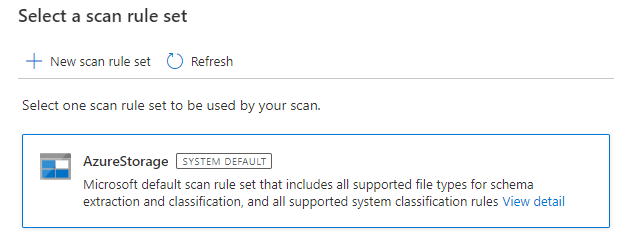
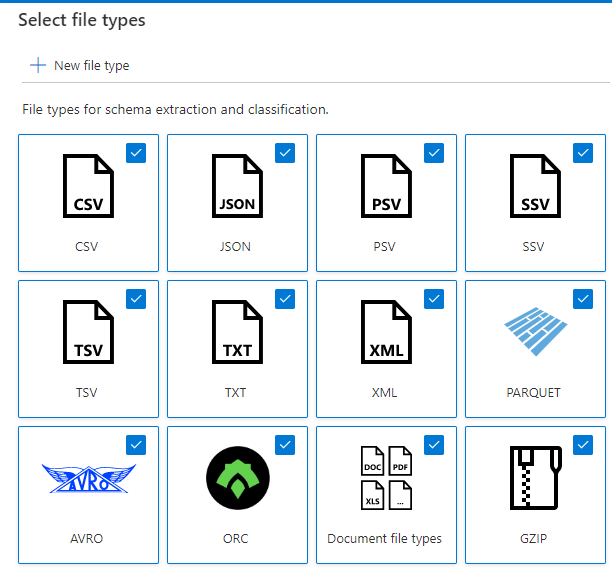
I have created a new scan rule set, and selected all the file types to be included in the scan rule > Continue
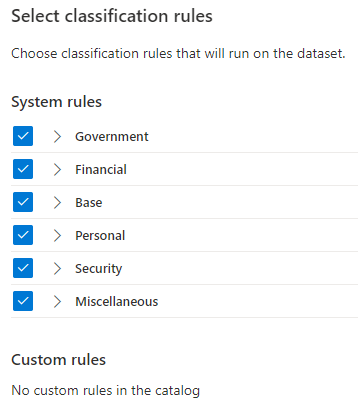
You can select the classification rules to be included in the scan rule > Continue
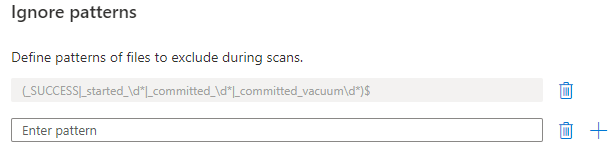
Define any patterns that you wish to ignore in your scan > Create
Select your Rule Set
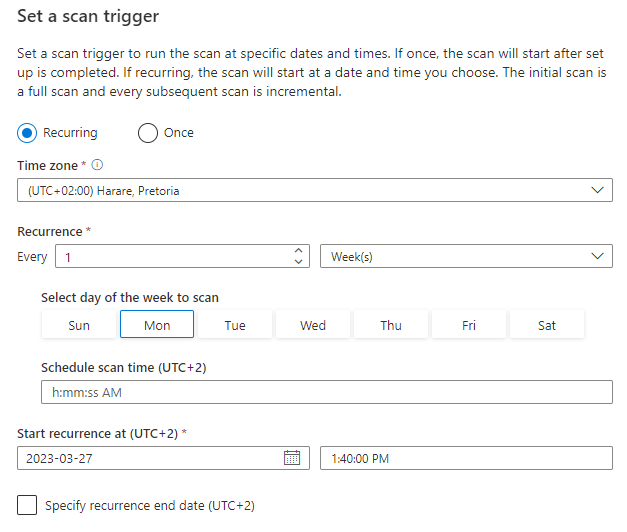
Choose your scan trigger as a run time schedule or once off run > Continue > Save and run
Step 7 - Viewing Scan
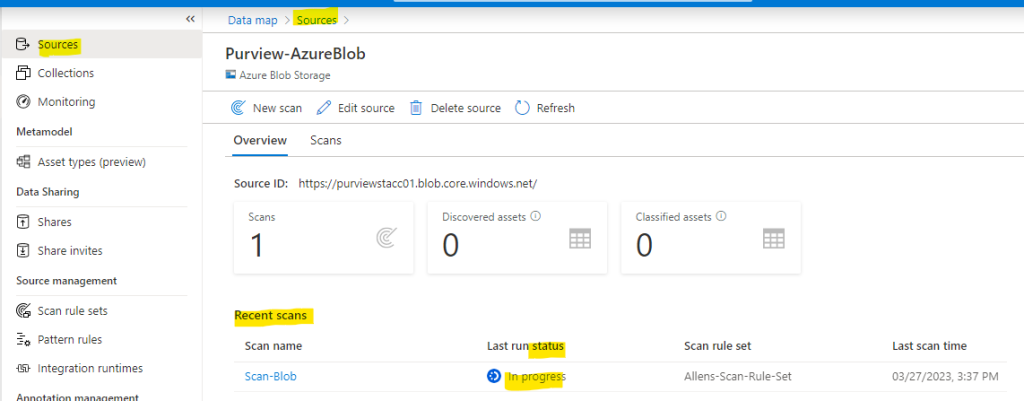
Go to Sources > select Sources > select View Details to check the status of the scan
The scan details show the scan progress in the Last run status and the number of assets scanned and classified
The Last run status will be updated to In progress and then Completed once the entire scan has run successfully
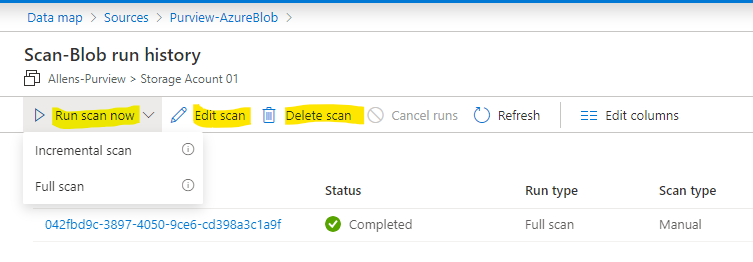
Step 8 - Managing Scan
To manage a scan:
Go to Data Map > Sources > select Source > View Details > Select the Scan name
You can run the scan again (Full or Incremental) , edit the scan, delete the scan.
Step 9 - Data sharing
Microsoft Purview Data Sharing (preview) enables sharing of data in-place from Azure Blob storage account to Azure Blob storage account for both sharing and receiving data in-place between Azure Blob storage accounts.
Source and target storage accounts must be in the same region as each other. They howver don’t need to be in the same region as the Microsoft Purview account.
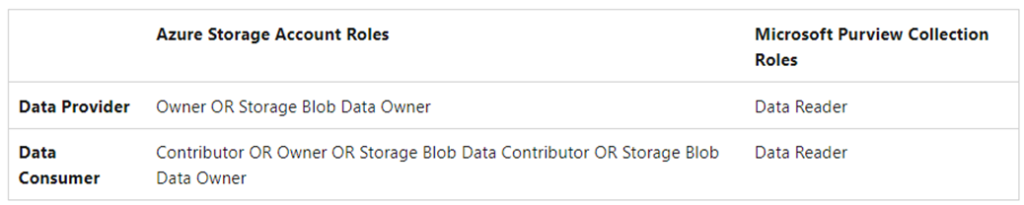
Permissions:
Storage account permissions required to share data
roleAssignments = Owner role and
blobServices = Blob Storage Data Owner role.
Storage account permissions required to receive shared data
storageAccounts= Contributor and Owner role.
blobServices = Contributor, Owner, Storage Blob Data Contributor and Storage Blob Data Owner role.
Storage accounts supported for in-place data sharing:
The following storage accounts are supported for in-place data sharing:
- Regions: Canada Central, Canada East, UK South, UK West, Australia East, Japan East, Korea South, and South Africa North
- Redundancy options: LRS, GRS, RA-GRS
- Tiers: Hot, Cool
- Use only storage accounts for Microsoft Purview that do not hold any other production workloads.
Updating shared data in the source storage account:
Updates you make to shared files or data in the source shared folder from source storage account will be made available to recipients in the target storage account in near real time. When you delete subfolder or files within the source shared folder, they will disappear for the recipient. To delete the source shared folder, file or parent folders or containers, you need to first revoke access to all your source shares from the source storage account.
Updating shared data in target storage account:
The target storage account enables recipients to access the shared data read-only in near real time. You can connect analytics tools such as Synapse Workspace and Databricks to the shared data to perform analytics. Cost of accessing the shared data is charged to the target storage account.
Service limit
Source storage account can support up to 20 targets, and target storage account can support up to 100 sources. If you require an increase in limit, please contact Support.
Step 10 - Prepare the Azure Storage Account subscription
Deploy the Microsoft Purview policies at the target subscription level where in the Azure Storage Accounts reside. You may deploy the ps1 below or use the Azure Portal steps below to enable Microsoft Purview to manage policies on all newly created Azure Storage accounts in that subscription.
To enable Microsoft Purview to manage policies for all Azure Storage accounts in a subscription, execute the following ps1
#Install the Az module
Install-Module -Name Az -Scope CurrentUser -Repository PSGallery -Force
#Login into the subscription
Connect-AzAccount -Subscription
#Register the feature
Register-AzProviderFeature -FeatureName AllowPurviewPolicyEnforcement -ProviderNamespace Microsoft.Storage
If the output shows RegistrationState as Registered, then your subscription is enabled for access policies.
If the output is Registering, wait at least 10 minutes, and then retry the command.

Pause until the RegistrationState shows as Registered.

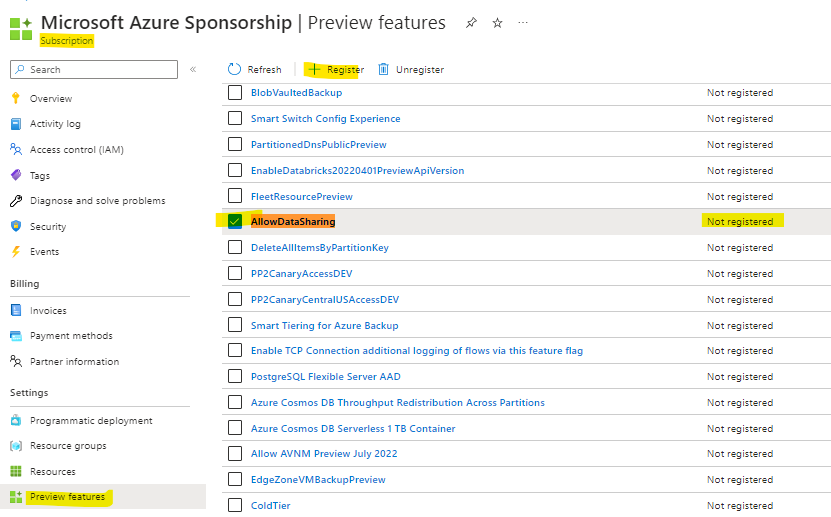
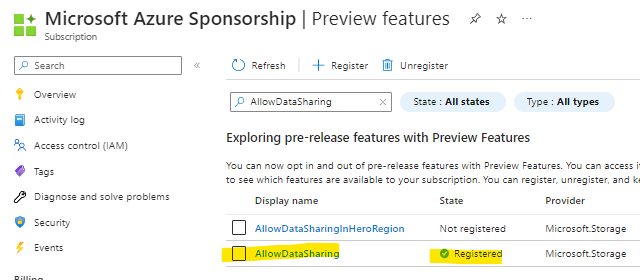
Go to Azure portal > Subscription (that contains the source and target Storage Accounts)
> Preview features > AllowDataSharing > Register.
Refresh the Preview features screen to verify the State is Registered. It could take 15 minutes to 1 hour for registration to complete.
Step - 11. Microsoft Purview Data Sharing (preview): Sharing Azure Storage data in-place
Required roles for sharing data and receiving shares.
Creating a share via Governance Portal:
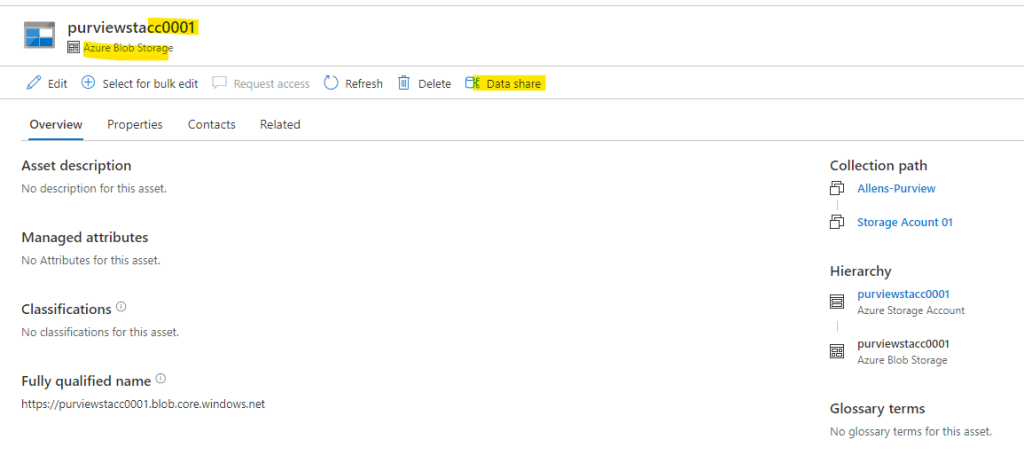
- Governance Portal > Azure Storage intended to share data from
- Select Storage Account > Data Share button.
- Governance Portal > Data Map > Collections > select collection containing your Storage Account > select Assets block > click on destination Storage Account link >
- Data Share > New Share > Name + description > Continue.
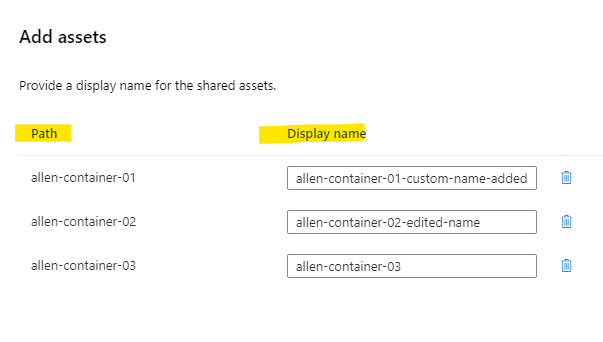
Add assets > option of editing the display names of the shared data based on containers created previously > Continue.
Search for and add all the assets you’d like to share out at the container, folder, or file level, and then select Continue.
Only containers, files, and folders that belong to the current Blob or ADLSGen2 Storage account can be added to the share > Continue
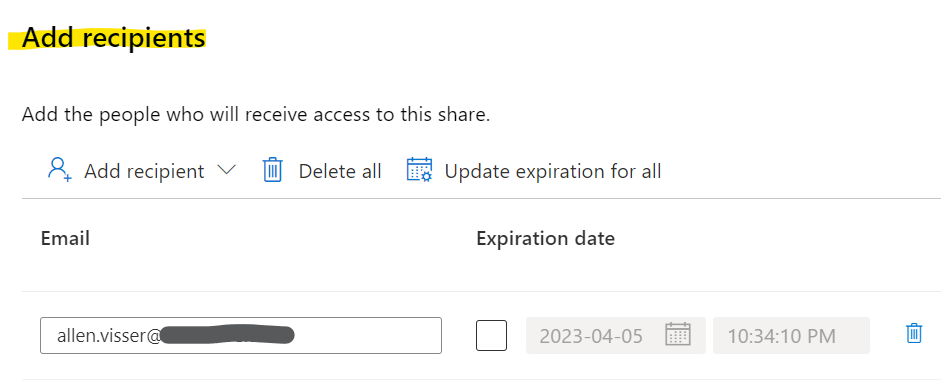
Select Add Recipient and select User or App (service principle) > Create and Share
Optionally, you can specify an Expiration date for when to terminate the share.
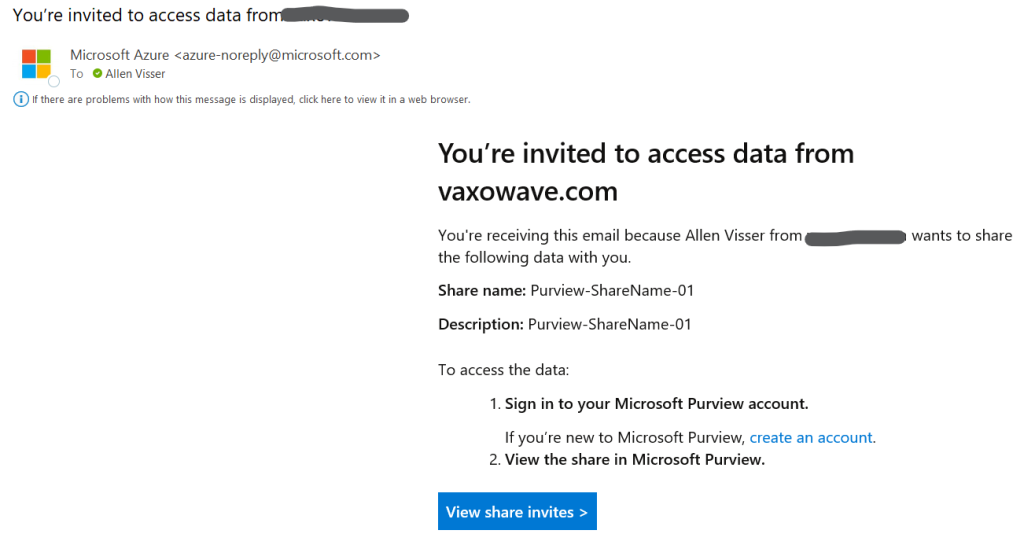
Your share has now been created. The recipients of your share will receive an invitation and they can view the share invitation in their Microsoft Purview account.
When a share is created, a new asset of type sent share is ingested into the Microsoft Purview catalog, in the same collection as the storage account from which you created the share. You can search for it like any other asset in the data catalog.

Step - 12 Microsoft Purview Data Sharing (preview): Receive Azure Storage data in-place
Microsoft Purview Data Sharing supports in-place data sharing from Azure Data Lake Storage (ADLS Gen2) to ADLS Gen2, and Blob storage account to Blob storage account.
Permissions:
Microsoft Purview: Reader permissions are needed on the Purview collection where the shared data is housed to view and manage Data Sharing.
Storage Account management: You need the Contributor or Owner or Storage Blob Data Owner or Storage Blob Data Contributor role on the target storage account.
The target storage account must be provisioned in the same Azure region as the source storage account.
The storage account needs to be registered in the collection where you’ll receive the share.
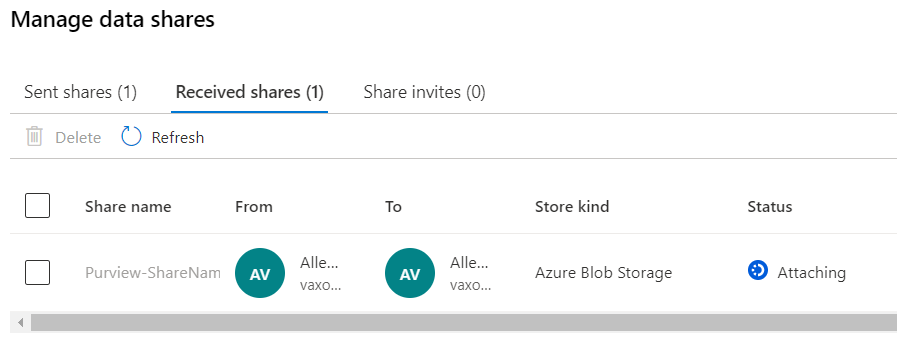
Received share
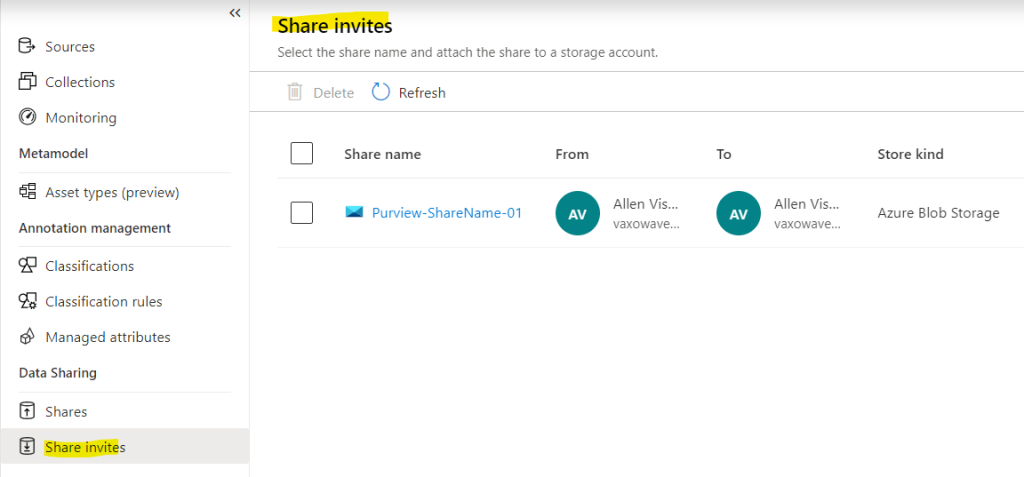
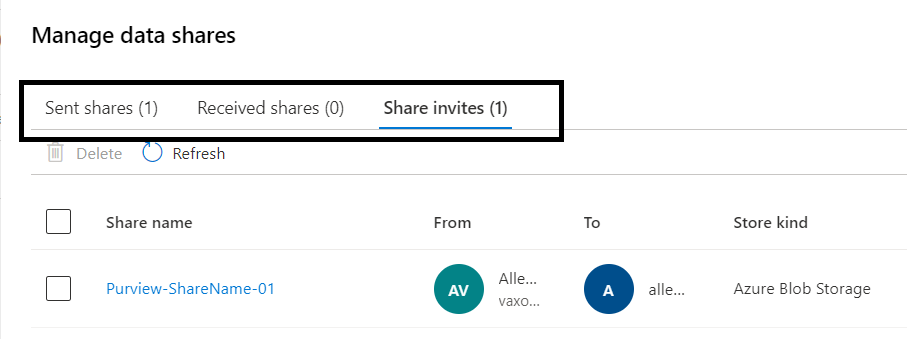
You may access your shared invites in two ways:
#1 In the Azure portal > select Microsoft Purview account you want to use to receive the share > Microsoft Purview governance portal > Data Map > Share invites,
#2 If you received an email invitation, you can also select the View share invite link in the email to select a Microsoft Purview account.
Alternately go to Microsoft Purview governance portal > Data Map > Collections > select your asset > Data Share > and manage the share accordingly. You can see all the invitations in the Share invites tab.
Edit a share name:
You can edit the Received share name if you like.
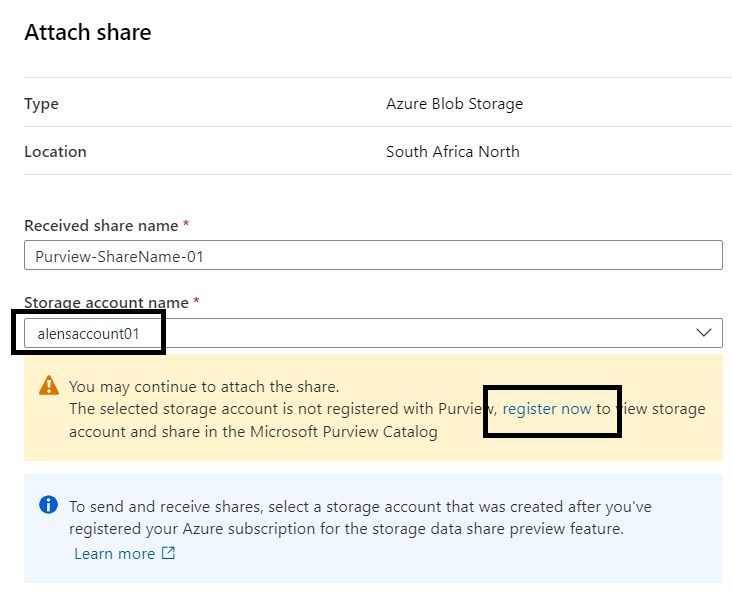
Microsoft Purview governance portal > Data Map > Collections > select your asset > Data Share > Share invites tab > select the share name >
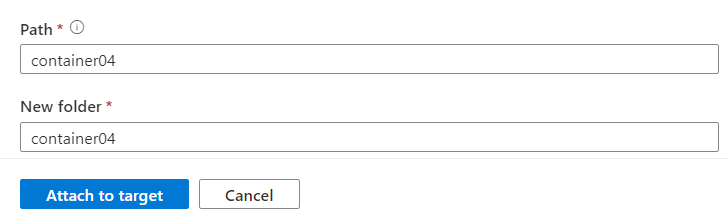
Select a Storage account name for a target storage account in the same region as the source. You can choose to Register a new storage account to attach the share in the drop-down as well.
Configure the Path (either a new container name, or the name of an existing share container) and, New folder (a new folder name for the share within in your container).
Select Attach to target.
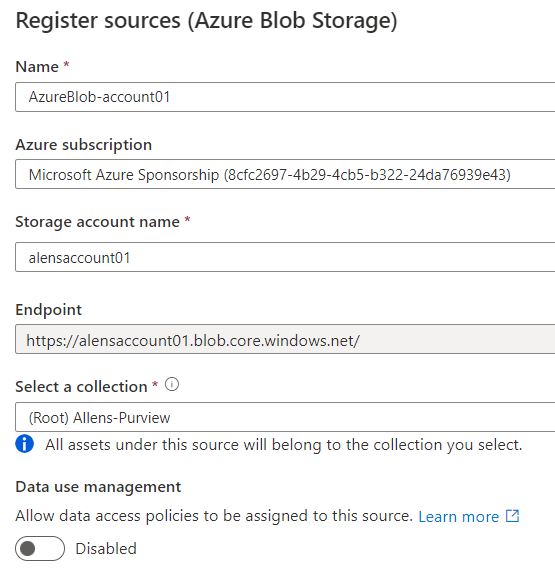
Register the Receive Storage Account if not previously registered.
Configure the Path (either a new container name, or the name of an existing share container) and, New folder (a new folder name for the share within in your container).
Select Attach to target.
You will notice the status of Attaching while the share is being created.
—