The aim of this blog is to simplify the basic deployment of your Azure Front Door. This blog unpacks the provisioning a premium tier AFD and connecting the Azure Front door to an Azure external load balancer backend (which will become the AFD orgin).
The next blog will explain how to configure private endpoints, as well as how to customize your Azure Front Door by applying your custom domain wildcard certificate which will be safely stored in an Azure key vault.
Preparation:
You may want to verify that you have all the required modules on your endpoint by running the following only once.
Install and update to the latest version of the Az PowerShell modules:
Install-Module -Name Az -Repository PSGallery -Force
Install-Module -Name Az.FrontDoor -Force
Update-Module -Name Az -Force
Deployment:
Step A – Create your new Resource Group container for your Azure Front Door resources:
$ResourceGroupName = "Allen-ECIF-AzFrontDoor"
$location = "uaenorth"
New-AzResourceGroup `
-Name $ResourceGroupName `
-Location $location `
-Tag @{CustomerName="Customer01"; AutoShutdownSchedule="None"; Environment="sandbox";}
Azure Front Door Deployment:
##Step 1 – Create the Azure Front Door Premium profile
#vars
$AFDName = "Allen-AzFrontDoor-Premium"
$ResourceGroupName = "Allen-ECIF-AzFrontDoor"
#script
$AzAFDprofile = New-AzFrontDoorCdnProfile `
    -ResourceGroupName $ResourceGroupName `
    -Name $AFDName `
    -SkuName Premium_AzureFrontDoor `
    -Location Global `
-Tag @{CustomerName="Customer01"; AutoShutdownSchedule="None"; Environment="sandbox";}##Step 2 – Create a public endpoint for your Azure Front Door profile
#vars
$EndpointName = 'Allens-AFD-frontendpoint'
$ResourceGroupName = "Allen-ECIF-AzFrontDoor"
#script
$AFDendpoint = New-AzFrontDoorCdnEndpoint `
    -EndpointName $EndpointName `
    -ProfileName $AFDName `
    -ResourceGroupName $ResourceGroupName `
-Location Global##Step 3 – Create a health probe
# Create health probe settings
$HealthProbeSetting = New-AzFrontDoorCdnOriginGroupHealthProbeSettingObject `
    -ProbeIntervalInSecond 100 `
    -ProbePath "/" `
    -ProbeRequestType HEAD `
    -ProbeProtocol Http
* using a probe method of HEAD instead of GET has a lighter payload for health probe traffic.
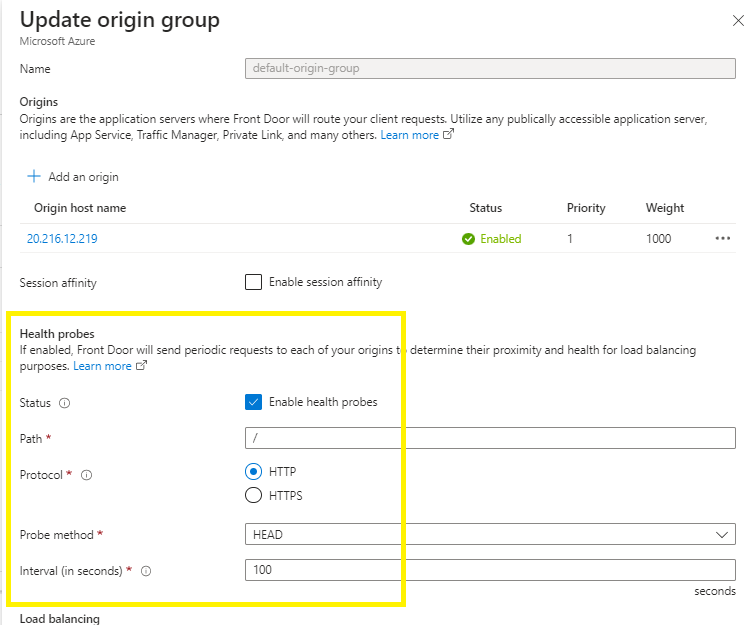
##Step 4 – Create load balancing settings
$LoadBalancingSetting = New-AzFrontDoorCdnOriginGroupLoadBalancingSettingObject `
    -AdditionalLatencyInMillisecond 50 `
    -SampleSize 4 `
-SuccessfulSamplesRequired 3##Step 5 – Create origin group
$OriginGroupName = 'Allens-origin-group'
$originpool = New-AzFrontDoorCdnOriginGroup `
    -OriginGroupName $OriginGroupName `
    -ProfileName $AFDName `
    -ResourceGroupName $ResourceGroupName `
    -HealthProbeSetting $HealthProbeSetting `
    -LoadBalancingSetting $LoadBalancingSetting
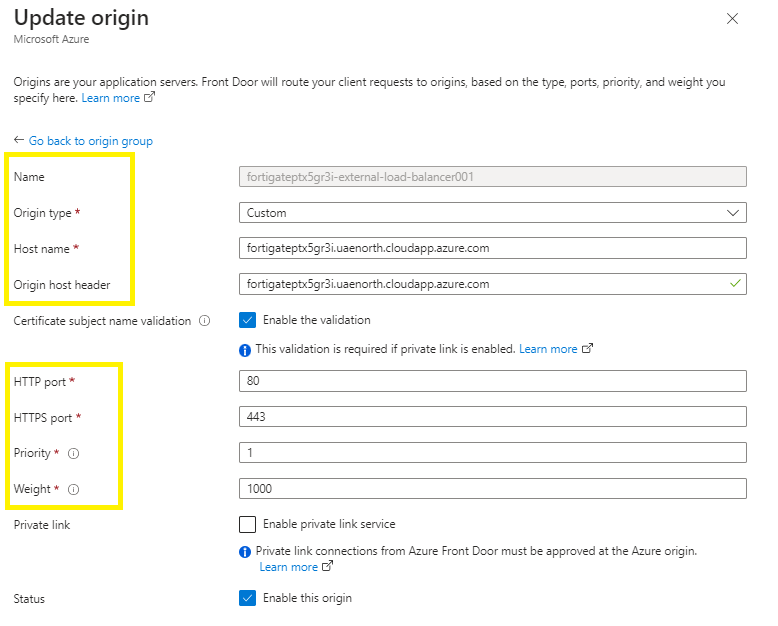
##Step 6 – Add an origin target (Back end Target) to a target group
OriginHostHeader and HostName are grabbed from the existing Fortigate external / internal azure load balancer backend target
New-AzFrontDoorCdnOrigin `
-OriginName 'fortigate-external-load-balancer001' `
-ResourceGroupName $ResourceGroupName `
-ProfileName $AFDName `
-OriginGroupName $OriginGroupName `
-HostName '20.233.90.92' `
-HttpPort 80 -HttpsPort 443 -Priority 1 -Weight 1000
The private link service needs to be enabled. That’s a great new feature provided by the premium tier. However this is not yet available in my clients region. I will append this blog when I deploy to a private endpoint.
Step 7 – Create a Route
This route maps your public facing endpoint to the backend origin group.
This route forwards requests from the public endpoint to your backend origin group.
Create a route to map the Front endpoint to the origin group
$Name = 'Allens-AFD-RouteRule'
$Route = New-AzFrontDoorCdnRoute `
    -EndpointName $EndpointName `
    -Name $Name `
    -ProfileName $AFDName `
    -ResourceGroupName $ResourceGroupName `
    -ForwardingProtocol MatchRequest `
    -HttpsRedirect Enabled `
    -LinkToDefaultDomain Enabled `
    -OriginGroupId $originpool.Id `
    -SupportedProtocol Http,Https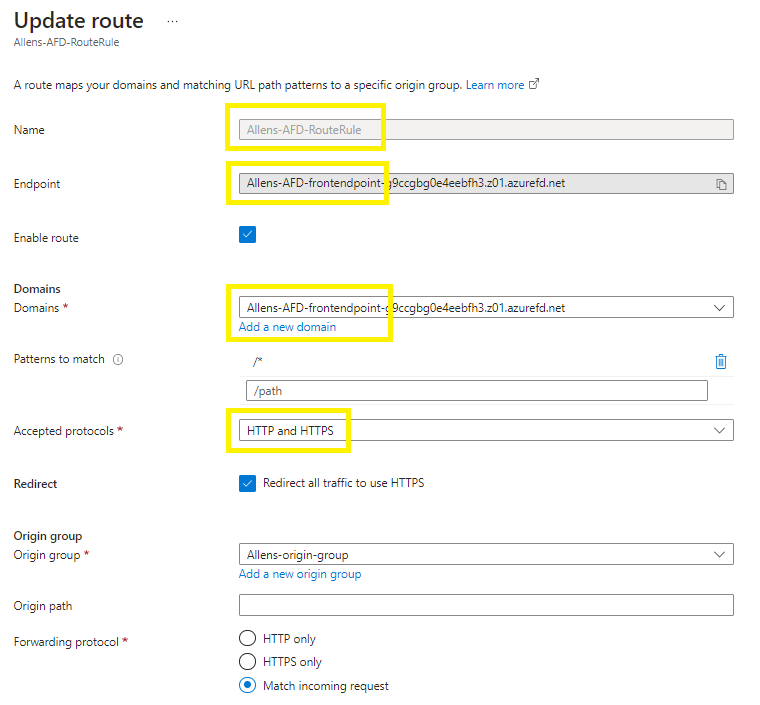
Step 8 – Create a no delete lock
<#apply a no-delete lock to the Azure Front Door#>
New-AzResourceLock `
-LockName "no-delete-customer-lock" `
-LockLevel CanNotDelete `
-LockNotes "No delete lock applied to this production resource" `
-Scope '/subscriptions/dc5a212d-1a63-4080-9102-80d829b54a5a/resourcegroups/Allen-ECIF-AzFrontDoor/providers/Microsoft.Cdn/profiles/Allen-AzFrontDoor-Premium' `
-Force

Step 9 – Create WAF policy
You will need to manually create the WAF policy via the Azure Portal.
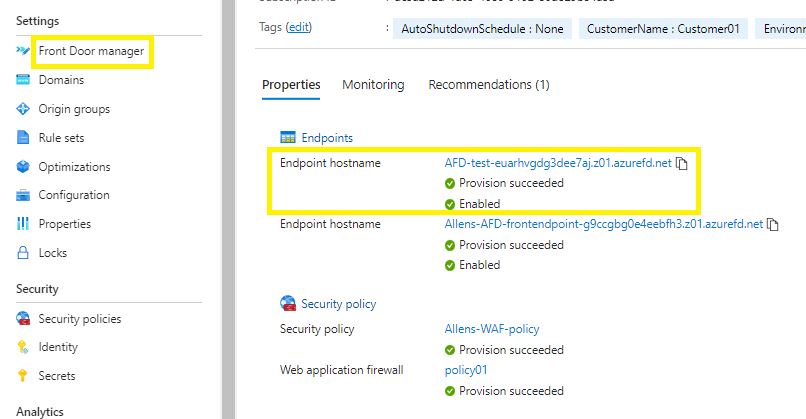
Verification
1. Test your Azure Front Door
Go to your Azure Front Door manager and copy any of your hostname endpoints, and paste into a browser. (Your newly provisioned AFD will take about 10 minutes to provision).
It’s hard to find knowledgeable people on this topic, but you sound like you know what you’re talking about! Thanks