A brute-force attack is simply explained as an attacker attempting to authenticate to a user account using multiple passwords, as opposed to a password spray.
I recently assisted a small client who doesn’t yet have the budget to invest in a SIEM/SOAR solution like Sentinel but is concerned about brute force attacks and account lockouts.
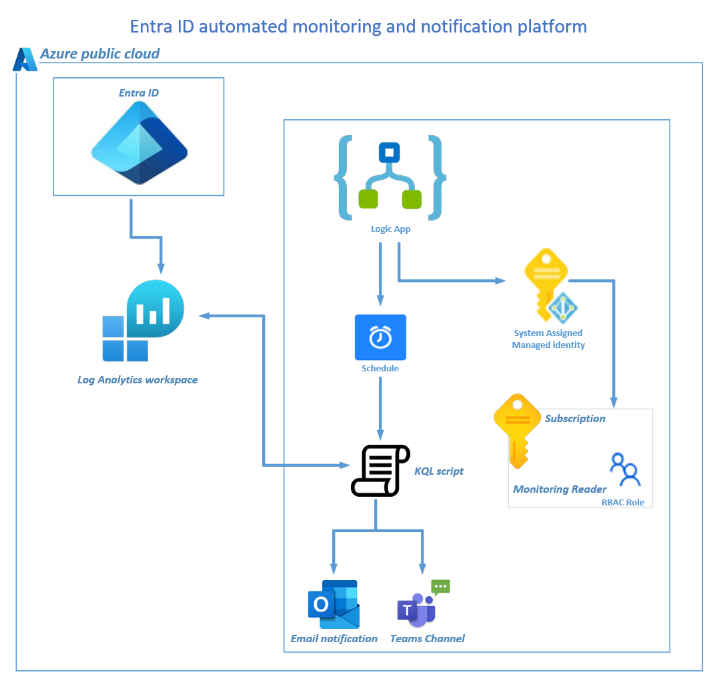
To help the client identify symptoms of a brute force attack, I created an automated monitoring and notification platform. It monitors the Entra ID logs and immediately notifies their team via email or Microsoft Teams whenever authentication failure activities occur on Entra ID user accounts.
This blog focuses on configuring an automation platform by deploying a logic app to monitor user accounts subject to unsuccessful authentications. The notification platform is configured to alert users immediately via email and Microsoft Teams.
Please note that this blog does not discuss Azure Smart Lockout or the customization of smart lockout settings in your organization to protect against brute force attacks, nor does it cover the multitude of brute force attack symptoms you could look for.
I have provided three KQL queries based on your bespoke query requirements:
The first query will search for a common IP address based on three unsuccessful attempts. (Be careful not to obsess over a single IP, as an attacker could use a DHCP-based device that changes their address with each deliberate login.)
The second query will search for all unsuccessful attempts. (This could become overwhelming in large organizations.)
The third query searches for all locked-out user accounts because a user tried to sign in too many times using an incorrect user ID or password, which generated error code 50053. This error code could be activated by Azure Smart Lockout.
Deployment Plan:
Step 1 – Provision a Log Analytics Workspace
Step 4 – Logic App Identity RBAC
Step 5 – Entra ID diagnostic settings
Deployment Steps:
Step 1 – Provision a Log Analytics Workspace
Create a log analytics workspace that will be used to centrally collect only your Entra ID audit logs. It is recommended to place this workspace into an Azure Monitor Private Link Scope logical container for added protection.
(Do not mix these logs with application or security logs).
My blog here demonstrates the the deployment of a Azure Monitor Private Link Scope if required.
Step 2 – Deploy a Logic App
Provision a Logic App. A simple consumption plan is good enough but you will lose redundancy.
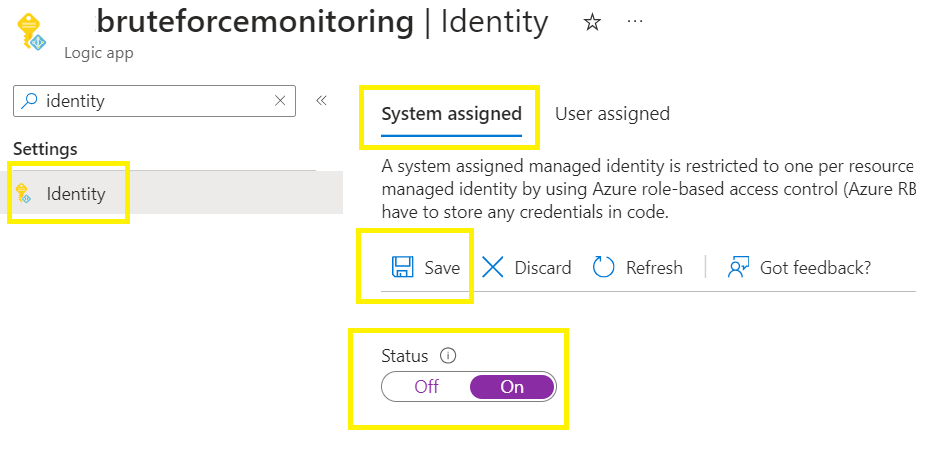
Step 3 – Logic App Identity
Once deployed, go to the new logic app,
Select Identity,
Select System Identity > switch ON > Save >
Enabled system assigned managed identity > Yes
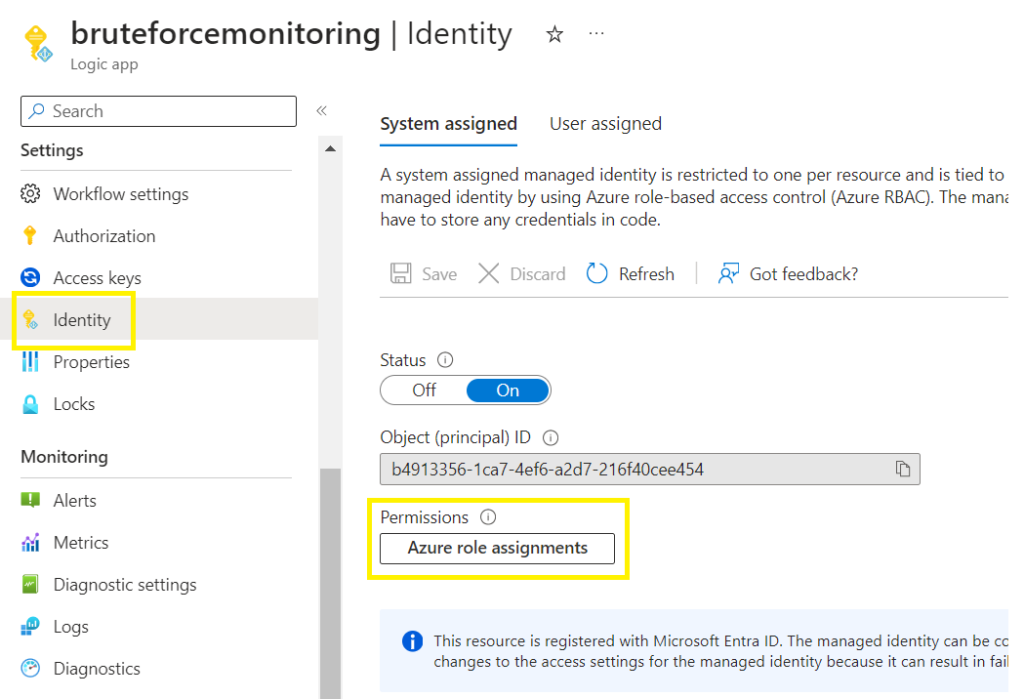
Step 4 – Logic App Identity RBAC
Click on the Azure role assignments button >
Click on Add role assignment (Preview)
Select the scope as subscription,
Select a target subscription (you need to add all subscriptions inside your tenant),
Select the role, following the Zero Trust Model’s Principle of Least Privilege Monitoring Reader

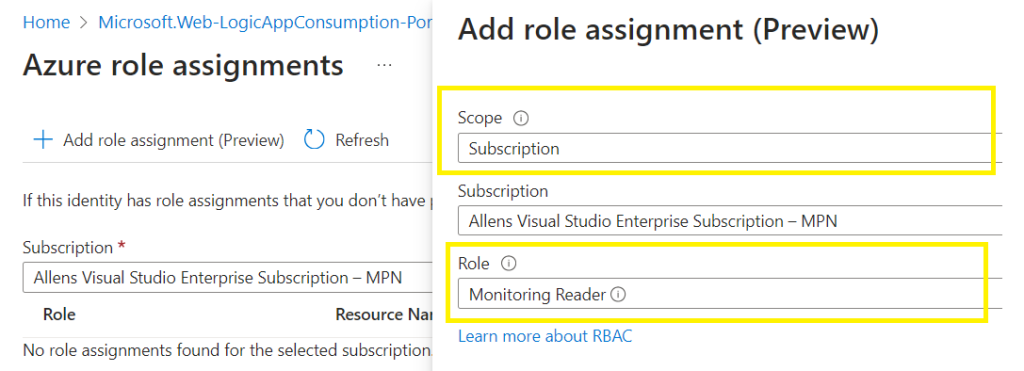
Select Save
Step 5 – Entra ID diagnostics settings
Lets configure an endpoint (log analytics workspace) into which to send the Entra ID diagnostic settings,
Go to Entra ID > Diagnostic settings >
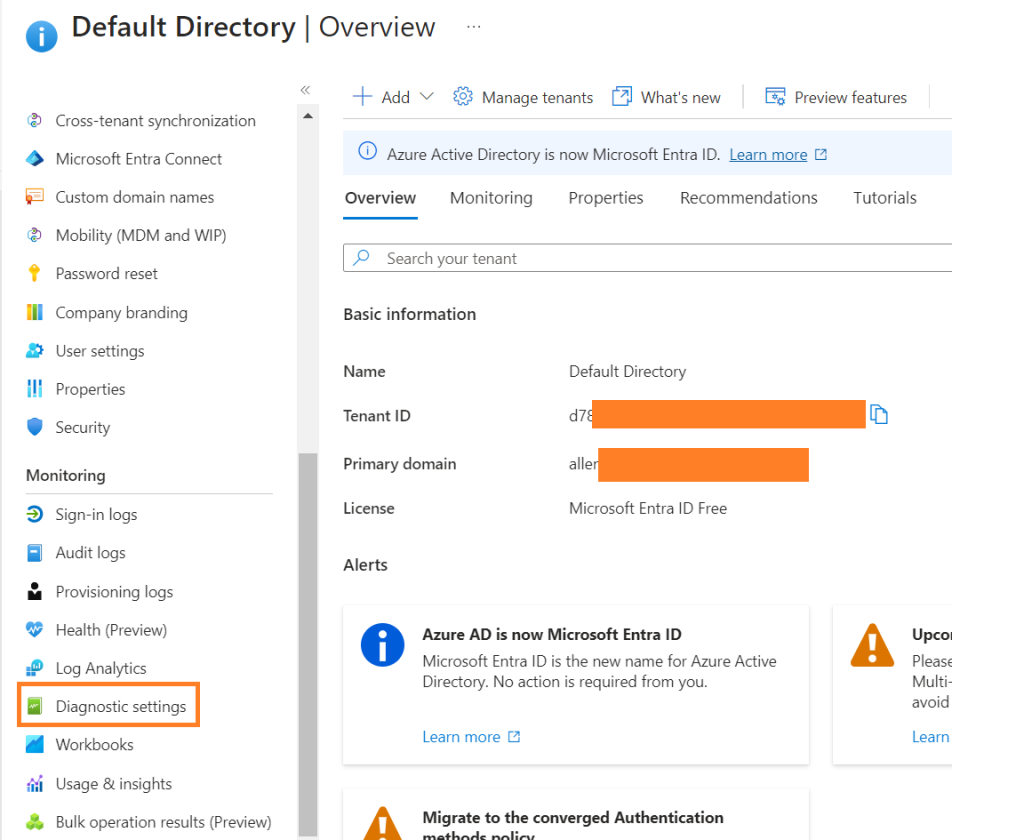
+ Add diagnostic setting,
Select the destination log analytics workspace,
Select the required log categories,
(*Remember that each category volume of data collected incurs costs at rest and in transit) so choose your categories carefully,

Select Save when done.
Step 6 – Kusto Query
The 1st Kusto queries the log analytics workspace logs and searches for disabled user accounts,
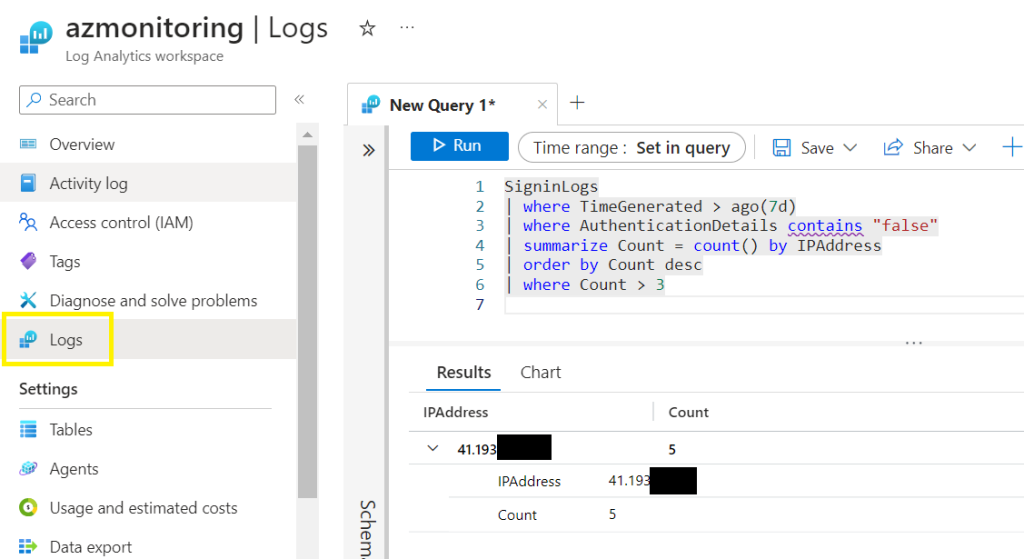
Go to Log Analytics Workspace > Logs > paste the custom KQL below,
My first KQL query shows a brute force attack coming from a single IP address with at least 3 failed authentication attempts.
(*Edit your time period accordingly)
SigninLogs
| where TimeGenerated > ago(40d) // Filter for logs generated more than 40 days ago
| where AuthenticationDetails contains "false" // Further filter for logs where authentication failed
| summarize Count = count() by IPAddress // Count and group by IP address
| order by Count desc // Order the results by count in descending order
| where Count > 3 // Filter for IP addresses with more than 3 failed attempts
| project IPAddress, Count // Select and display only the IPAddress and Count columns
The 2nd query will search any | all unsuccessful attempts. (This can become overwhelming in large environments, so you may need to filter this to event ID’s instead).
In my KQL query below, I have:
Searched all activities for the last 10 minutes (data is replicated between Entra ID to the log analytics workspace within 10 minutes),
I have included comments on every line for explanation,
// Extracting sign-in logs from the last 10 minutes
SigninLogs
| where TimeGenerated > ago(10m) // Filter logs to those generated in the last 10 minutes
| where AuthenticationDetails contains "false" // Filter logs where authentication details contain 'false'
| extend StatusSplit = split(Status, ",") // Split the 'Status' field into an array
| extend errorCode = StatusSplit[0] // Extract the error code from the 'Status' array
| extend failureReason = StatusSplit[1] // Extract the failure reason from the 'Status' array
| extend LocationDetailsSplit = split(LocationDetails, ",") // Split the 'LocationDetails' field into an array
| extend city = LocationDetailsSplit[0] // Extract the city from the 'LocationDetails' array
| extend state = LocationDetailsSplit[1] // Extract the state from the 'LocationDetails' array
| extend countryOrRegion = LocationDetailsSplit[2] // Extract the country or region from the 'LocationDetails' array
| extend AuthenticationDetailsSplit = split(AuthenticationDetails, ",") // Split the 'AuthenticationDetails' field into an array
| extend authenticationMethod = AuthenticationDetailsSplit[1] // Extract the authentication method from the 'AuthenticationDetails' array
| extend authenticationMethodDetail = AuthenticationDetailsSplit[2] // Extract details of the authentication method
| extend succeeded = AuthenticationDetailsSplit[3] // Extract the success status of the authentication
| extend authenticationStepResultDetail = AuthenticationDetailsSplit[4] // Extract detailed results of the authentication step
// Project selected fields to output
| project TimeGenerated, UserPrincipalName, UserDisplayName, errorCode, failureReason, ResultDescription, Identity, city, state, countryOrRegion, authenticationMethod, authenticationMethodDetail, succeeded, authenticationStepResultDetail, IPAddress
The 3rd KQL query searches for locked out user accounts because a user tried to sign in too many times using an incorrect user ID or password, which may be generated by Azure Smart Lockout.
// Query SigninLogs for entries over the last 10 minutes with a status containing "50053"
SigninLogs
| where TimeGenerated > ago(10m) and Status contains "50053"
// Split the Status field into an array and extend the table with errorCode and failureReason
| extend StatusSplit = split(Status, ",")
| extend errorCode = StatusSplit[0] // The error code is the first element of the split Status
| extend failureReason = StatusSplit[1] // The failure reason is the second element
// Split the LocationDetails field into an array and extend the table with city, state, and countryOrRegion
| extend LocationDetailsSplit = split(LocationDetails, ",")
| extend city = LocationDetailsSplit[0] // The city is the first element of the split LocationDetails
| extend state = LocationDetailsSplit[1] // The state is the second element
| extend countryOrRegion = LocationDetailsSplit[2] // The country or region is the third element
// Split the AuthenticationDetails field into an array and extend the table with authentication details
| extend AuthenticationDetailsSplit = split(AuthenticationDetails, ",")
| extend authenticationMethod = AuthenticationDetailsSplit[1] // The authentication method is the second element
| extend authenticationMethodDetail = AuthenticationDetailsSplit[2] // Details of the authentication method
| extend succeeded = AuthenticationDetailsSplit[3] // The result of the authentication (success/failure)
| extend authenticationStepResultDetail = AuthenticationDetailsSplit[4] // Detailed result of the authentication step
// Project the desired columns to display in the final output
| project TimeGenerated, UserPrincipalName, UserDisplayName, errorCode, failureReason, ResultDescription, Identity, city, state, countryOrRegion, authenticationMethod, authenticationMethodDetail, succeeded, authenticationStepResultDetail, IPAddress
After running the query above, you should receive an output below of all user account that experienced an unsuccessful authentication,

Now, lets automate this KQL query and configure a notification platform,
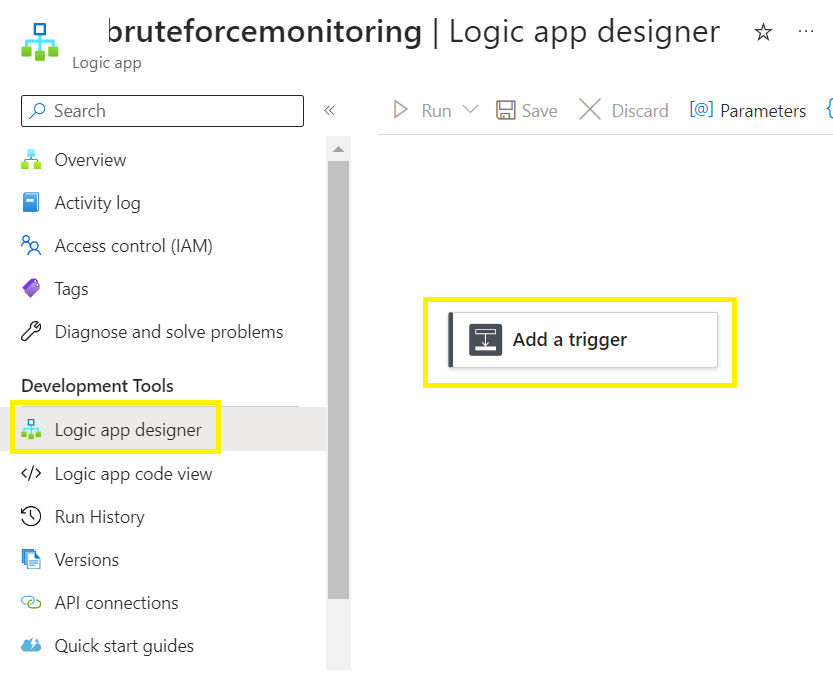
Step 7 – Logic App
Inside the logic app > go to the logic app designer,
Click on Add a trigger,
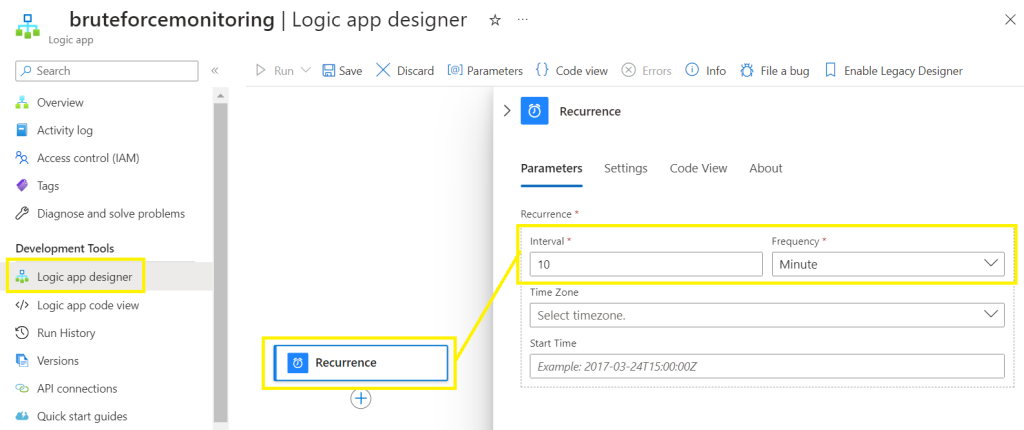
Search for recurring,
Find and select the Recurrence trigger

Configure the trigger to run on a recurring schedule of 10 minutes.
(It takes 5 – 8 minutes for Entra ID events to replicate to your storage),
Click on Save,
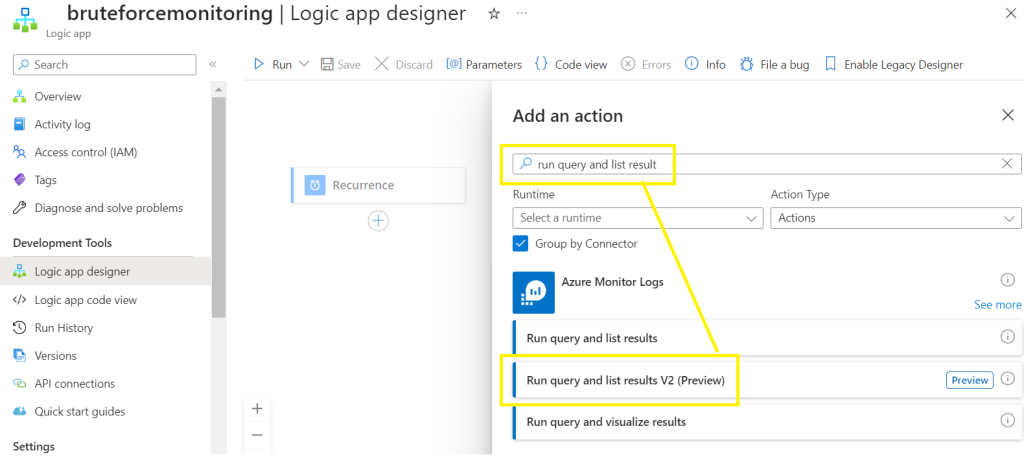
Click on Add an action

Search and select Run query and list result v2 (preview),
Create a connector,
Select the System Assigned Managed Identity you configured in step 2,
Click on Create New

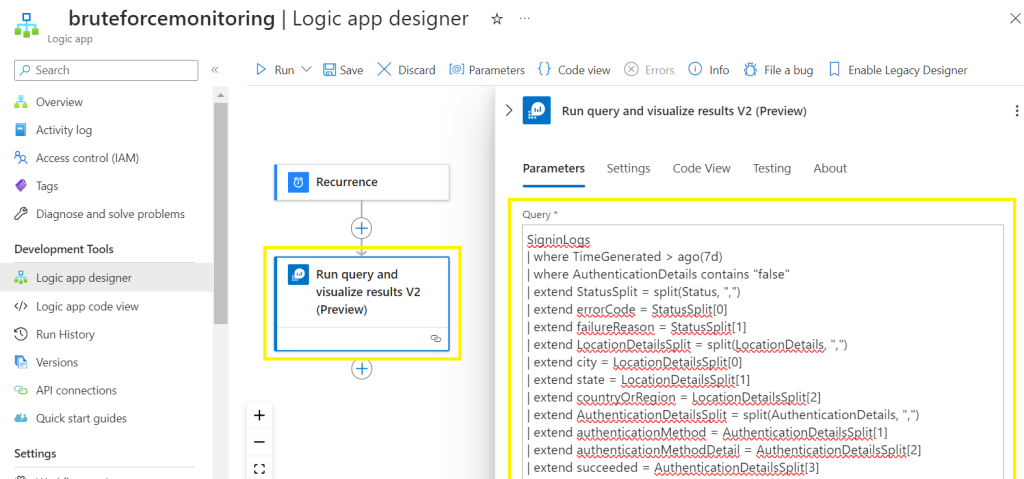
Paste the KQL query into the query section,
Select the subscription, resource group and resource type of source workspace location,
If your query contains a time range, then specify the time range as set in query,

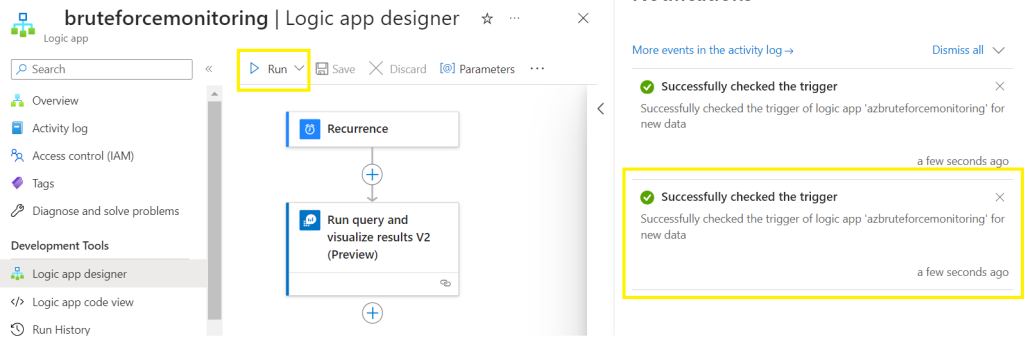
Click on Save and Run,
Make sure your query works as expected,
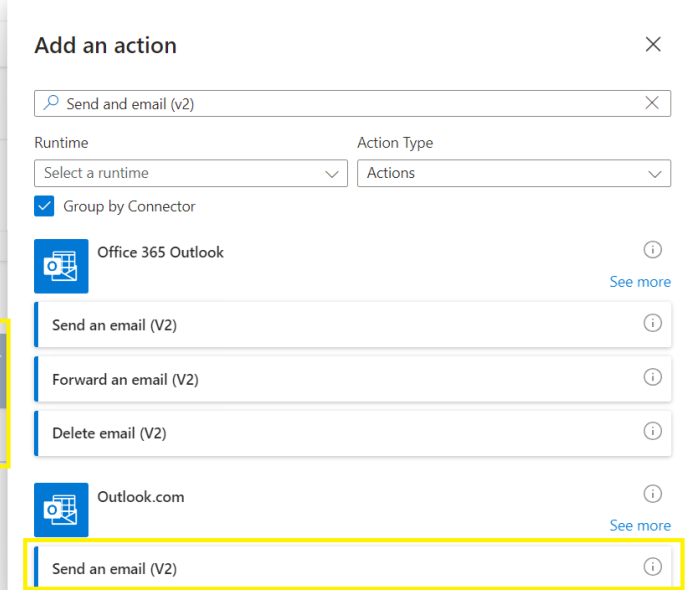
Click on Add an action,
Search and select Send and email (v2)
Select the destination mailbox type of your choice,
(In my sandbox Im using my Gmail account. To understand how to configure a O365 mailbox and Microsoft Teams channel instead, please read through my blog here)
Create Connection > Sign-in
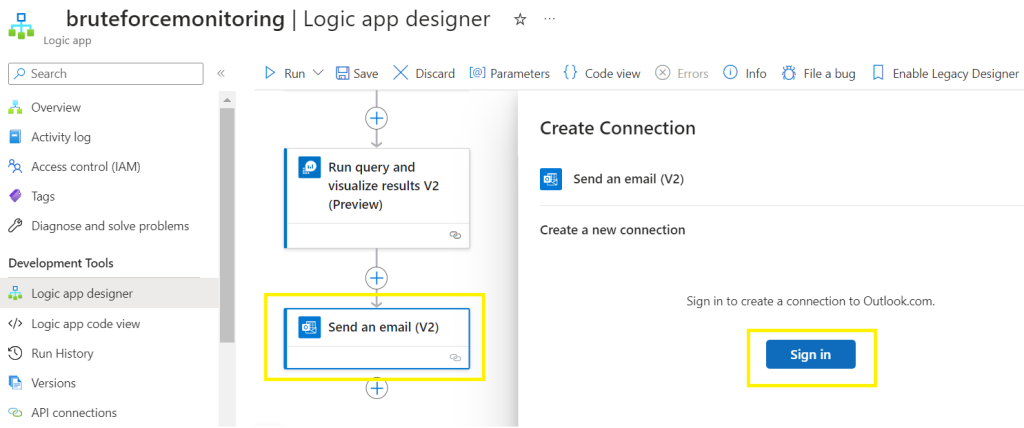
Configure the email settings:
Populate the To and Subject field,
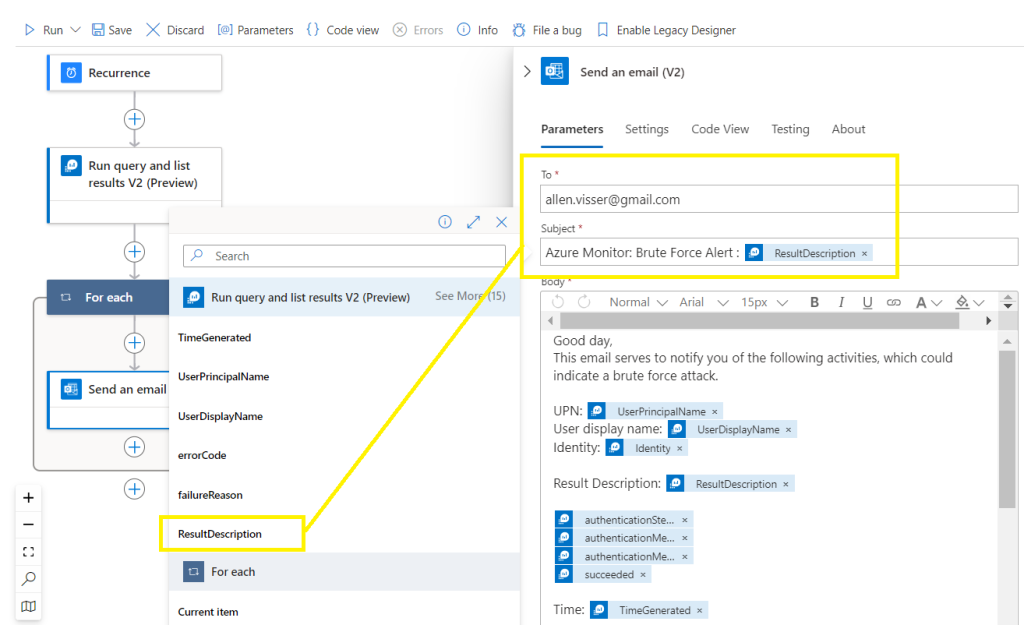
Populate the body of the email using your custom dynamic content fields,
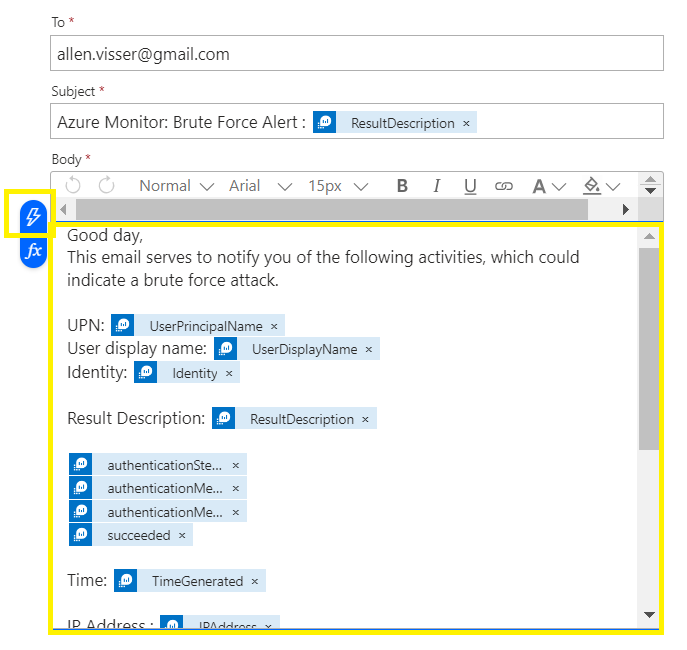
Save the design,
Run the design,
Step 8 – Verification
Go to Overview > click on the running task,

Verify that all the activities have completed successfully,

Step 9 – Outlook Email
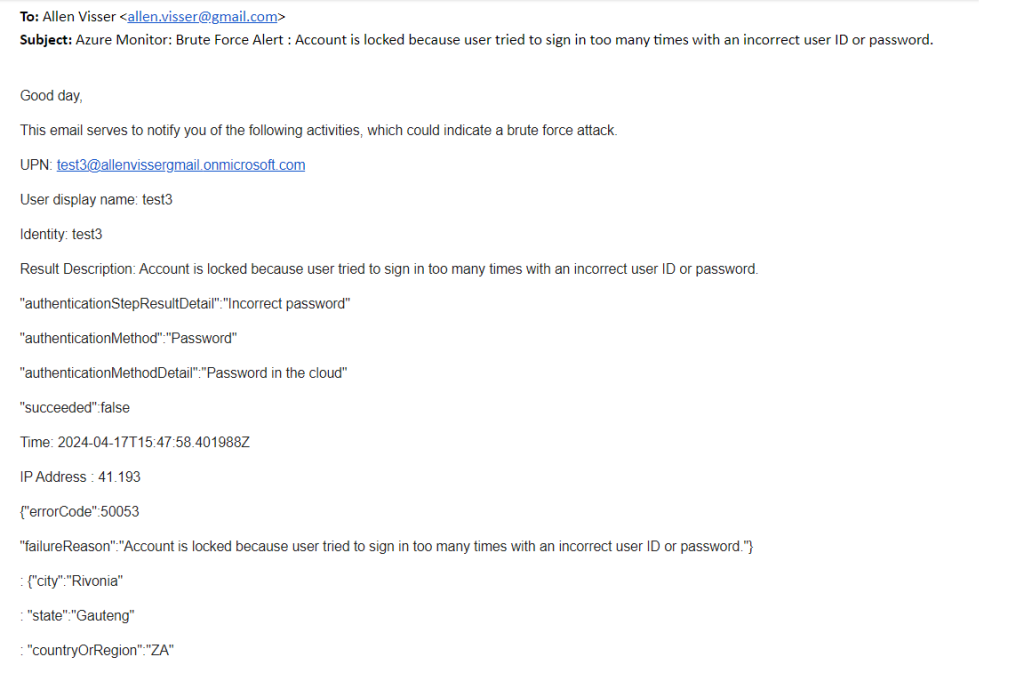
The dynamic content from the logic app will be displayed in your recipients Outlook email.
Step 10 – Microsoft Teams
If you wish to setup Microsoft Teams, then scroll to the bottom of this blog.
———-The End———–
— I hope this blog helped simplify the deployment of your Entra ID monitoring and notification automation platform solution —
Very nice articⅼe, jսst what I needed.
Thank you for sharing, the spend for enterprises with tools like defender and sentinel grows swiftly, reading through this share we could reduce some of that overhead for less critical operations (possibly).