I wrote this blog in an attempt to simplify and streamline the complexity of configuring Azure Monitoring testing of non public URL’s in disconnected / no ingress scenarios. I ran down numerous rabbit holes trying to figure this out and hopefully I have simplified this deployment and architecture for you, thus making your experience frustration free.
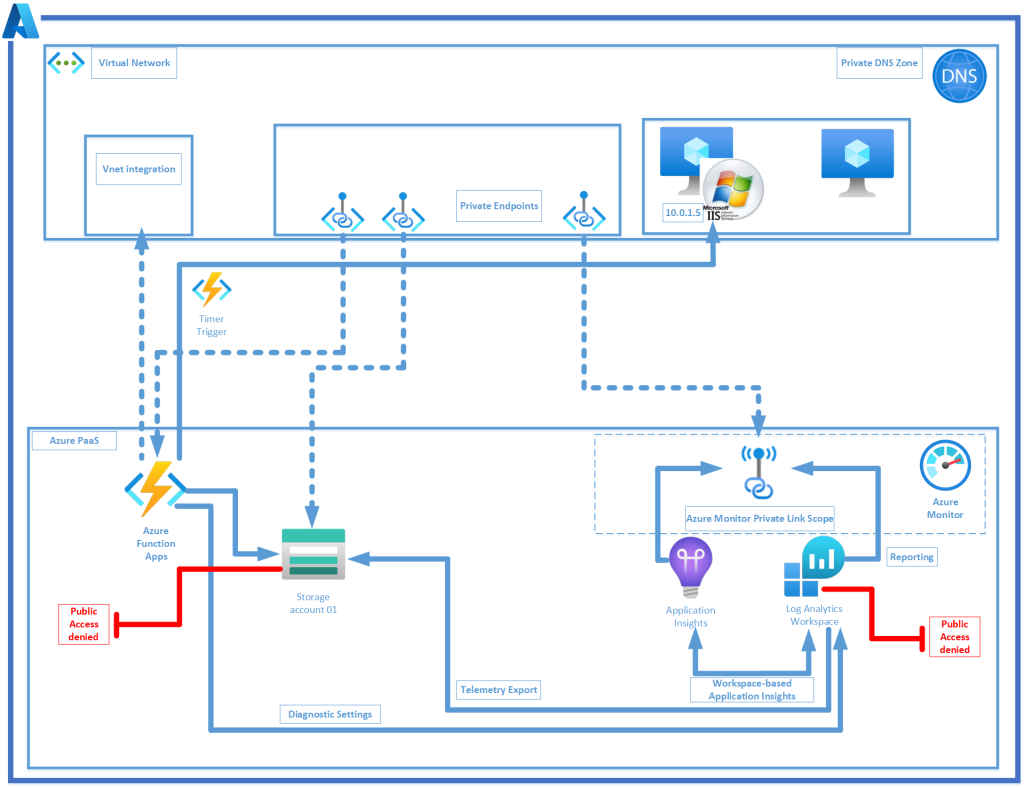
The point of this architecture is to enable you to perform the equivalent of Log Analtyics Availability tests on your internal (non public facing) web resources without having to modfiy any firewall rules to permit additional traffic. This is ideal in highly regulated enviroments such as banking clients. The entire architecture will use private endpoints and rely on the secure Azure Monitor Private Link Scope, thus ensuring all traffic is secured and never traverses the internet.
I have updated this procedure after having a client request that this scenario be tested with public access denial on the the Log Analytics Workspace and the storage account.
The Azure Resources that form part of this architecture are the following:
> Your existing internal trusted virtual network with your non public web servers,
The Deployment Process :
- Create a resource group,
- Create a Storage Account,
- Create a Log Analytics Workspace,
- Deploy an Internal DNS Zone,
- Workspace-based Application Insights provisioned with a private endpoint,
- Deploy the Azure Function App with vnet integration,
- Azure Monitor Private Link Scope (AMPLS),
- Log Analytics Workspace Lockdown,
- Verification of your Azure Resources,
- Timer Trigger Function code
Deployment Steps:
Step 1 - Create a resource group
Create a new resource group to centrally manage all your non-public url resources inside one containter.
$rgName = "resourcegroupname"
$location = "uaenorth"
New-AzResourceGroup `
-Name $rgName `
-Location $location `
-Tag @{CustomerName="Customer01"; `
AutoShutdownSchedule="None"; `
Environment="sandbox";}
Step 2 - Create a Storage Account
Lets start by creating a storage account which will be used by the Application Insights resource for telemetry export. This is a straight forward vanilla storage account deployment with a unique name.
$ResourceGroupName = '<rgname>'
$location = 'uaenorth'
$StorageAccName = '<staccname>'
$StorageType = 'Standard_LRS'

###create your storage account
New-AzStorageAccount `
-ResourceGroupName $ResourceGroupName `
-Name $StorageAccName `
-Type $StorageType `
-Location $location
Step 3 - Create a Log Analytics Workspace
Deploy a vanilla Log Analytics Workspace. This workspace will be workspace-based integrated with your Application Insights resource in the next step.
$ResourceGroupName = "<resourcegroupnamefromstep1>"
$WorkspaceName = "non-public-url-workspace"
$location = "uaenorth"

# Create the resource group if needed
try {
    Get-AzResourceGroup -Name $ResourceGroupName -ErrorAction Stop
} catch {
    New-AzResourceGroup -Name $ResourceGroupName -Location $Location
}

# Create the workspace
New-AzOperationalInsightsWorkspace -Location $location `
-Name $WorkspaceName -ResourceGroupName $ResourceGroupName
Step 4 - Deploy an Internal DNS Zone
To ensure that all your resources are communicating securely via the Azure fabric, they will be using private endpoints and the Azure Monitor Private Link Scope. This will require the provisioning of an internal DNS zone on a linked virtual network.
Step 5 - Deploy a Workspace-based Application Insights resource
Application Insights workspace-based resources means the integration of Application Insights and Log Analytics. Using workspace-based resources, Application Insights sends telemetry to a single consolidated common Log Analytics workspace, providing full access to the Log Analytics Workspace while keeping your application, infrastructure, and platform logs in a single consolidated location.
Go to Azure Portal > Application Insights > Create,
Complete the subscription, resource group,
Use a unique identifiable name for your Application Insights resource,
Place the Application Insights resource in a region close to your resources to avoid inter-regional costs,
Resource-mode > Workspace-based (to enable the integration between your Application Insights resource and the Log Analytics Workspace)
Log Analytics Workspace > select your pre-created LAW > Create.
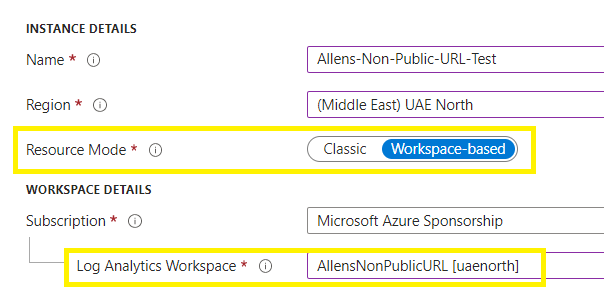
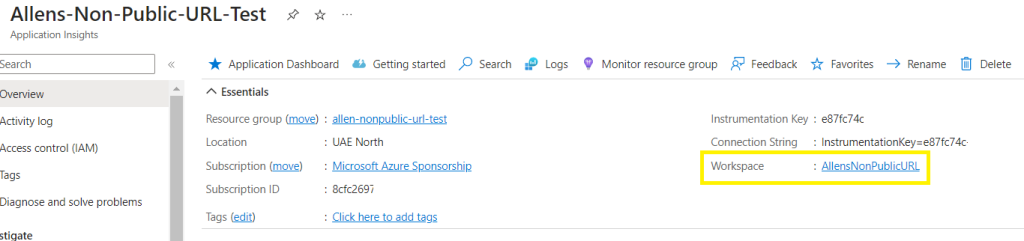
Upon completion, verify the workspace-based integration in the Application Insights Overview pane, the Log Analytics Workspace will appear as a link.
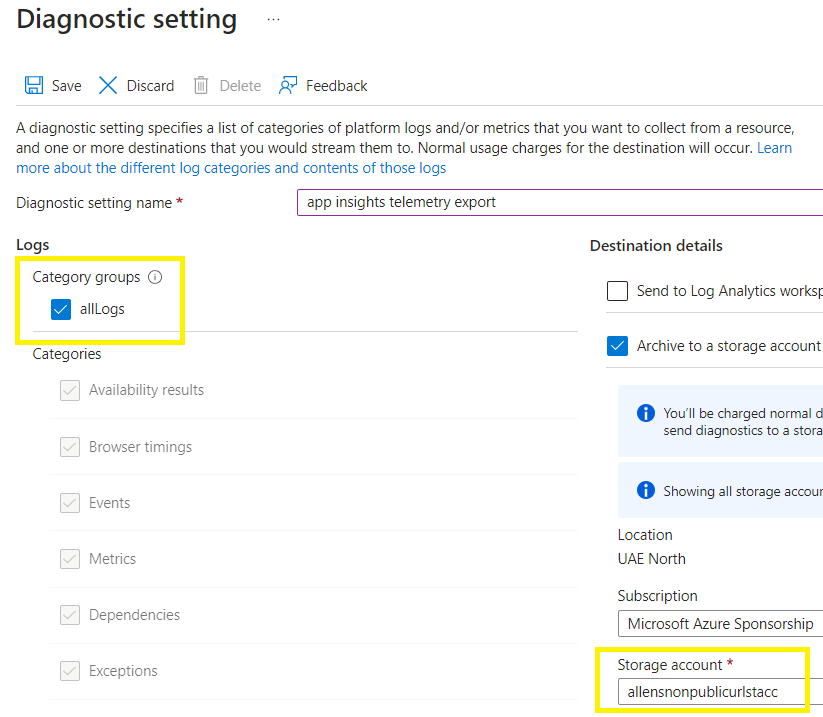
Post deployment of your Application Insights:
Export telemetry
On your Application Insights Resource > Diagnostic settings > Add diagnostic setting > send to a storage account >
Select all tables (or a subset of tables of your choice)
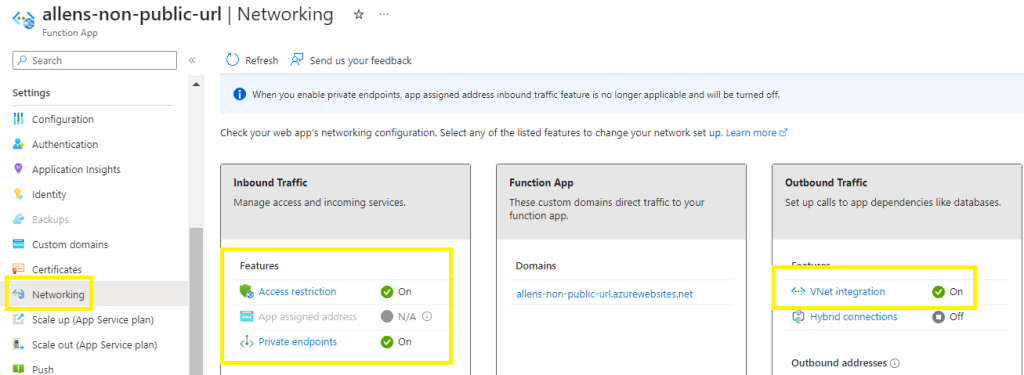
Step 6 - Deploy the Azure Function App with vnet integration
Deploy your Azure Function App and lets connect your Azure Functions to resources in your internal Azure virtual network by using private endpoints and virtual network integration.
Go to Azure Portal > Function App > Create
Basic Tab:
Complete the subscription, resource group, unique Function App name,
Choose to deploy as code or container > Code
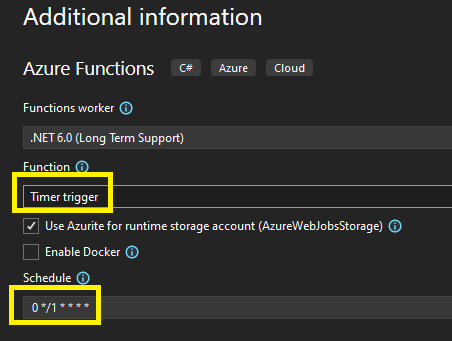
Runtime stack > .NET >
Version > 6 (LTS)
Region > nearest to the services >
Operating system > Windows
Plan > Functions Premium
Storage Tab:
Storage account > Point to the storage account that you pre-created in step 1.
Networking Tab:
Enable public access > Off
Enable network injection > On
Virtual Network > select your destination vnet
Inbound Access:
This step creates a private endpoint on your function app.
*To continue interacting with your function app from portal, you will need to connect to a vm on the virtual network.
Enable private endpoints > On
Private endpoint name > create a unique and easily identifiable endpoint name
Inbound subnet > New > (option to create a new dedicated subnet for your inbound private endpoint/s, or use a pre-created subnet. Multiple private endpoints may be added to this singular subnet).
DNS > Azure Private DNS Zone
Outbound Access:
(This step enable vnet integration of your function app with the virtual network and exposes options to create storage account private endpoints which restricts your storage account from network access on creation. When the function app is vnet integrated, all outbound traffic by default goes through the vnet.)
Enable VNet Integration > On
Outbound subnet > Create new > ( option to create a new dedicated subnet (or select a pre-configured subnet) for your function app’s VNet integration. A function app can only be vnet integrated with an empty subnet. To use your function app with virtual networks, you need to integrate it to a subnet. An integrated vnet cannot be used by any other resources.
Storage private endpoint:
The option to create a Storage Account private endpoints is displayed.
Add storage private endpoint > On
Private endpoint name > create a unique and easily identifiable endpoint name
Private endpoint subnet > Create New > (option to create a new dedicated subnet for your inbound private endpoint/s, or use a pre-created subnet. Multiple private endpoints may be added to this singular subnet).
DNS > Azure Private DNS Zone
Monitoring Tab:
Application Insights > Yes
(be aware of your region, if this is not available at this point, we will enable the Application Insights later on.)

Deployment tab:
Unless you plan to use Github, you may skip over this tab.
Create
Post Deployment:
Azure Function App:
Go to Azure Function > Application Insights >
Enable Application Insights:
Azure Function App > Application Insights > Turn on Application Insights >
*This step is important and required when publishing your visual studio project to Azure Function and is only required if you could not enable Application Insights under the under the Monitoring tab in the previous step).
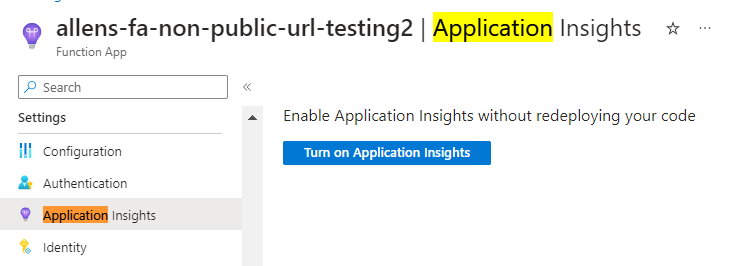
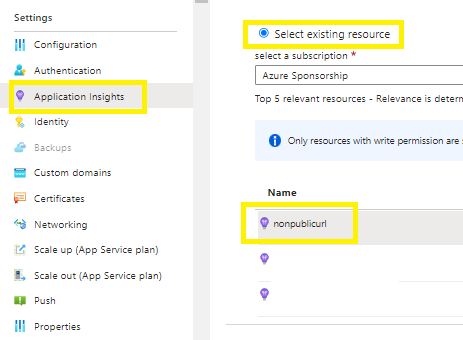
Select the pre-created Log Analytics Workspace to link to your Function App > Apply
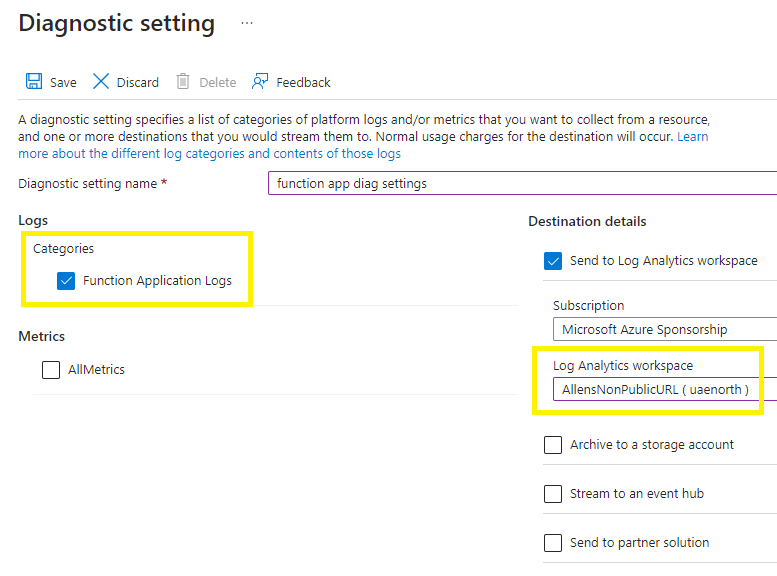
Function App > Diagnostic Settings > select the destination Log Analytics Workspace > Save
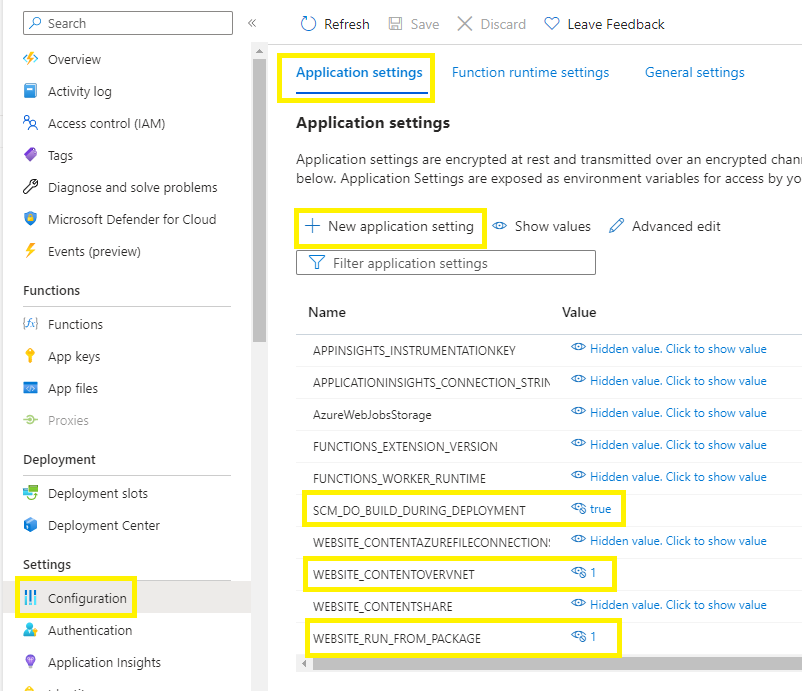
Go to Function App > Configurations > Application Settings > +New application setting > add the following entries:
| Setting | Suggested value | Description |
| WEBSITE_CONTENTOVERVNET | 1 | A value of 1 enables your function app to scale |
| WEBSITE_RUN_FROM_PACKAGE | 1 | Enables your function app to run from a package |
| SCM_DO_BUILD_DURING_DEPLOYMENT | true | Azure Functions can automatically perform builds on the code it receives after zip deployments |
Verify your network settings to ensure that all the Function App traffic is vnet integrated and using private endpoints.
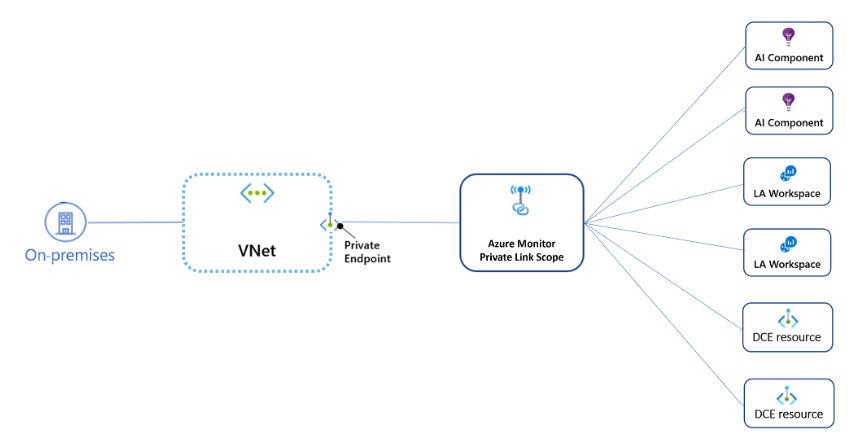
Step 7 - Deploy the Azure Monitor Privat Link Scope (AMPLS)
You can securely link your Azure platform as a service (PaaS) resources to your virtual network by using private endpoints. Azure Monitor is a cluster of different interconnected services that work together to monitor your workloads. An Azure Monitor private link connects a private endpoint to a cluster of Azure Monitor resources to define the boundaries of your monitoring network. That set is called an Azure Monitor Private Link Scope (AMPLS).
Instead of creating multiple private links for each resource the virtual network connects to, Azure Monitor uses a single private link connection, from the virtual network to an AMPLS. AMPLS is the set of all Azure Monitor resources to which a virtual network connects through a private link.
Only a single AMPLS resource should be created for all networks that share the same DNS.
Click here to understand the recommended design around AMPLS.
Go to Azure Portal > search for Azure Monitor Private Link Scope > Create
Complete the subscription, resource group,
Provide a unique AMPLS name > Create
Take note of your access modes. Privately only will only permit connectivity between all resources connected via the AMPLS. If you have resources not all traversing the AMPLS, then select the Open mode.
I am choosing to use Open mode since only the Application Insights and Azure Function is going to be connecting via the AMPLS.
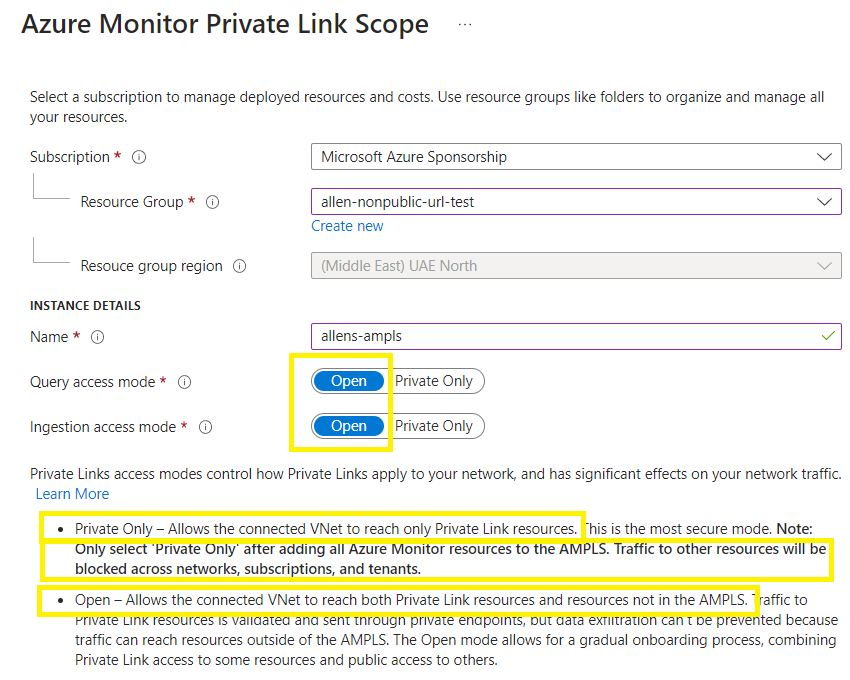
You can edit the modes post-deployment if you want to tighten the traffic.

Connecting your Azure Monitor resources:
The aim will be to connect your AMPLS Azure Monitor to the following resources later on:
- Log Analytics workspaces,
- Application Insights components
Create your AMPLS private endpoint:
Create a private endpoint to connect your AMPLS to your private network:
- In your AMPLS > go to Private Endpoint connections > + Private Endpoint
Basic tab:
Input your subscription, resource group fields,
Add a custom unique instance name,
Nic name will populate accordingly,
select the region,
Resource tab:
Connection Method = Connect to an Azure resource in my directory,
Subscription,
Resource type = Microsoft.insights/privateLinkScopes
Resource > select your custom created AMPLS unique name
Target sub-resource > azuremonitor
Virtual Network tab:
Select your destination internal vnet and subnet (any subnet is an option except for you vnet integration subnet).
Network policy for private endpoints, you may edit if you need to apply network security groups or route tables to the subnet that contains the private endpoint,
Private IP configuration, by default, Dynamically allocate IP address,
Application Security Group is optional as per your needs,
DNS tab:
Select Yes for Integrate with private DNS zone unless you prefer to manage your DNS records manually,
Select the subscription and resource group where these resources will be contained.
Remember to use the correct resource group container for your target DNS zone! Else you will join the private endpoints to the wrong DNS zone!
Skips the Tags tab if you are using Azure policies for tagging,
Review and Create.
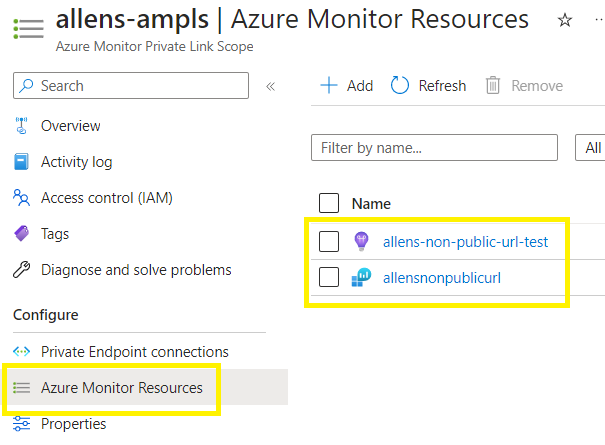
Go to Portal > AMPLS > Azure Monitor Resources > Add > Select the individual target resources which will be linked to the AMPLS (log analytics workspace and application insights) > Apply
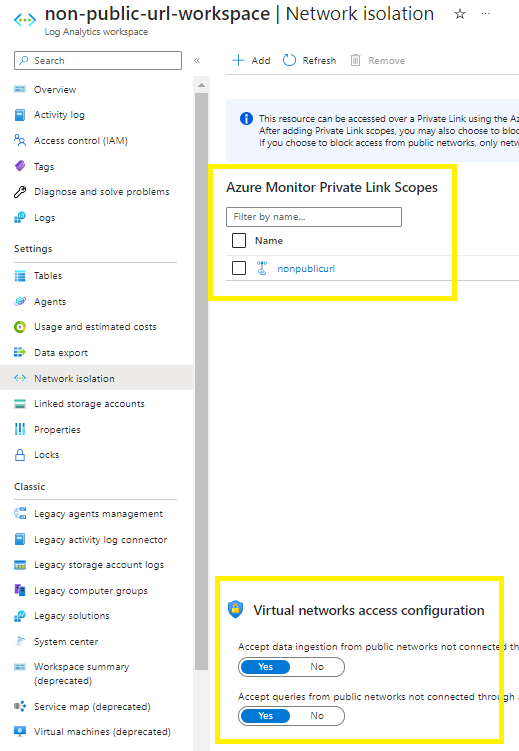
Step 8 - Log Analytics Workspace Lockdown
To secure your Log Analytics Workspace:
Go to network isolation > you will find the log analytics workspace now connected to the AMPLS,
To prevent public access to your log analytics workspace:
No = Accept data ingestion from public networks not connected through a Private Link Scope
No = Accept queries from public networks not connected through a Private Link Scope
Step 9 - Verification of your Azure Resources
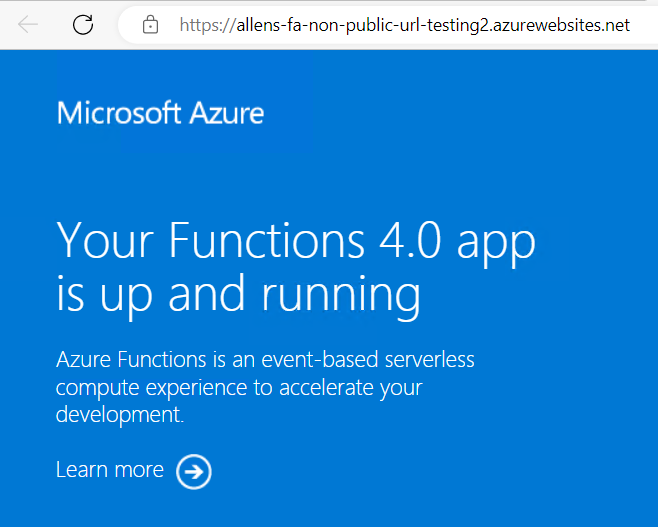
9.1 Verifying your Azure Function App
Remember, now that all your resources are locked down and forced to route via the AMPLS, you will need to connect and work via a vm on your internal destination virtual network.
Via your internal virtual machine > verify that your Azure Function App is both, working and that you are able to connect to the Function App.
Go to Function App > go to Overview > browse from a local vm on the internal vnet, you should get the following screen.
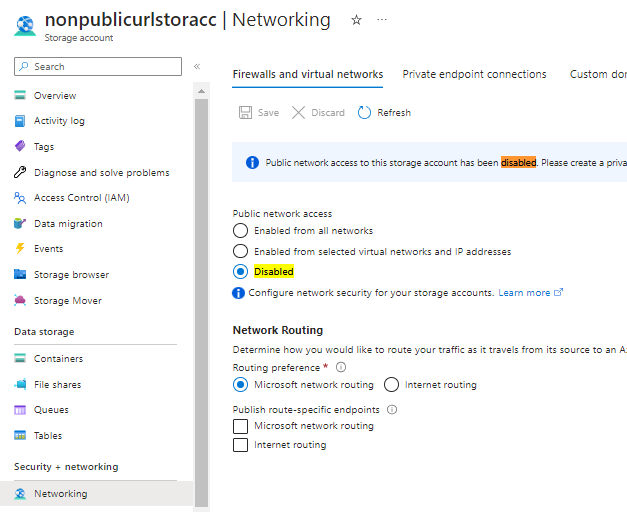
9.2 Verifying your Storage Account Lockdown
Ensure that your Storage Account has no public access, go to Networking > Firewalls and virtual networks tab and verify that your Public network access = Disabled.
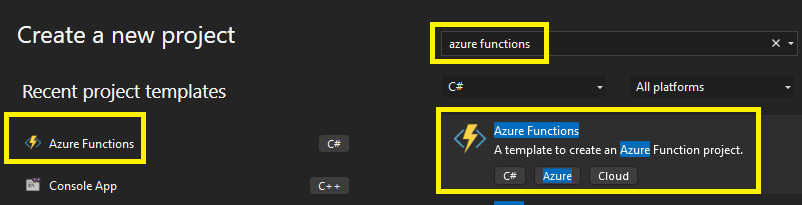
Step 10 - Creating your Timer Trigger Function
Step 1 – Create a new Visual studio Function App Project
Ive chosen to create a Timer Trigger and for testing purposes – set the interval at 1 minute.
Add Manage a Nuget package > Microsoft.ApplicationInsight to your new project

Now edit the function.cs file and your local.settings.json as per below.
Override your current entries by copying and paste the contents from here
After you have updated the 2 files > Save All.

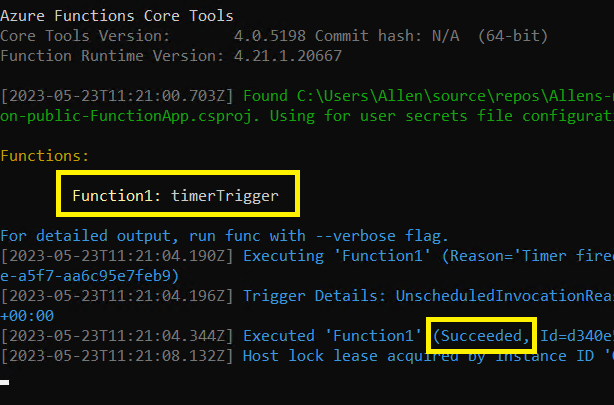
Step 3 – Run the project to make sure your TimerTrigger Function succeeds.
(Now its time to build your project and then deploy it in the next few steps)
Step 4 – Build your project

Step 4 – Publish your project
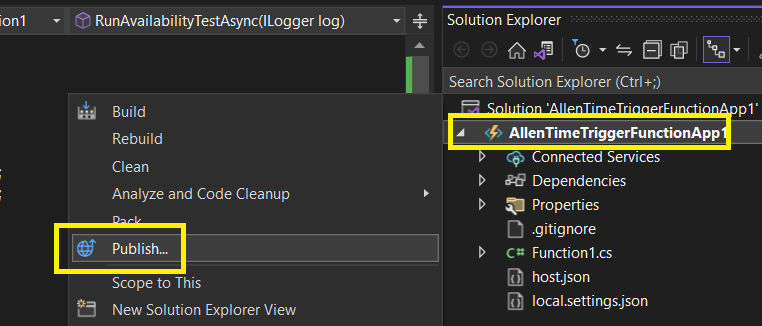
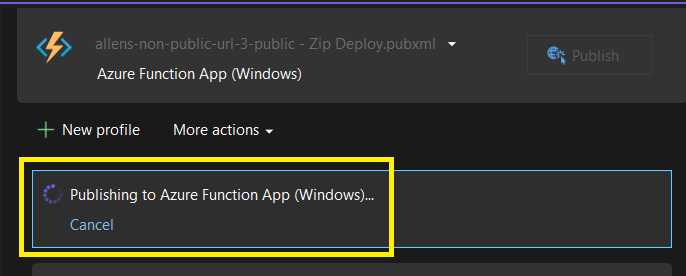
Step 5 – Publish to Azure Function App
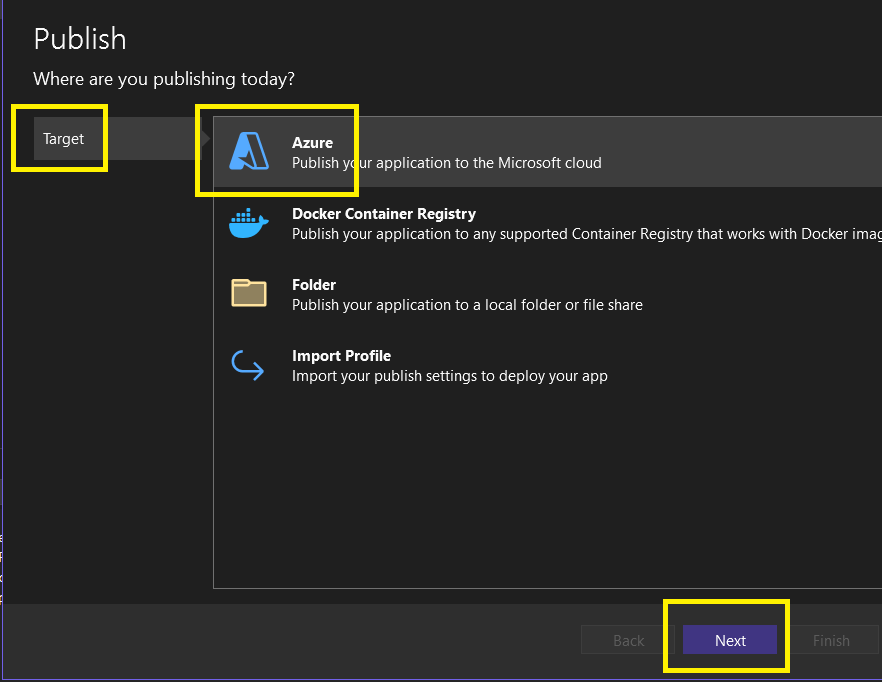
Step 6 – Publish to Azure Function (Windows) as per your runtime stack
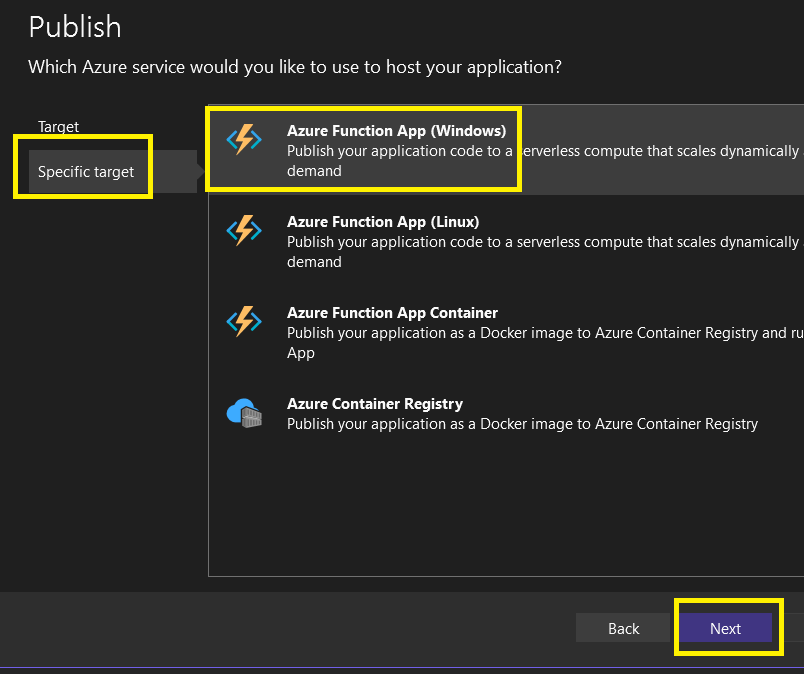
Step 7 – Publish to your destination Azure Function App
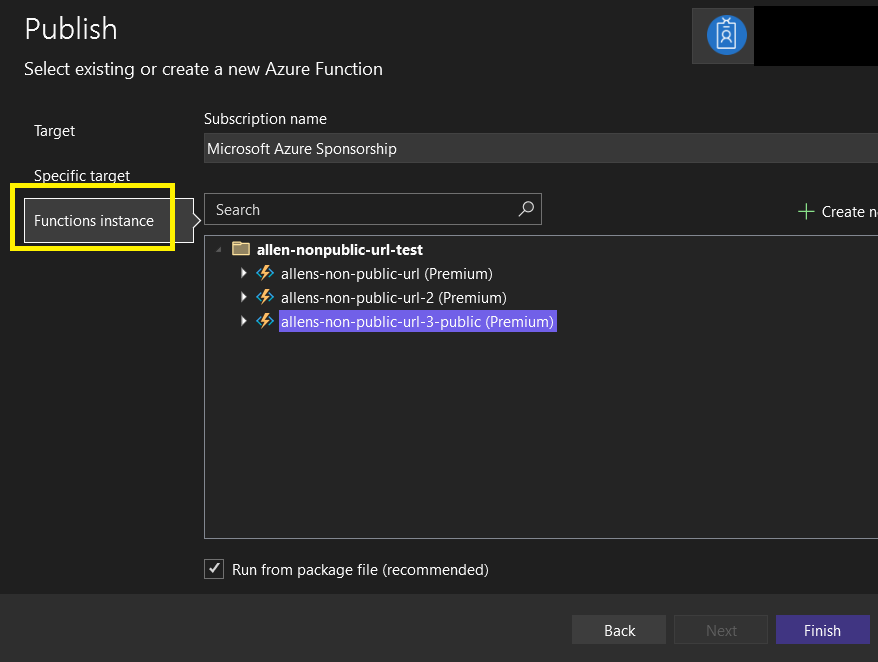
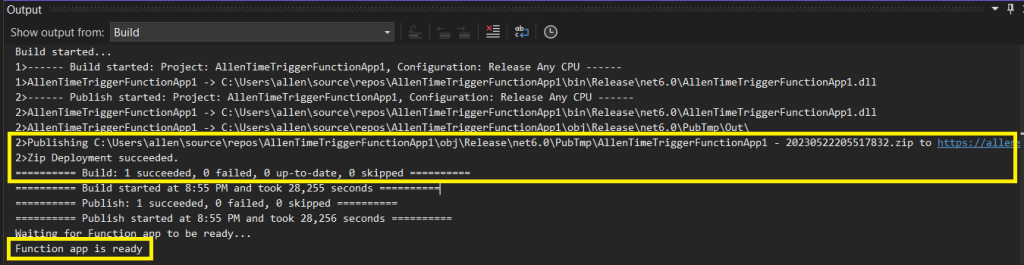
Step 8 – When your project is successfully published to the Azure Function App > close
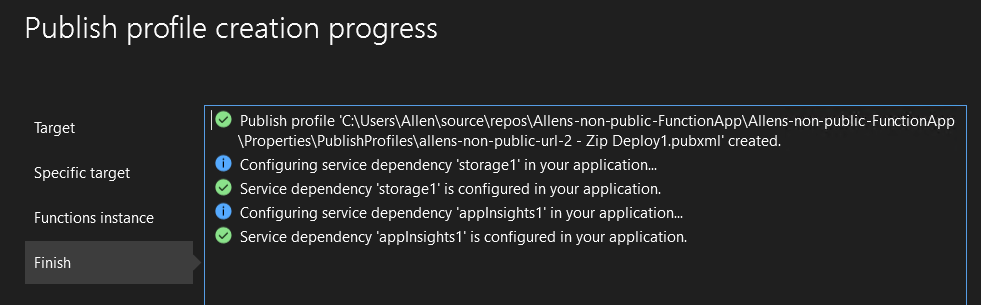
Step 9 – Publish your project to Azure Function App
In progress
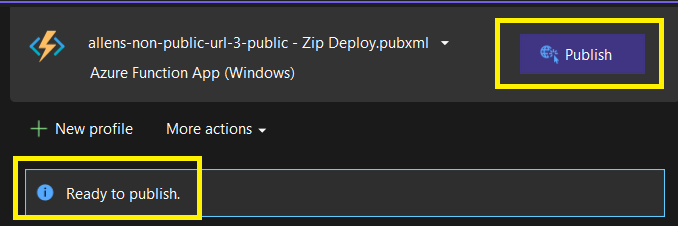
Verification of a successful publication to your Azure Function App
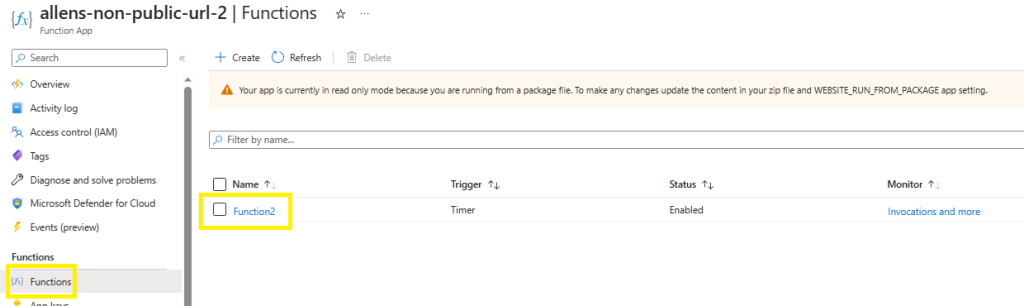
Step 10 – Go to Azure Function > Function
You should now see your Timer Trigger Function uploaded from your local endpoint to Function App as a Function.
Step 11 – Verification of the Timer Trigger
Depending on the Timer Trigger frequency you configured, you should begin to see results.
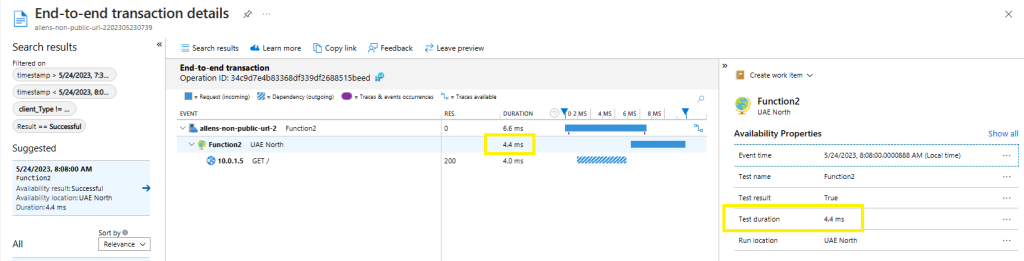
Go to Application Insights > Availability
Select your availability test to expand on.
On the Overall section, click on the Failed / Successful bar to deep dive the end-to-end results.

Verification of the successful transaction details.
—The End—
Thank you for sharing superb informations. Your site is so cool. I’m impressed by the details that you抳e on this blog. It reveals how nicely you understand this subject. Bookmarked this website page, will come back for more articles. You, my pal, ROCK! I found simply the info I already searched all over the place and just couldn’t come across. What an ideal web-site.
Thank you for the sensible critique. Me and my neighbor were just preparing to do some research on this. We got a grab a book from our local library but I think I learned more clear from this post. I’m very glad to see such wonderful info being shared freely out there.
Hey there, You’ve done an excellent job. I will certainly digg it and personally recommend to my friends. I’m confident they’ll be benefited from this website.
Nice read, I just passed this onto a friend who was doing some research on that. And he just bought me lunch because I found it for him smile So let me rephrase that: Thank you for lunch!
Its like you learn my mind! You seem to grasp so much approximately this, like you wrote the ebook in it or something. I feel that you simply could do with some percent to force the message house a little bit, however instead of that, that is magnificent blog. An excellent read. I’ll definitely be back.
Woh I love your content, saved to my bookmarks! .
I am glad to be one of many visitors on this outstanding internet site (:, regards for posting.
Spot on with this write-up, I actually believe this web site needs far more attention. I’ll probably
be returning to see more, thanks for the information!
I’m really impressed with your writing skills and also with the
layout on your weblog. Is this a paid theme or did you customize it yourself?
Anyway keep up the excellent quality writing, it is rare to see a great blog like this
one these days.
Hello, I enjoy reading through your post. I like to write a little comment to support you.
Nice i really enjoyed reading your blogs. Keep on posting. Thanks
magnificent put up, very informative. I ponder why the other specialists of this sector don’t realize this. You must continue your writing. I am sure, you have a great readers’ base already!
Wow, wonderful blog structure! How lengthy have you ever been blogging for? you make running a blog look easy. The overall look of your website is wonderful, as neatly as the content!
Hey There. I found your blog using msn. This is a really well written article. I?ll be sure to bookmark it and return to read more of your useful info. Thanks for the post. I will certainly comeback.
Hi, I do believe this is a great site. I stumbledupon it 😉 I may come back once again since I book marked it. Money and freedom is the greatest way to change, may you be rich and continue to help others.
you are actually a excellent webmaster. The site loading speed is amazing. It sort of feels that you are doing any distinctive trick. Furthermore, The contents are masterwork. you’ve done a fantastic job in this topic!
It’s hard to find knowledgeable people on this topic, but you seem like you know what you’re talking about! Thanks
This is very interesting, You’re a very skilled blogger.
I have joined your rss feed and look forward to seeking more of your fantastic
post. Also, I have shared your website in my social networks!
Wow, wonderful blog layout! How long have you been blogging for?
you made blogging look easy. The overall
look of your website is fantastic, let alone the content!
This site was… how do I say it? Relevant!! Finally I’ve found something which helped me.
Many thanks!
Thanks for sharing such a pleasant thought, piece of
writing is nice, thats why i have read it completely
Wow, that’s what I was seeking for, what a information! existing here at
this weblog, thanks admin of this web page.
Look at my web-site :: 메이저사이트
Excellent post. I was checking continuously this blog and I’m impressed!
Extremely helpful info specifically the last part 🙂
I care for such info much. I was seeking this certain info for a long
time. Thank you and best of luck.
Good web site you’ve got here.. It’s hard to find good quality writing like yours nowadays. I honestly appreciate individuals like you! Take care!!