The aim of this blog is to help you build a simple Azure Monitor Ingestion Time Transformation solution.
By using Ingestion Time Transformation you have the ability to apply an ETL concept to modify or filter out irrelevant or sensitive data before it is stored in your Log Analytics workspace.
Advantages of Ingestion Time Transformation
-Filtering or remove sensitive data – if you don’t want stored for privacy or compliancy reasons.
-Enriching data with additional or calculated information that provides business context or simplifies querying the data later.
-Reduce data costs due to being charged for ingestion costs for any data sent to a Log Analytics workspace, you want to filter out any data that you don’t require to reduce your costs.
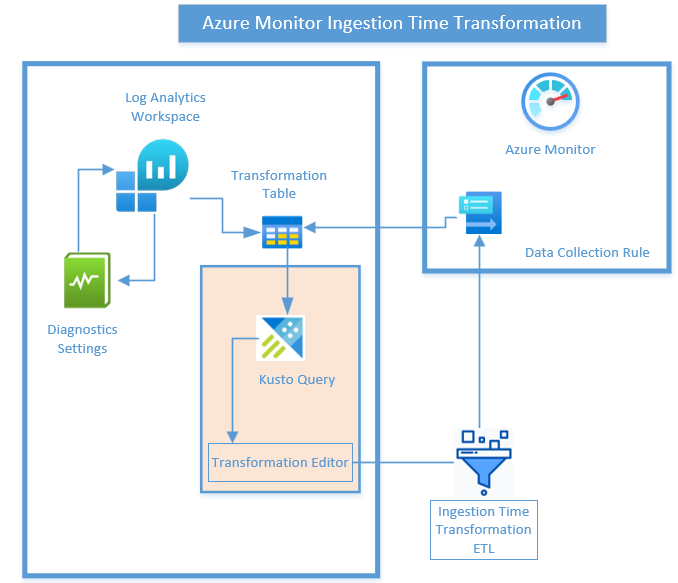
Ingestion Time Transformations are performed in Azure Monitor in the ETL data ingestion pipeline after the data source delivers the data and before it’s sent to the destination Log Analytics Workspace.
The ETL Ingestion Time Transformationsare use data collection rules (DCR) and apply a Kusto Query Language (KQL) statement individually to each entry in the incoming data and creates an output in the structure expected by the destination.
Deployment of Ingestion Time Transformation
Step 1 -Enable query audit logs on your Log Analytics Workspace
You need to enable query auditing for your workspace to create the LAQueryLogs table that you’ll be working with. This is not required for all ingestion time transformations. It’s just to generate the sample data that this sample transformation will use.
Go to Log Analytics workspaces > Diagnostic settings > Add diagnostic setting > select the same workspace so that the auditing data is stored in the same workspace. Select the Audit > Save

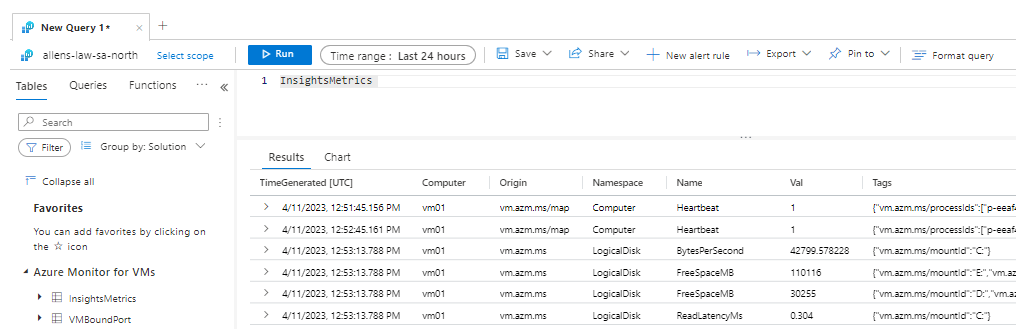
Go to Logs > run some queries to populate LAQueryLogs with some data. (The queries don’t need to actually return any data.)
Step 2 - Enable query audit logs
Before you can create the transformation, the following two changes must be made to your target table:
- The table must be enabled for workspace transformation. This is required for any table that will be subject to transformation, even if the transformation doesn’t modify the table’s schema.
- Any additional columns populated by the transformation must be added to the table.
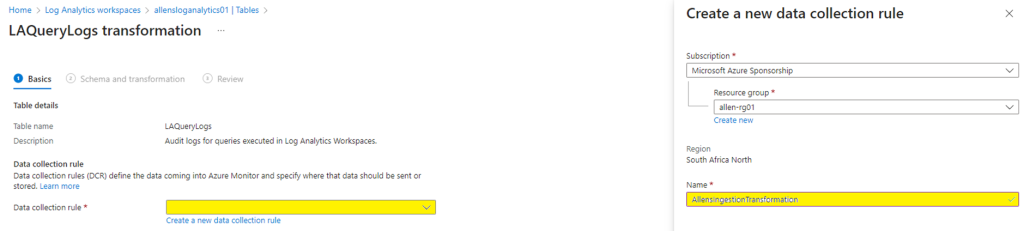
On the Log Analytics workspaces > Tables > Locate your target table > follow the breadcrumbs on the far right > and select Create transformation.

If this transformation is the first one in the workspace, you must create a workspace transformation DCR. If you create transformations for other tables in the same workspace, they will be stored in this same central tranformation DCR.
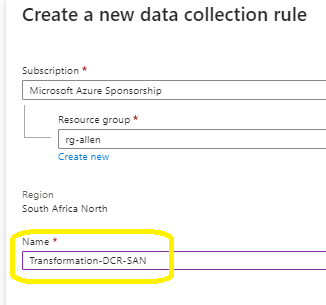
Create a new data collection rule. The Subscription and Resource group will already be populated for the workspace. Enter a name for the DCR and select Done.

Try to use a unique DCR naming convention. Because the DCR is region bound to the LAW, I try to include the region as a DCR-suffix
> Next
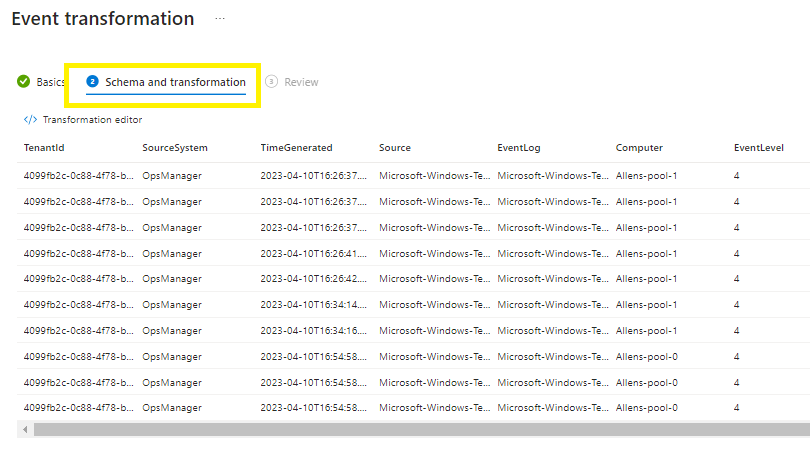
You may need to customize the transformation data as per your business requirements, the result will be applied to the sample data. You can evaluate the results before you apply it to actual data. Select Transformation editor to define the transformation.
Go to schema transformation
Next > Next > Create
Step 3 - Test the transformation
Allow about 30 minutes for the transformation to take effect and then test it by running a query against the table. Only data sent to the table after the transformation was applied will be affected.
Run some sample queries to send data to your target table. Include some custom queries so that you can verify that the transformation filters these records.
Step 4 - Verification
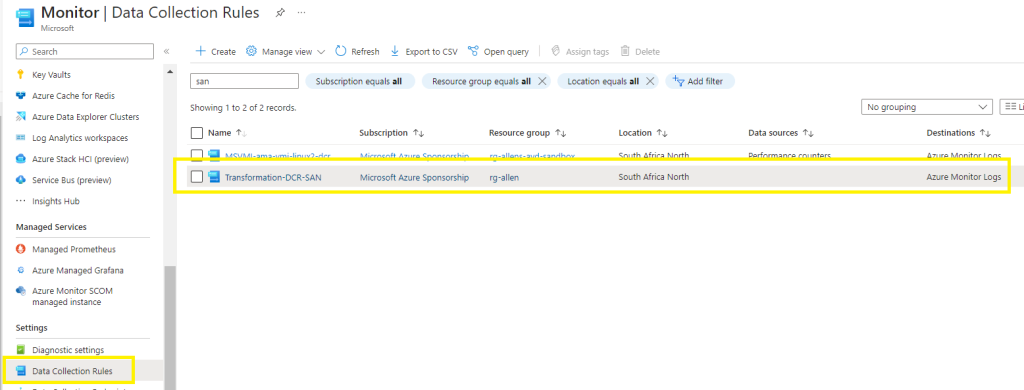
Go to Portal > Monitor > Data Collection Rule > and find the DCR you created earlier
I hope this simplistic recipe helps you understand Ingestion Time Transformation enough to implement the solution in your bespoke enviroment.
Understanding how to edit your Transformation Editor - ETL
To obfuscate or remove any unwanted or confidential data, the ETL process must be completed in the Transformation Editor section. Lets first begin the process by understanding what data we want to remove by running KQL query on the existing Log data. (In my blog, I will be wanting to remove sensitive data in my LAQuerysLogs table).
Part 1 - Create your KQL query
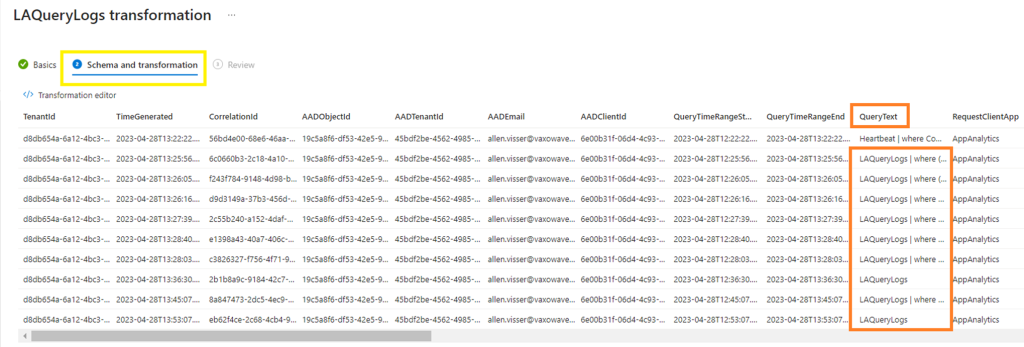
Go to the LAW > Logs and run a KQL search on your target table to retrieve a full list of results.
LAQueryLogs (I am going to focus on removing LAQueryLogs data in the QueryText column)
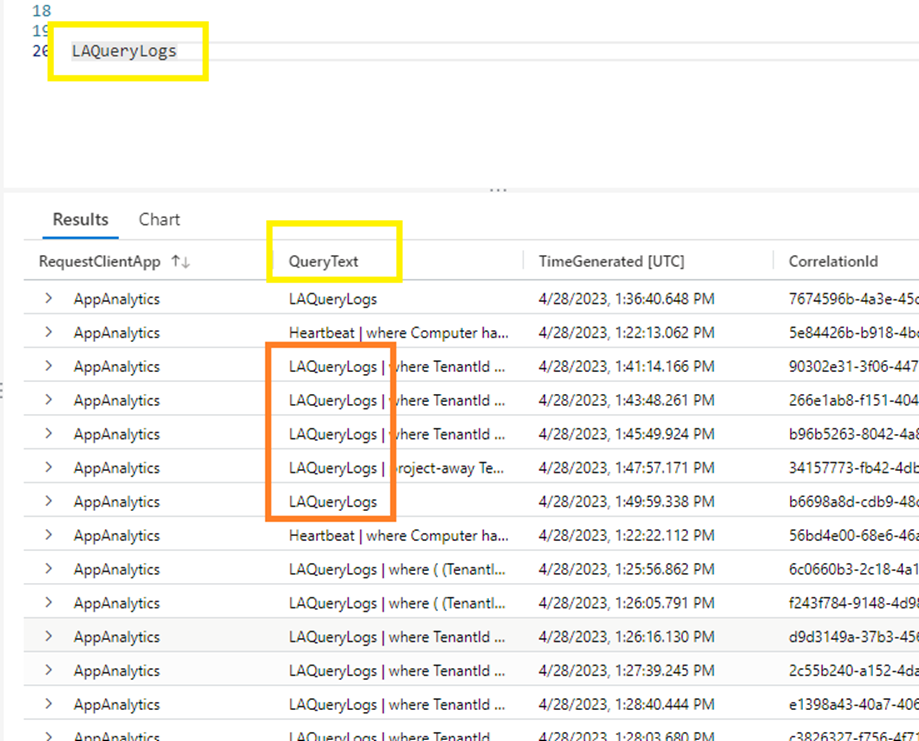
Now lets edit the KQL script to remove the LAQueryLogs items from the QueryText column inside the LAQueryLogs table:
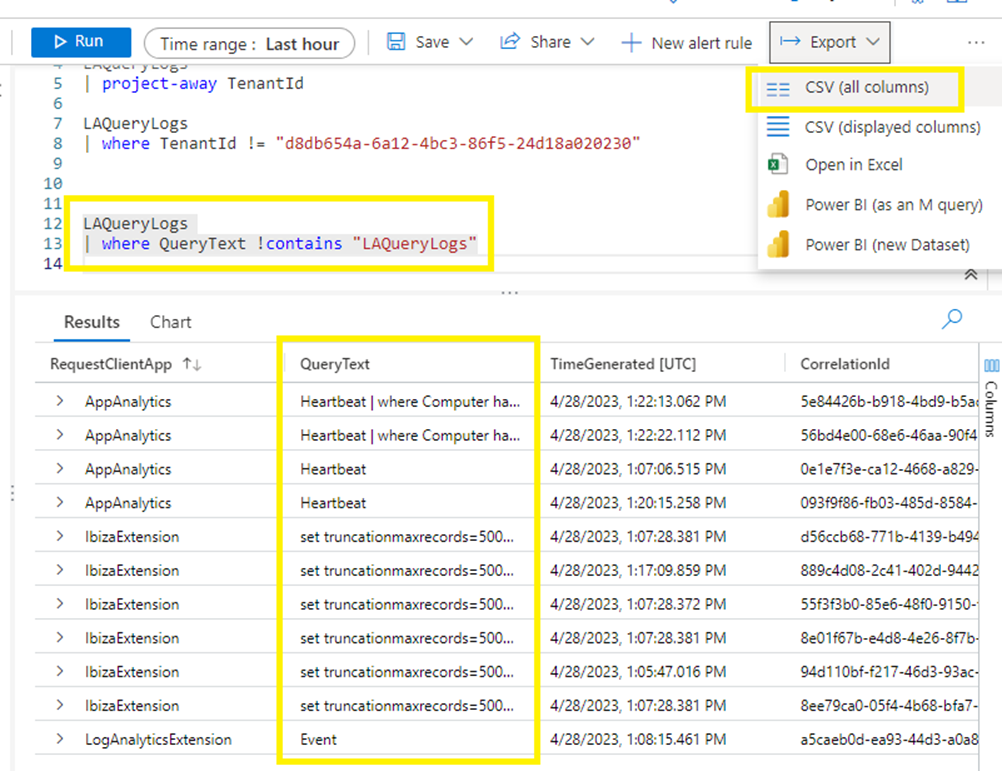
LAQueryLogs
| where QueryText !contains “LAQueryLogs”
Now run the KQL query.
You will notice that the selected LAQueryLogs subset has been removed from the QueryText column. Verify your output by exporting a csv showing all columns and make sure that your script has applied correctly.
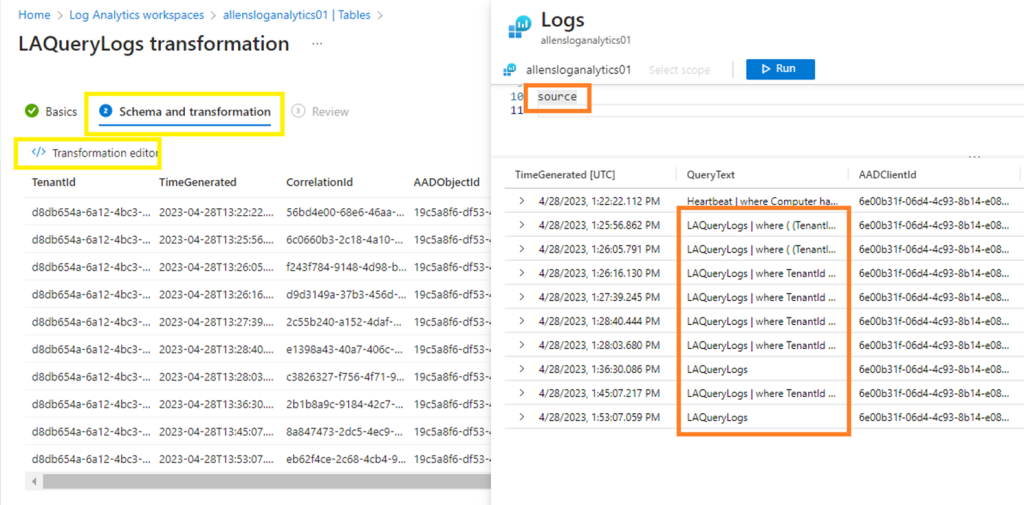
Part 2 - Create your Transformation Editor
Lets go to the target LAQueryLogs table and configure the data transformation. This part will reveal the new / previously created DCR on the LAQueryLogs table.

Verify your Transformation DCR which will be your Ingestion Time Transformation engine.
Proceed to the schema transformation tab
At first, you will see the same unfiltered view as when you ran the LAQueryLogs KQL query.
Lets begin by repeating Step 1 inside the Transformation Editor
Open the Transformation Editor and Run
This reveals the fully populated table data. Since you are running your Transformation Editor on your target table, your KQL query table will now be source.
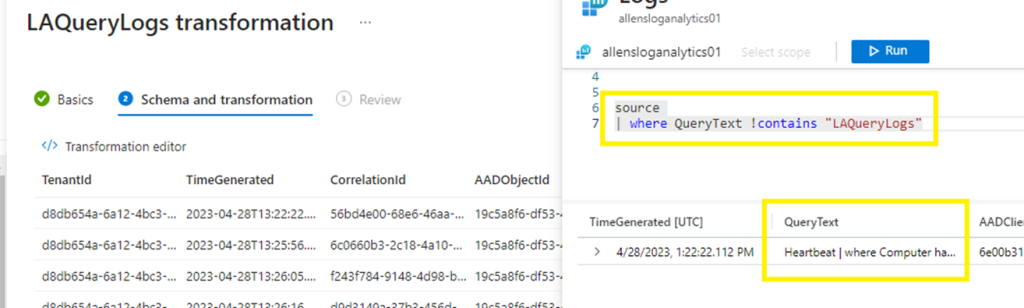
Now Run the KQL query using source which will present the full tables data. Lets focus on our QueryText column and remove the LAQueryLogs data again.
Lets convert our original custom KQL to fit the editor:
Replace the tablename with source
LAQueryLogs
| where QueryText !contains “LAQueryLogs”
Convert to:
Source
| where QueryText !contains “LAQueryLogs”
(This should now only produce the ETL data that you want to see in your output. Our LAQueryLogs has been removed and now only Heartbeats data is presented).
Apply > Create to save your ETL KQL update.
Optional – what if you want to filter and remove more than 1 data set simultaneously?
Reverting back to our unedited source table.
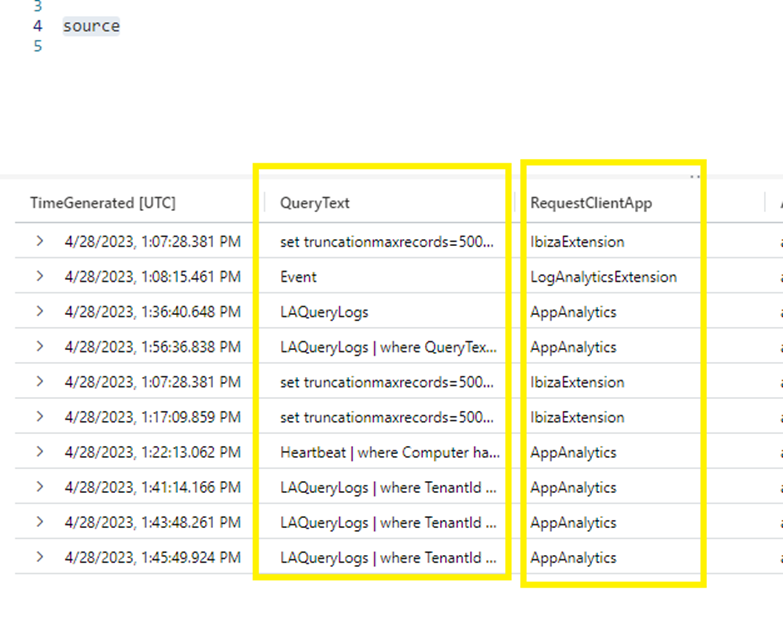
Lets choose to remove the LAQueryLogs dataset from the QueryText column and the IbizaExtension dataset from the RequestClientApp colum at the same time. Lets create the following script to run in our Transformation Editor:
source
| where QueryText !contains “LAQueryLogs” and RequestClientApp !contains “IbizaExtension” and Run.
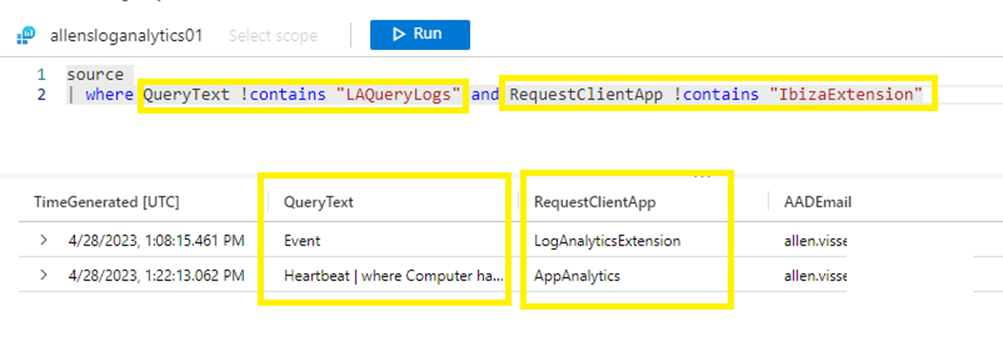
You will now notice the ETL results above with the 2 data sets removed > Save.
Thank you for the good writeup. It in fact was once a enjoyment account it. Look complex to far delivered agreeable from you! By the way, how can we keep in touch?
Just what I was looking for, regards for putting up.