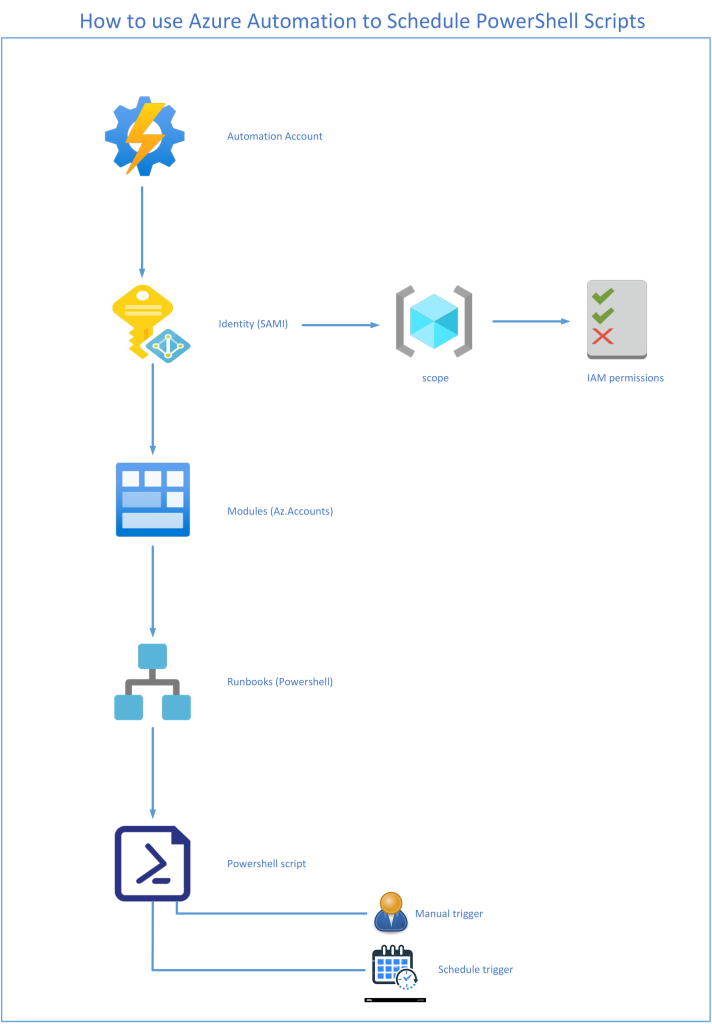
Azure Automation is an excellent platform if you’re looking to schedule your recurring PowerShell tasks. Scheduling a PowerShell script to run in Azure allows you to automate your repetitive tasks in your Azure environment. You are able to schedule your PowerShell scripts to run at specific times or intervals, making it easy to automate a wide variety of tasks and processes. In this blog, I will walk through the most simplistic configuration steps to provision and schedule a PowerShell script to run in Azure, including creating a runbook, assigning the SAMI, testing the script and using various trigger options.

Depolyment Plan
- Create an Azure Automation Account
- Provision the SAMI
- Import the Necessary PowerShell Modules
- Create a Runbook
- Add the PowerShell script
- Choosing the PowerShell Script trigger
Deployment Steps
1. Create an Azure Automation Account
Go to Portal > Automation Accounts > Create >
Basic tab:
Populate the subscription, resource group, unique automation account name and region fields > Next
Advanced tab:
Enable SAMI > Next,
Networking tab:
Select your level of network access,
Tags tab:
Populate the fields as required,
Review and Create.
2. Provision the SAMI
Go to your Automation Account > Identity > System Assigned tab > make sure the SAMI is ON,

Click on Azure Role Assignments button > Add role assignment > select your scope and role based on PoLP

3. Import the Necessary PowerShell Modules
I have to install the Connect-AzAccount module for my powershell script. To understand what modules you need to install, will be determined by what modules you need to install to get the script working on your local powershell.
Click on Modules > Add a Module > select Browse from gallery > click here to browse from gallery > enter Connect-AzAccount >
Click on the Az.Accounts module

On the content page > populate the search bar with your required command to ensure that the command is included in the module.
Go to Automation account > Modules > search and install the required modules required by your PowerShell script >

Select > choose a runtime version that is not in preview > Import.
You can then do a search on the module name to verify its importation.

4. Create a Runbook
Click on Runbooks > Create a runbook >
Name > provide a unique name,
Runbook type > Powershell,
Runtime version > (Ive selected a version not in preview),
Create

5. Add the PowerShell script
Expand Runbooks and find your new Runbook >
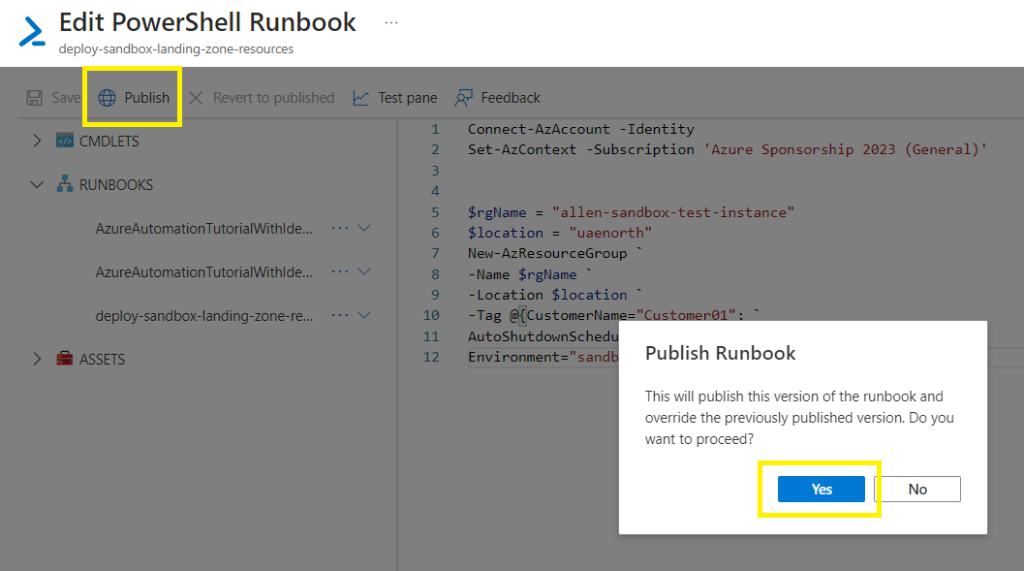
Copy and paste your prepared PowerShell script into the window,

*My powershell is simplistic:
*The first part is to call the SAMI that I enabled under the Identity section (make sure you have granted the SAMI the correct permissions and scope in your target landing zone to perform the proceeding powershell actions).
*The second part of simply provisioning a resource group to begin with. You may populate your landing zone as per your bespoke requirements).
	Connect-AzAccount -Identity
	Set-AzContext -Subscription 'Azure Sponsorship'

	$rgName = "allen-sandbox-test-instance"
	$location = "uaenorth"
	New-AzResourceGroup `
	-Name $rgName `
	-Location $location `
	-Tag @{CustomerName="Customer01"; `
	AutoShutdownSchedule="None"; `
        Environment="sandbox";}
Click on Save (to save your draft),
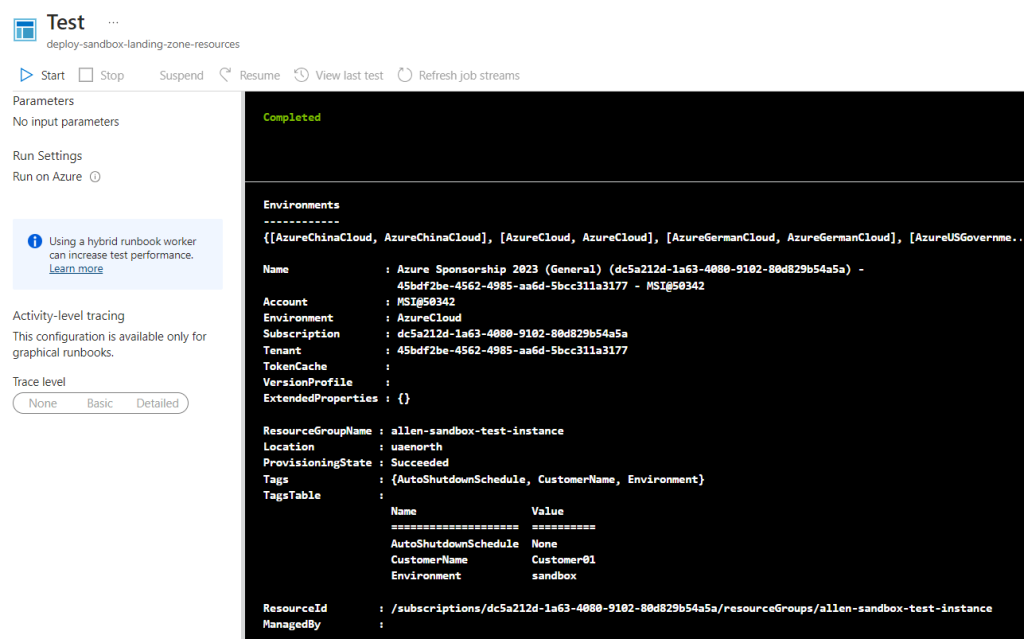
Click on Test Pane (to test whether your draft script actually works) > then click Start (this may take a few seconds as Azure Automation assigns an isolated worker to run a job during runbook execution),
Upon successful execution, you will be presented with the output screen of your powershell script.

If you go back to your Azure Portal, you should see your resource provisioned (based on the complexity deployment time of the resource).

Now you can close the Test window and click on Publish to make your draft runbook official.

Going back to Runbooks, you will now find your Runbook status has changed from New to Published. (This takes about 5 minutes)


I provisioned a 2nd Runbook to do the opposite, whereby I delete the resource as part of cost management whenever the resource is no longer required.
The client has the option of triggering the runbook manually or on a schedule (daily / weekly) as part of their cost management / frugality exercise.
Triggers:
There are 2 ways to initiate the runbooks, namely:
- Manually, via the Start button on the runbook, or
- Schedule > go to your Runbook > Schedule > Add a schedule > Link a schedule to your runbook > Add a schedule >
- Populate a unique descriptive name, description, determine your start date and time, time zone and whether this is once off or recurring Fridays > Create
- *To remove the schedule > click on the schedule and unlink)

I am often to running a blog and i actually respect your content. The article has actually peaks my interest. I am going to bookmark your website and hold checking for brand new information.
I truly appreciate this post. I have been looking all over for this! Thank goodness I found it on Bing. You’ve made my day! Thank you again
This is more practical info than I can find anywhere else.
I really prize your piece of work, Great post.