This blog details the deployment of the Trend Micro Network Security instances inside a virtual machine scale set for high availability across 3 availability zones.
This is an internal deployment on a virtual network which is not public facing and thus does not make use of an Azure Gateway Load Balancer.
This solution uses using Azure Function to monitor and reroute network traffic. You can manage your virtual appliances through the Network Security management interface. You can also use the Azure Monitor log analytics function and the command line interface to monitor the health of your web applications.

Deployment Plan
Step 1 – Subscribe to the Trend Cloud One Plan
Step 2 – Activate Cloud One Subscription
Step 4 – Create your resource group container
Step 5 – Create a Log Analytics Workspace
Step 6 – Planning the Cloud One subnets
Step 7 – Planning a NAT Gateway
Step 8 – Launch HA from Azure Marketplace
Step 9 – Configure the ARM Template
Step 10 – Deploy the ARM template
Step 11 – Provision Route Tables (optional)
Step 12 – Post deployment verification
Step 14 – Sentinel integration
Deployment Steps
Step 1 - Subscribe to the Trend Cloud One Plan
Go the Marketplace > search for “Trend Cloud One” > select your Plan > click on Subscribe

Basics tab:
Fill in the subscription, resource group and location,
SaaS details:
Enter in a unique plan name,
Billing Term, select your subscription term,
Select your Recurring billing > On / Off
(ON will auto renew the monthly billing),
Next,
Tags,
Subscribe,
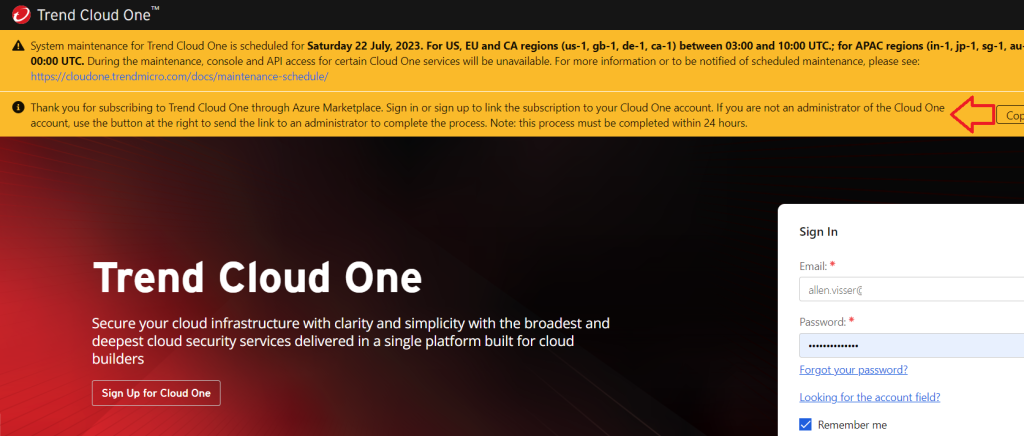
*After subscribing, remember to configure your SaaS account on the vendor’s website > click on the Configure account now blue button
when it becomes available.

Step 2 - Activate Cloud One Subscription
You have two options to access the Trend Cloud One console @
https://cloudone.trendmicro.com/
- The Trend Cloud One Console will open up after clicking on the blue button above. Sign up for Cloud One or Sign in if you already have an account.
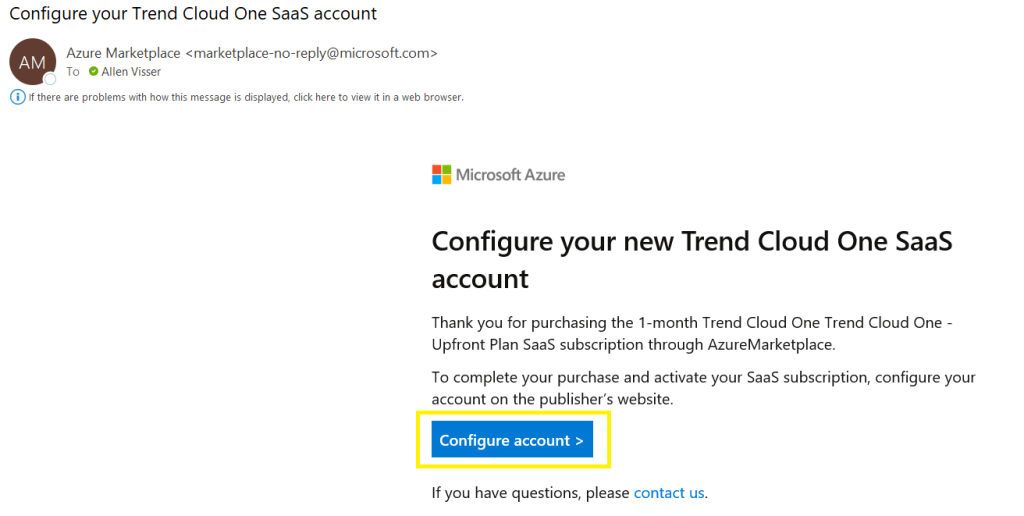
- Alternatively, when your confirmation email is received, click on the configure account button in the email.


Click on the target subscription to highlight and then click on the Link Subscription button.

Link your Azure Marketplace subscription to this account.

Your Azure Marketplace subscription should now be linked.

Step 3 - Obtain a token
Without the Deployment token, your deployed instances will not report into the Cloud One Management portal. The Cloud One Management Portal is essential for IPS / TLS and other configuration and management.
Go to your Cloud One https://cloudone.trendmicro.com/network/ui/appliances

Go to Network Security > Network > Appliances > click on the Manage Deployment Token >

Click on Generate Token and then Copy to Clipboard.
This token will be used in the step 7.

Step 4 - Create your resource group container
Create a resource group container for your Trend Micro resources

$ResourceGroupName= "allen-tm-stack"
$location = "uaenorth"
New-AzResourceGroup `
-Name $ResourceGroupName `
-Location $location `
-Tag @{CustomerName="Customer01"; AutoShutdownSchedule="None"; Environment="sandbox";}
Step 5 - Create a Log Analytics Workspace
Create a log analytics workspace that will be used for your Trend Micro resources scale set diagnostics,
#variables
$ResourceGroupName= "allen-tm-stack"
$WorkspaceName = "trendmicrolaw"
$location = "uaenorth"
#script
New-AzOperationalInsightsWorkspace `
-Location $location `
-Name $WorkspaceName `
-Sku pergb2018 `
-ResourceGroupName $ResourceGroupName
Step 6 - Planning the Cloud One subnets
At this point you need to pre-plan / identify the 4 subnets across which your Cloud One deployment will be spread. We will perform the deployment later.
The internal load balancer will be deployed in the load balancer subnet, while the Cloud One instances will be deployed in the management subnet.

Step 7 - Planning a NAT Gateway
The NAT Gateway must be either pre-deployed before we deploy the Cloud One stack (or during the deployment process),
This ensures that the Cloud One resources can communicate with the Cloud One Management portal at the time of deployment for verification,
If you don’t have a pre-existing NAT Gateway, then one will be provisioned in the Management subnet during the deployment. Else, you need associate your Management subnet to your existing NAT Gateway before you begin deploying your Cloud one stack,
Step 8 - Launch HA from Azure Marketplace
Go to Azure Marketplace > search for Trend Micro Cloud One – Network Security
To deploy a scale set solution in Azure on an internal (non-public facing) subnet (with scale sets), select the Network Security – Scale Set VM > Create

Basic tab:
Select your subscription, resource group and region,
Select your scale set instance name/s,
start-up instance count,
vm sku sizes,
Cloud one appliance deployment token = insert your copied token here
Username and password,

Networking tab:
Virtual network > select your target virtual network,
Select your 4 x subnets:
Load balancer subnet #this is where your internal load balancer will be deployed,
Management subnet #this is where your instances will be deployed
Inspection subnet,
Sanitized subnet,

NAT Gateway
*It is vital to either create a new or select an existing NAT Gateway (traffic egress) at this point to enable connectivity to the SaaS Trend Micro console,
*Functionality is impacted without the Cloud One console connectivity,
* Alternatively, if you are not using a NAT Gateway for egress connectivity, then select ignore if you already have existing in-place egress endpoint in place,
Next,

Advanced tab:
Boot diagnostics : Enable,
Select an existing (or create a new) Diagnostics storage account,
If you have a pre-existing storage account, then add the workspace ID and Primary Key, else create a new storage account at this point, which will be deployed into the same resource group container,
Next,

Review and Create tab:
If you are planning on deploying across multiple availability zones – then DONT press CREATE at this point!
Step 9 - Configure the ARM Template
Instead, click on the View automation template > and download the template.zip file that will contain your template and paramaters json files.

Now unzip folder and open the template.json file, lets add the 3 zones:
Step 1:
Search the json file for “Microsoft.Compute/virtualMachineScaleSets” you should find the result on link #446,
Insert the following code into your script to add 3 zones to your template.json file > Save,
"zones": [
"1",
"2",
"3"
],

Close and save your template.json file,
Step 2:
Now open your parameters. json file and verify whether your API Key value is null, line #17,
If so, then you will need to update this value with your “cloud one token value”.

Step 3:
Now verify the value of your LogMonitorPrimaryKey primary key, if it is null, you will need to update the primary key value from target your log analytics workspace,


Save & close the parameters.json file,
Step 10 - Deploy the ARM template
Upload the 2 updated files into the azure cloud shell and run the following command to provision your ARM template:

az deployment group create `
--resource-group allen-tm-stack `
--template-file tm-vmss-template.json `
--parameters tm-vmss-parameters.json
You will notice a variation to the original vendor template, where your virtual machine scale set is now spread across 3 availability zones,

Step 11 - Provision Azure Route Tables (optional)
You may need to provision UDR’s for traffic management across if required.
Step 12 - Post deployment verification
- Deployed Resources
Five resources will be deployed into your resource group container:

2. Scale Set
Go to Scale Set > Scaling > confirm your instance count,
Go to Scale Set > Instances > ensure that instances are running,

3. Trend Micro Console
Go back to your Network Security > Network > Appliances >
You should now see an updated list of your running instances, as well as health status , threat intelligence, version, virtual network and location.

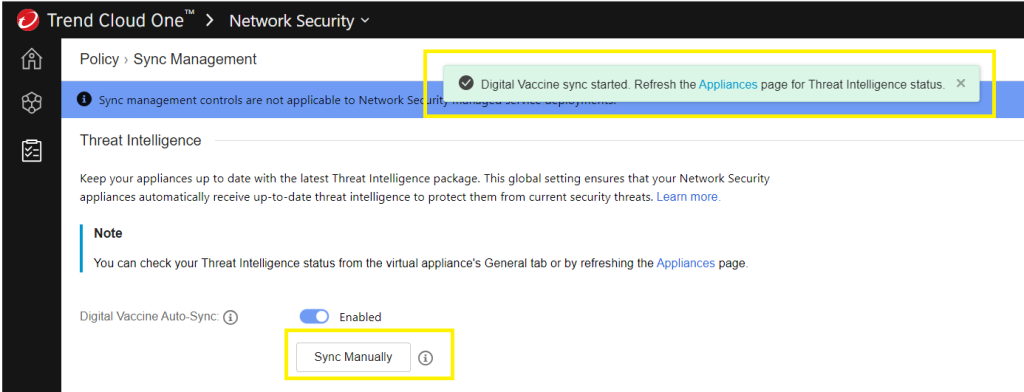
If you get an out of date Threat Intelligence warning then follow the steps below.

Go to Network Security > Policy > Sync Management >

Click on the Manually Sync button to update all your instances,

This will update all your instances.

Step 13 - XDR integration
Work in progress with the vendor
Step 14 - Sentinel integration
Work in progress with the vendor
Thank you for sharing superb informations. Your site is so cool. I’m impressed by the details that you?¦ve on this website. It reveals how nicely you understand this subject. Bookmarked this website page, will come back for extra articles. You, my friend, ROCK! I found just the info I already searched all over the place and simply could not come across. What a great website.