This aim of this blog is to demonstrate how to implement a Power Automate Flow using an approval group to provide management control over the deployment of Azure resources. This is in an effort to prevent cloud sprawl and thus prevent cost overruns and minimizing security risks
Deployment Plan
Deployment Steps
Step 1 – ARM Template
The deployment of your Azure resources will be based on ARM templates. Prepare your Azure resource-specific ARM templates and save each of them into a storage account inside your own secured subscription.
If you have any issues with your ARM templates and need an ARM Template verification tool, try the ARM test toolkit here.
Step 2 – Storage Account
Create a container into which you are going to save each of your resource-specific ARM templates (or create a separate container per resource). This will become the source location from which each of your Power Automate Flows retrieve their ARM templates.
Step 2.1 Access Level
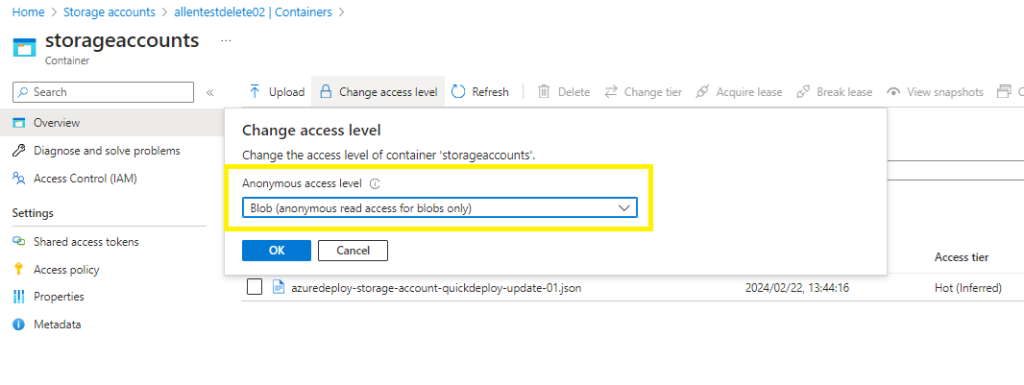
For the Power Automate Flow to be able to access the ARM template blob, you will need to edit the access level of the container to Blob (anonymous read access for blobs only).
Step 2.2 BLOB URL
Copy the blob URL for use later in the Power Automate Flow, this URL will be required in 2 of the template actions later.

Step 3 – Power Automate
Open the Power Automate home page
Select Create,
Select Instant cloud flow,

On the splash screen click the Skip button to create your own blank Flow,

Select Add a trigger
Search for when a new email arrives v3,

From the Advanced parameters, select From and Subject Filter,
Populate the following 3 fields:
From: with the senders distribution group email address rather than individual addy (as I have done for sandboxing),
Subject Filter : The subject name of the resource to be deployed eg Storage Account,
Folder: The designated Outlook folder into which all such Flow emails will be delivered.

Add an action,
Lets create the approval process:
Search for and select “start and wait for an approval”

In the Start and wait for an approval window,
Select the Approve/Reject – First to respond

Title: Make this bespoke to your needs,
Assigned To field is the approval distribution group
Details: Make this bespoke to your needs,

Add an action,
Search and select a Condition
In the condition, search dynamic content for outcome,

In the next section, type in Approve (case sensitive with trimming)

Go to True and select Add an action,

Lets create the ARM template validation process:
Search for validate azure resource
Select the validate a template deployment under Azure Resource Manager

Select the target subscription and resource group into which ALL storage account / resources in this FLOW will be deployed. This destination is “hard coded” here and cannot be changed later on.
Select a custom deployment name (make sure to trim the CamelCase friendly name), (you will use this name again when you Create or update a template deployment)
Add an advanced parameter value = Template URI > This is where you will paste the BLOB URL from step 2.2
Deployment mode : Incremental

Add an action to the Validate a template deployment,
Add a condition,
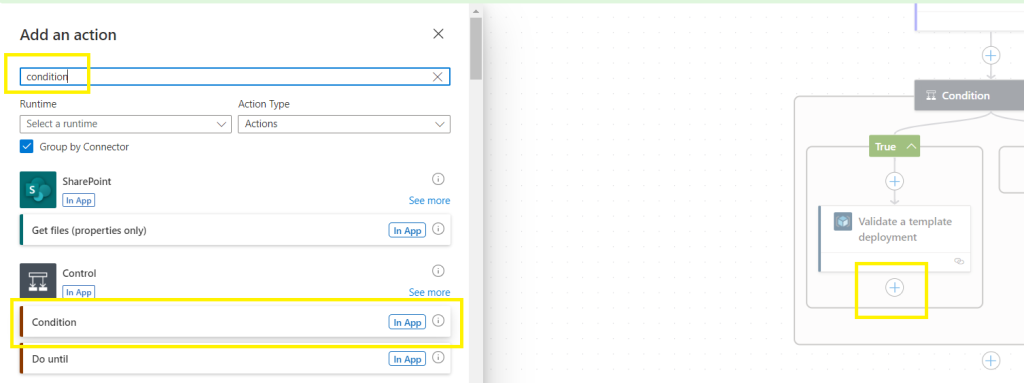
Search dynamic content for “provisioningstate“

Select “is equal to” “Succeeded” (be aware of syntax and trim),

Add an action to the condition,

Do a search for and select “create or update a template deployment”

Lets create the ARM template deployment process:
Update the following details:
Select the target subscription and resource group into which the Azure resource will be deployed. Remember that this is “hard coded” at this point and cannot be changed when triggering the flow.
Specify the same Deployment name used in your “Validate a template deployment”
Populate the Template URI with the same blob url,
Deployment mode – Incremental,
Wait for Deployment – No

Add an action to the Create or Update a template deployment
Do a search for “read a template deployment”
Select Read a template deployment,

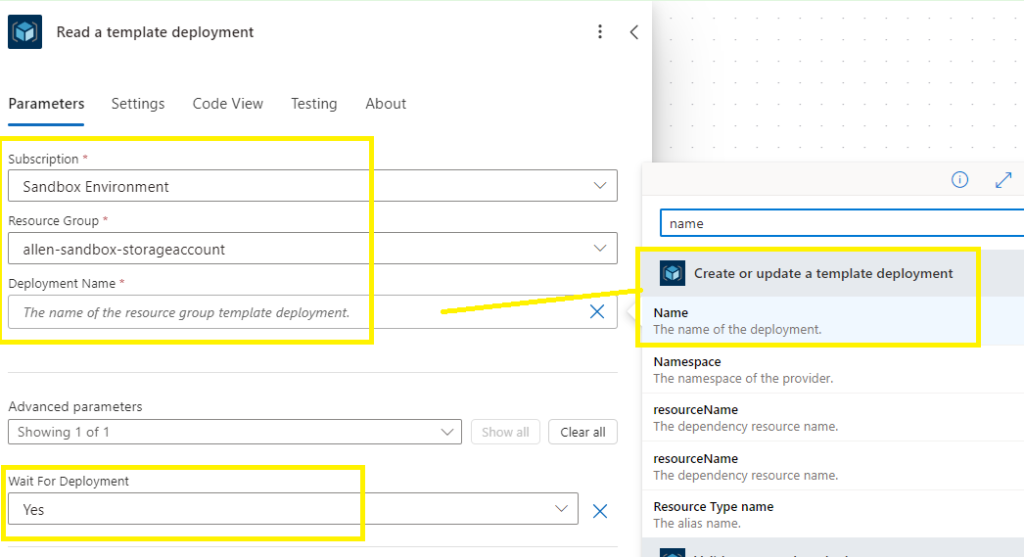
In the Read a template deployment,
Populate the subscription and resource group,
Deployment Name > add the dynamic content “Name”
Wait for deployment > Yes
Add an action under Read a template deployment

Search for “send an email (v2)”
Select Send an email (v2)
*This is the email that will be sent back to the requester providing feedback about the deployment.

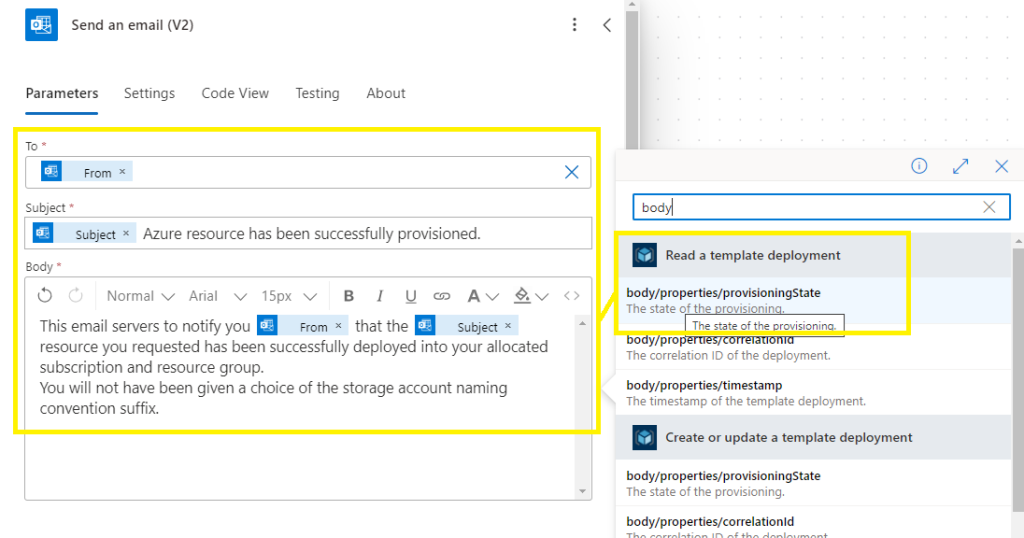
Populate To with the requestors email address,
Subject: populate with dynamic content “Subject”
Body: Create message and add dynamic content > search for “body” and under Read a template deployment,
Select body/properties/provisioningState
Now lets go to the two False endoints and create the same email action

Add an Action,
Search for and select send an email (v2)

add the dynamic content “From”
Create your bespoke Subject and Body email to notify the requester of the denied / rejected request.
This action needs to be created on each False action for complete automation.

###############This completes the Flow build.###############
Save your Flow and create a backup copy.
Wait about 10 minutes for the Flow backend to provision before testing.
Testing
Power Automate Flow:
Go to your Flow name > Edit > select Test on your Flow,

Test Flow
Select Manual > Test

Create and send a new email:
Addressed To the approver group,
With the same subject filter defined in the When a new email arrives (V3)


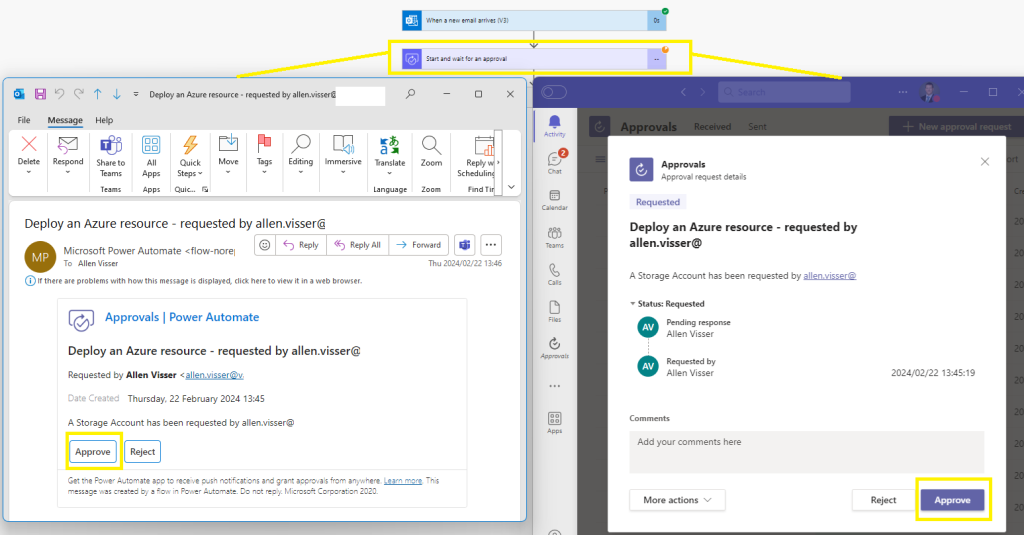
The requestor email will be delivered to the approvers group on 2 mediums, namely:
An email distribution address, upon which a reply Approve | Reject is required.
Complete the comments section,
Click on Submit,
Microsoft Teams:
Under your Teams Activity Feed you will receive a request Approvals with a Reject | Approve button
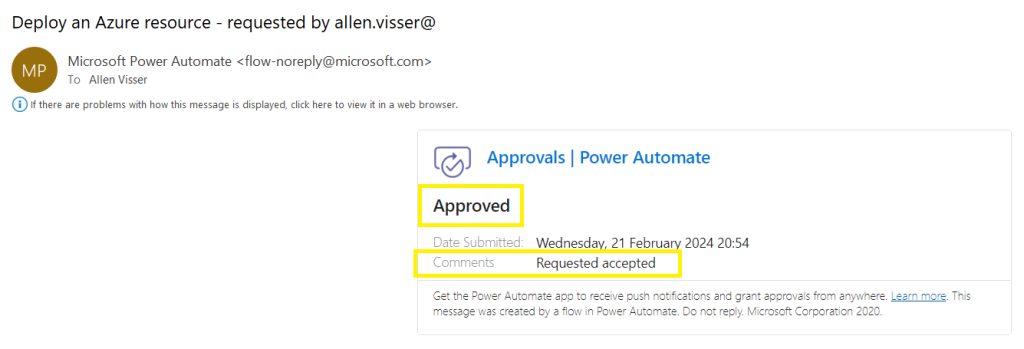
A reply email will be sent to the requester indicating whether the request has been approved or rejected,
Your ARM template will now be validated

The requested will receive an email verifying the successful Azure resource deployment

Verification
Verify the Power Automate Flow has successfully deployed your Azure resource.
- Go to the Azure Portal, find your designated resource group and search for your newly deploy Azure resource.

Power Automate Flow verification
Verify the True Flow works:

Also verify that the False Flow works as when your approver was to reject a request:

— I hope this blog helped simplify the provisioning of your Power Automate Flow with an integrated approval group to deploy Azure resources using ARM templates—
I want to thank you for your assistance and this post. It’s been great.
There’s certainly a great deal to find out about this subject. I love all the points you made.
Heya i抦 for the first time here. I came across this board and I find It truly useful & it helped me out much. I hope to give something back and help others like you aided me.
Excellent post. I was checking continuously this weblog and I am impressed!
Very helpful info specially the final phase 🙂 I
take care of such information a lot. I was seeking this particular information for a long time.
Thanks and best of luck.